Working in HOPEX
Workspace Types and Updates
According to the Solutions in which you work, or to your rights, you access your HOPEX desktop in:
• a public workspace
• a private workspace
• a read-only workspace
What is your workspace type?
Your profile defines the desktop in which you are working. This desktop defines the type of workspace in which you are working.
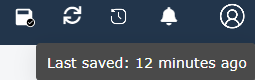
Desktops that allow to work in public workspaces have in their toolbar an auto-save indicator.
In their Main menu, desktops that allow to work in private workspaces have specific menus to manage their tasks:
• Dispatch
• Discard
Public workspace
In most of the desktops, you work in a public workpace:
• You can perform modifications.
• Your modifications are automatically saved and dispatched in the repository as soon as the window on which you are working is closed.
• You can anticipate this automatic save.
• Your modifications are available for other users that are connected in the same way.
Desktop examples: HOPEX IT Portfolio Management, HOPEX Explore (edit mode), HOPEX Administration (Web).
Private workspace
In some desktops, you work in a private workspace:
• You can perform modifications.
• Your modifications are viewable by other users once you have published your work.
The other users must refresh their workspace to see your modifications.
Desktop example: HOPEX Studio
For more details on private workspaces and particularly on your work dispatch, see Managing Workspaces.
Read-only workspace
You can access certain desktops in read-only mode:
• You can add review notes to an object.
• You can customize your personal parameters.
• You can customize your desktop (e.g.: home page, dashboard).
Desktop example: HOPEX Explorer (navigation mode)
Saving your Work
How you save your work depends on the type of workspace in which you are working.
Saving your work (public workspace)
In a public workspace your work is automatically saved and dispatched in the repository as soon as the window on which you are working is closed.
There might be a 30 second delay in the time display update.
You can save (and dispatch) the modifications you are performing on the current page, i.e. anticipate the automatic save.
To save (and dispatch) your work performed on the current page:
1. In your HOPEX desktop, click Main Menu  .
.
.2. Select Save.
Your modifications are saved and published in the repository.
Saving your work (private workspace)
In a private workspace, you can regularly save your modifications in your workspace. These modifications are not saved in the repository. To save your modifications in the repository, you must dispatch your work.
For more details on private workspaces and particularly on your work dispatch, see Managing Workspaces.
To save the modifications you have made in your private workspace since the last save:
1. In your HOPEX desktop, click Main Menu .
.2. Select Save.
Your modifications are saved in your workspace.
Customizing your Personal Parameters
In your HOPEX desktop, you can customize your personal parameters:
• modify your password
• modify the image of your avatar
Modifying your password
Your password must contain at least 8 characters and be complex enough to meet your enterprise security requirements.
A colored progress bar (red, orange, green) indicates your password complexity level as you type.
To modify your password:
1. In your HOPEX desktop, click Main Menu .
.2. Select Settings > Modify Password.
The Change password window is displayed.
3. Enter your former password.
 .
.4. Enter and confirm your new password.
5. In the Security question field, select a security question.
6. In the Answer to question field, answer the selected security question.
 to check your answer.
7. Click Apply.
Your modified password is saved but is not taken into account until you dispatch your work.
Modifying your avatar
The Main menu is represented by your avatar. You can modify it by downloading an image in ico, bmp, gif, or png format up to a size of 30 MB.
is represented by your avatar. You can modify it by downloading an image in ico, bmp, gif, or png format up to a size of 30 MB.To modify your avatar:
1. In your HOPEX desktop, click Main Menu .
.2. Hover the cursor over your avatar.
Your avatar appears in edit mode .
3. Click your avatar.
The selection of a file dialog box opens.
4. Click  .
.
.The selection dialog box of the file opens.
5. Click Browse and select your image.
6. Click Upload.
The image file to be downloaded is defined.
7. Click OK.
The Main Menu icon is replaced by your image  .
.
icon is replaced by your image Your avatar is updated.
Resetting your Desktop Customizations
In your HOPEX desktop, you can reset your personal parameters. This includes customization of your desktop, such as for example:
• your home page customization:
• addition of tiles
• size of tiles
• arrangement of tiles
• your dashboard customization:
• addition of widgets
• your customization of columns in lists:
• column display or not
• column width
• column order
• column grouping
• column locking
• your customization of windows in the desktop:
• window size
• navigation panel display
This does not impact customizations that concern the repository, such as for example:
• your avatar
• your alerts
• your data language and interface language
• your password
• your options
To reset your customizations:
1. In your HOPEX desktop, click Main Menu .
.2. Select Settings > Reset personal parameters.
Your customization of your desktop will be reset on the next connection.
Setting a Current Library
A library is used to represent a work context.
In your HOPEX desktop, when you set a current library, by default all the objects that you have created are contained in this library.
When a library is set, if needed, on creation of the object you can modify the library that contains it.
Defining a current library prevents the existence of isolated objects and facilitates exporting objects in a given context.
If the administrator has defined a default library for you (user level), this also defines your current library.
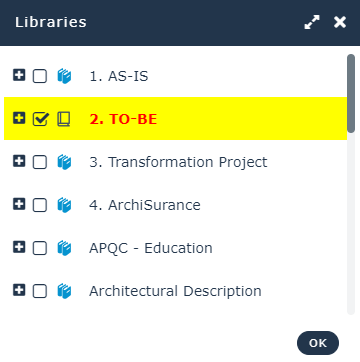
To set a current library:
1. In your HOPEX desktop, click Main Menu .
.2. Select Set Current Library.
The library tree window appears.
3. Select a library or a sub-library.
The current library is highlighted and indicated by  .
.
..
Consulting your Licenses
According to your licenses, you have access to certain products.
Each product defines the metamodel, the parameterization (technical data) and the features you have access to.
To consult your license list:
1. In your HOPEX desktop, click Main Menu .
.2. Select Settings > License information.
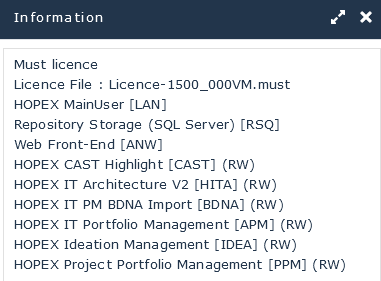
For information regarding a product (e.g.: associated profiles, available objects (MetaClasses), report templates, and diagram types), see the online documentation: Concepts > Products.