Standard Metamodel Customization
Customizing an Object
You can override an attribute or a link of a Hopex object. The custom value is preserved even when the standard value changes.
Prerequisite: check which attributes and links of an object are overridable.
The Overridable Metamodel report indicates which MetaAttributes and which MetaAssociations (link type) of which MetaClasses are overridable.
E.g.: the Overridable Metamodel report states that the Command Line, Profile Status, and Profile Options MetaAttributes and the Covered Domain and Homepage MetaAssociations of the Profile MetaClass are overridable.
You are allowed to override the Command Line, Profile Status, and Profile Options attributes, and the Covered Domain and Homepage of a specific profile.
Overriding an object attribute
You can:
• override an object attribute
The custom value is directly entered in the standard attribute field.
• revert from the custom value to the standard value
The standard value is reverted in the attribute field.
To override an attribute of an overridable object:
1. Access HOPEX Studio desktop (with Hopex Customizer profile).
2. Access the overridable object property pages.
E.g.: the EA Functional Administrator profile".
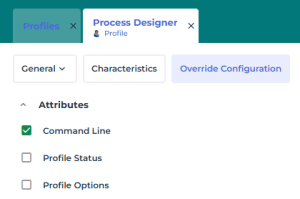
3. Display its Override Configuration page.
The Attributes section displays the overridable MetaAttributes.
E.g.: Process Designer profile.
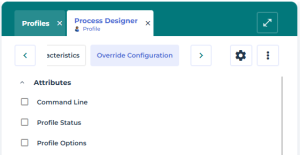
4. Select the attribute you want to override.
E.g.: Command Line.
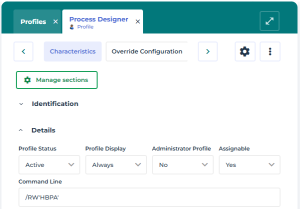
5. Access the page showing the attribute to override it.
E.g.: Display the Characteristics page of the profile and expand its Details section.
6. Enter the attribute value.
E.g.: The Command Line field is now empty, enter the overriding value.
The Command Line standard value for Process Designer profile is: /RW'HBPA,HCJ,ERML,BCM'.
Enter: /RW'HBPA' so that the Process Designer profile access is restricted to Hopex Business Process Analysis (Hopex Customer Journey, Hopex Risk Mapper, and Hopex BCM are no longer available).
Overriding a single object link
For a specific link type (with cardinality 1), you can:
• override the object link:
• disable the standard link
• connect a custom link
• override the link attributes
• revert to the standard configuration
To override a link of an overridable object:
1. Access HOPEX Studio desktop (with Hopex Customizer profile).
2. Access the overridable object property pages.
E.g.: the Process Designer profile.
3. Display its Override Configuration page.
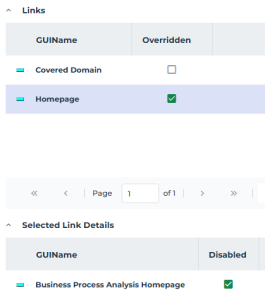
The Links section displays the overridable links of the object.
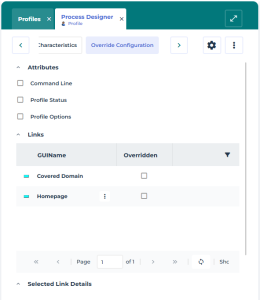
4. In the Links section, select Overridden corresponding to the link you want to override.
E.g.: Homepage.
5. For each link with Overridden selected:
E.g.: Homepage.
• Click the row of the link.
• In the Selected Link Details section, select Disabled.
6. Access the page displaying the link to override it.
E.g.: Display the Characteristics page of the profile.
The field is empty.
7. Use the right oriented arrow to connect the overriding link.
Overriding multiple object links
For a specific link type (with cardinality n), you can:
• override the object links
• add links
• remove links
• reorganize the links
• override the link attributes
• revert to the standard configuration
To override the links of an overridable object:
1. Access HOPEX Studio desktop (with Hopex Customizer profile).
2. Access the overridable object property pages.
E.g.: the "Hopex V6 - Enterprise Architect" Working Environment Template.
3. Display its Override Configuration page.
The Links section displays the overridable links of the object.
4. In the Links section, select Overridden corresponding to the link type you want to override.
E.g.: Available Groups.
5. To remove a link:
• Click the row of the link type (with overridden selected):
The Selected Link Details section expands and displays the available links.
• In the Selected Link Details section, select Disabled corresponding to each link you want to remove.
E.g.: "Hopex V6 - EA Baseline - Business"
6. To add a link:
• Access the page displaying the links to override:
E.g.: Display the Characteristics page of the "Hopex V6 - Enterprise Architect" Working Environment Template, and expand Available Groups.
• Click Connect  and select the link you want to add.
and select the link you want to add.7. To reorganize the links:
• Access the page displaying the links to override:
E.g.: Display the Characteristics page of the "Hopex V6 - Enterprise Architect" Working Environment Template, and expand Available Groups.
• Click Reorganize  .
.
.• Drag and drop the links to get the required order.
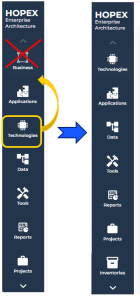
E.g.: drag and drop "Hopex V6 - EA Baseline - Technologies" above "Hopex V6 - EA Baseline - Applications"
• Click OK.
E.g.: in EA desktop navigation menu order is changed and Business navigation menu is removed.
Reverting to the standard value
You may decide to revert to the standard value of an attribute or a link.
To revert to a standard value:
1. Access HOPEX Studio desktop (with Hopex Customizer profile).
2. Access the overridable object property pages.
E.g.: the EA Functional Administrator profile".
3. Display its Override Configuration page.
4. In the:
• Attributes section: clear each attribute concerned
• Links section: clear Overridden for each link type concerned
The standard attribute value or link configuration is reapplied for each cleared item.
You can still revert to the overriding attribute value or link configuration for each item.