Configuring UAS Options
UAS options are configured through HOPEX Administration options.
To configure authentication options, you must access to HOPEX Administration options in Extended view.
To configure authentication options:
1) Access the HOPEX Administration application (Administration.exe).
2) Right-click HOPEX and select Options > Modify.
3) Right-click Options and select Extended.
4) Expand Installation > Authentication folders.
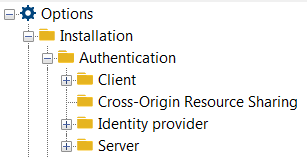
5) Click:
See Client Option Description.

See Server Option Description.
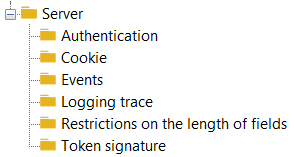
Server Option Description
Server global options
The server global options (HOPEX > Options (Extended view) > Installation > Authentication > Server) are the following:
• Name of the authentication site (available in Standard view)
Displays name of the site used in standard views. Default to HOPEX.
• SSL Activation
Indicates if SSL is required for UAS. You need to activate this option if you want to secure your authentication service and work with some identity providers. Defaults to false.
• Public origin of the site
By default, UAS uses the host, protocol, and port from the HTTP request when creating links. This might not be accurate in reverse proxy or load-balancing situations. You can override the origin used for link generation using this property.
• Information storage type
UAS allows to use the following data component types:
This storage type allows to store data in memory of your server. It's the simplest storage type. You cannot use it with a cluster deployment and you lose your token when you reboot your server.
This storage type allows to store data in Redis, a nosql database storage, used for caching. You can use it with a cluster deployment. No data loss.
This storage type allows to store data in NCache Entreprise 4.6.2 minimum, used for caching. You can use it with a cluster deployment. No data loss.
For legal reason (License redistribution), MEGA cannot provide the assemblies to work with.
You need to put the following assemblies in the UAS binary folder (by default wwwroot/uas/bin):
- Alachisoft.NCache.Web.dll
- Alachisoft.NCache.Runtime.dll
This storage type allows to store data in SQL Server 2008 R2 minimum, used for caching. You can use it with a cluster deployment. No data loss.
You must launch SQL scripts which can be found in:
{HOPEX installation folder}\Utilities\Hopex Cluster Tools\UAS_Scripts.sql
• Parameters of the UAS data component
This parameters allows to complete the data component type. Several data components needs more informations like connectionstring or key.
No need to fill this parameter.
Fill the Redis connection string into this parameter.
Fill the NCache name into this parameter.
Fill the SQLServer connection string into this parameter.
Data Source={ServerName}\{Instance};Initial Catalog={DataBaseName};Integrated Security=False;User ID={UserId};Password={UserPassword}
Authentication options
The server authentication options (HOPEX > Options (Extended view) > Installation > Authentication >Server > Authentication) are the following:
• Activation of user name backup
Indicates whether UAS will remember the last username entered on the login page. Defaults to true
• Activation of the local connection
Indicates if UAS will allow users to authenticate with a local account. Disabling this setting will not display the username/password form on the login page. This also will disable the resource owner password flow. Defaults to true.
• Activation of the login hint
Indicates whether the login_hint parameter is used to prepopulate the username field. Defaults to true.
• Limit to the number of consecutive messages
Gets or sets the limit after which old sign in messages (cookies) are purged. Defaults to 3.
• Activation of the capacity to redirect directly to an URL after disconnection
Gets or sets a value indicating whether UAS automatically redirects back to a validated post_logout_redirect_uri passed to the sign out endpoint. Defaults to false.
• Activation of confirmation during connection
Indicates whether UAS will show a confirmation page for sign-in. When a client initiates a sign-in, by default UAS will not ask the user for confirmation but you can activate it. This is a mitigation technique against “logout spam”. Defaults to false.
• The redirection timeout of the automatic post-disconnection
Gets or sets the delay (in seconds) before redirecting to a post_logout_redirect_uri. Defaults to 0.
• Activation of display of the disconnection confirmation page
Indicates whether UAS will show a confirmation page for sign-out. When a client initiates a sign-out, by default UAS will not ask the user for confirmation.
• The invalid sign in redirect URL
Gets or sets the invalid sign in redirect URL. If the user arrives at the login page without a valid sign-in request, then they will be redirected to this URL. The URL can be absolute or relative (starting with “~/”).
Cookie options
The server cookie option (HOPEX > Options > Installation > Authentication > Server > Cookie) is:
• Sliding cookie Expiration
Indicates if the authentication cookie is sliding, which means it auto renews as the user is active. Defaults to false.
Event options
UAS raises many events at runtime.
The server event options (HOPEX > Options (Extended view) > Installation > Authentication >Server > Events) are the following:
By default, these events are forwarded to the configured log provider - a custom event service can process or forward them in any way suitable for the environment.
Options regarding events are the following:
• Generation of all events (default: disabled)
Activates all the events below
• Generation of success events (default: disabled)
Activates refresh token refreshed or authentication success.
• Generation of information events (default: disabled)
Activates token issued or certificate valid events.
• Generation of error events (default: enabled)
Activates unhandled exceptions events.
• Generation of failure events (default: enabled)
Activates authentication failure, authorization code redeems failure events.
Logging trace options
The server logging trace options (HOPEX > Options (Extended view) > Installation > Authentication > Server > Logging trace) are the following:
• Activation of all logging
Activates all the logging traces (http flow, katana Flow, programming web interface, programming web interface in Verbose mode).
• Activation of Http flow logging
When enabled, HTTP requests and responses are logged.
• Activation of Katana Flow Logging
When enabled, the Katana log output is logged (this is often useful to troubleshoot problems with external identity providers).
• Activation of logging of the programming web interface
When enabled, Web API internal diagnostic logging is forwarded to the log provider.
• Activation of logging of the programming web interface in Verbose mode
When enabled, the Web API diagnostics logging is set to verbose.
Token Signature options
The server token signature options (HOPEX > Options (Extended view) > Installation > Authentication > Server > Token Signature) are the following:
• Name of the certificate to be used by the authentication server
X.509 certificate (and corresponding private key) name for signing security tokens.
• Password for the signature certificate of the authentication server
X.509 certificate (and corresponding private key) password for signing security tokens.
Identity Provider Option Description
The identity provider options (HOPEX > Options > Installation > Authentication > Identity provider) are the following:
HOPEX provider
The HOPEX provider is the HOPEX default provider, which displays a login page with username and password.
To authenticate HOPEX users, use either:
See HOPEX Administration documentation: Authentication in HOPEX section.
• LDAP Authentication
IIS Windows provider
With the IIS Windows provider HOPEX users are authenticated by Windows Authentication.
To use IIS Windows provider, you must configure the following mandatory options:
SAML2 provider
SAML 2.0 is an XML based framework, used to describe and exchange security information. It can be used for Single Sign On (SSO), Identity Management and Federation.
To use SAML2 provider, you must set UAS in SSL Mode.
UAS manages only Service Provider (SP) initiated SSO and not Identity Provider (IDP) initiated SSO.
We have implemented two SAML2 Identity Provider and you can find the server configuration example:
OpenID Connect (OIDC)
Use the OpenID Connect (OIDC) provider to authenticate HOPEX users with an OpenID Connect account by OAUTH2.
To use OpenID Connect provider you must:
Google provider
Use the Google provider to authenticate HOPEX users with a google account by OAUTH2.
To use Google provider, you must:
If you do not know this information, go to the Google console (https://console.developers.google.com) to create your API keys.
Do not forget to activate Google + API at least, otherwise you will not be able to authenticate HOPEX users.
Microsoft provider
Use the Microsoft provider to authenticate HOPEX users with a Microsoft account by OAUTH2.
To use Microsoft provider, you must set UAS in SSL Mode and ensure the address is accessible by Microsoft server and fill the following fields:
If you do not know this information, go to the Microsoft website (https://apps.dev.microsoft.com ) to create your API keys.
Cross-Origin Resource Sharing Option Description
(available with options in Extended view only)
Cross Origin Resource Sharing (CORS) allows us to use Web applications within browsers when domains aren't the same. For example, a site with domain test.org wants to execute AJAX requests to a Web application with domain mydomain.org using HTTP.
Using CORS isn't so simple especially when you face debugging difficulties. As a matter of fact, CORS can imply an additional OPTIONS request and error messages aren't so explicit. Most of the time, errors correspond to a lack of required headers from the server. For such reasons, a good understanding of how this feature works is essential.
CORS is used in a lot of places and use cases. In Web development, it's often necessary to split the front application from the server application for development reasons or to interact with a remote service.
The CORS mechanism is mainly implemented with the Web server but this has an impact on the client side if some headers are missing in responses.
With CORS, the remote Web application (here the one with domain mydomain.org) chooses if the request can be served. The CORS specification distinguishes two distinct use cases:
Simple requests. This use case applies if we use HTTP GET, HEAD and POST methods. In the case of POST methods, only content types with the following values are supported: text/plain, application/x-www-form-urlencoded and multipart/form-data.
Preflighted requests. When the ‘simple requests' use case doesn't apply, a first request (with the HTTP OPTIONS method) is made to check what can be done in the context of cross-domain requests.
Notice that if you add authentication to the request using the Authentication header, simple requests automatically become preflighted ones.
Client and server exchange a set of headers to specify behaviors regarding cross-domain requests. Let's have a look at them now. We will then describe how they are used in both use cases.
Origin: this header is used by the client to specify which domain the request is executed from. The server uses this hint to authorize, or not, the cross-domain request.
Access-Control-Request-Method: with in the context of preflighted requests, the OPTIONS request sends this header to check if the target method is allowed in the context of cross-domain requests.
Access-Control-Request-Headers: with in the context of preflighted requests, the OPTIONS request sends this header to check if headers are allowed for the target method in the context of cross-domain requests.
Access-Control-Allow-Credentials: this specifies if credentials are supported for cross-domain requests.
Access-Control-Allow-Methods: the server uses this header to tell which headers are authorized in the context of the request. This is typically used in the context of preflighted requests.
Access-Control-Allow-Origin: the server uses this header to tell which domains are authorized for the request.
Access-Control-Allow-Headers: the server uses this header to tell which headers are authorized in the context of the request. This is typically used in the context of preflighted requests.
Simple requests
Where simple requests are concerned, the request is executed against the other domain. If the remote resource supports cross domains, the response is directly sent back. Otherwise an error occurs.

Preflighted requests
In the case of preflighted requests, this corresponds to a negotiation between the caller and the Web application based on HTTP headers. It consists of two phases:
The browser first executes an OPTIONS request with the same URL as the target request to check that it has the rights to execute the request. This OPTIONS request returns headers that identify what is possible to do for the URL. If rights match, the browser executes the request.

This processing is completely transparent for the caller but we can have hints of what actually happens using the development tools of the browser, for example Firebug within Firefox. With the latter, we can use the Network tab to check which calls are executed and which CORS headers are exchanged.
An important comment. You must take into account that, when executing CORS request containing security, i.e. an Authorization header, the OPTIONS request won't contain it. So you need to be careful regarding security when handling the first OPTIONS requests of preflighted ones. As a matter of fact, no authentication check can be done at this level.
Use within browsers
When implementing applications within browsers using JavaScript, it's common to interact with services that aren't hosted on the same domain. Several solutions are usable like JSONP, but also CORS. In this section, we will describe how to use this feature within commonly used tools.
Low-level API
XHR corresponds to the low-level API to implement AJAX calls within JavaScript applications in browsers. Regarding CORS, there is nothing to do unless you want to use credentials with the withCredentials property. It's mainly if you deal with cookies.
In fact, if the browser detects that the domain of the page is different from the AJAX request that is about to be sent, it automatically adds the Origin header. The consequence is to enable CORS support within the response if the Web service supports this technology.
Here is a sample of a simple CORS request:
var req = new XMLHttpRequest();
req.open('GET', 'https://maptestapi.apispark.net/v1/maps/', true);
req.onreadystatechange = function() {
if (req.readyState === 4) {
console.log(req.responseText);
}
};
req.setRequestHeader('Accept', 'application/json');
req.send();
This will result in the following request in the browser:

Here is a sample of a preflighted CORS request:
var req = new XMLHttpRequest();
req.open('PUT', 'https://maptestapi.apispark.net/v1/maps/4', true);
req.onreadystatechange = function() {
if (req.readyState === 4) {
console.log(req.responseText);
}
};
req.setRequestHeader('Content-type', 'application/json');
req.send('{ "id": "4", "name": "Meteorites", "type": "d3js", (…)');
This will result in the following request in the browser:

As described above, CORS is natively supported by the JavaScript XMLHttpRequest object. We can notice that old Internet Explorer versions (7 and 8) use a dedicated object for XDomainRequest requests.
That being said, if you want to send credentials managed by the browser (Access Control) within CORS requests, you need to enable the credentials support of XHR using the withCredentials attribute. By default, the feature is disabled.
var req = new XMLHttpRequest();
(...)
req.withCredentials = true;
Notice that you don't need to use this attribute if you build the Authentication header by yourself.
Libraries and frameworks
The aim of JavaScript libraries and frameworks regarding AJAX is to provide an abstraction level upon browser specificities, an API that is common and works in every browser. That means that using CORS is transparent.
JQuery provides a way to configure the withCredentials attribute previously discussed, as described below:
$.ajax({
type: "POST",
data: {},
dataType: 'json',
xhrFields: {
withCredentials: true
}
});
With AngularJS, there is nothing to do.
Note that on the web you can find content telling you that you need to set the defaults.useXDomain property of the $httpProvider object to true or to delete the X-Requested-With header. This may have been true in the past but it's not the case anymore.
Error detection
To detect CORS problems, you obviously need to enable debugging tools in your browser and especially the JavaScript console. For example, in Chrome, if the server doesn't include CORS headers in the response, you will see this error for a simple request:

And this one for a preflighted one:

Using the Network tab, you will see that CORS headers aren't present in the response of the OPTIONS request:

Errors can be more subtle since the content of CORS headers could possibly be incorrect. For example, if you try to call a HTTP method that didn't return Access-Control-Allow-Methods.
Another source of errors is that credentials aren't sent within the OPTIONS request (Authorization header). When implementing CORS on the server side, checking credentials musn't apply for this request but only for target ones.


With UAS you can add resources from another domain. It can be used if you use several domains in your HOPEX installation. You can have up to 5 different CORS.
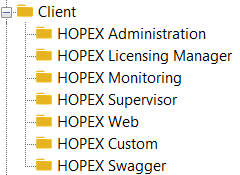
Client Option Description
HOPEX Custom (options in Extended view only)
HOPEX allows you to authenticate an external client with UAS and enable UAS SSO Features.
You must fill the following fields: