Managing MS Word Reports in HOPEX (Windows Front-End)
HOPEX enables generation of reports (MS Word) from the desktop Documentation window.
The reports are generated in .doc format.
Creating an MS Word report in HOPEX (Windows Front-End)
To create an MS Word report:
1. In the HOPEX menu bar, select View >Navigation Windows > Documentation.
2. Right-click the Reports (MS Word) folder and select New > Report (MS Word).
The first step of the Creation of Report (MS Word) wizard appears: Documented Object.
3. In the Documented Object field, click the arrow and select Connect.
4. In the Element With (MS Word) Report list, select the object type you want to document, and click  .
.
.5. In the results list, select the object to be documented and click Connect.
The object appears in the report (MS Word) creation wizard.
6. Click Next.
The second step of the Creation of Report (MS Word) wizard appears: Report Template (MS Word).
7. In the Report Template (MS Word) field, in the drop-down list, select the report template (MS Word) on which you want base your report.
8. (If needed) A window asks you to enter the parameter values. Most frequently the object name provides the starting point for the query in the repository. Parameters correspond to settings of queries that make up the report (MS Word).
Enter the parameter values in the appropriate fields.
9. Click Next.
The third step of the Creation of Report (MS Word) wizard appears: Distribution.
10. (Optional) Enter the report (MS Word) distribution list.
11. Click Finish.
The new report (MS Word) appears in the Documentation navigation window and at object level.
12. Double-click the new report (MS Word) icon to automatically generate the document.
The report appears in Microsoft Word.
A specific toolbar and a HOPEX menu appear in Word.
Detaching an MS Word Report in HOPEX (Windows Front-End)
This functionality can be useful in HOPEX (Windows Front-End) if you want to distribute a working report (MS Word) (a diagram and its description) to persons who do not have access to HOPEX.
For example, within the framework of a quality approach, you can detach reports (MS Word) of processes as well as the quality manual once these have been validated.
This copy of the report (MS Word) reflects the state of an object at a given moment and will no longer be modified by HOPEX. Links with HOPEX are cut.
The report (MS Word) generated via the pop-up menu of the object will continue to evolve according to object modifications.
To detach a report (MS Word):
1. From the Documentation navigation window, expand the Reports (MS Word) folder.
2. Right-click the report (MS Word) to be detached and select Detach from HOPEX.
3. In the Detach from HOPEX dialog box, select a location and give a name to your report (MS Word).
Links with the repository are broken.
You can now archive your report (MS Word), distribute it in electronic or printed form for information.
Distributing an MS Word report for review or validation
From HOPEX (Windows Front-End), you can distribute a report (MS Word) via electronic mail for review or validation if the recipients concerned are business persons whose e-mail address has been specified.
Two commands in the report (MS Word) pop-up menu allow you to trigger its distribution.
The Send for Review and Send for Validation commands trigger distribution of the report (MS Word) and cause:
• Breaking links with HOPEX.
• Sending the report (MS Word) as an attachment to the persons concerned.
For more details on the distribution list, see Creating a distribution list.
Sending for review
To send a report (MS Word) for review (checking):
1. Right-click the report (MS Word) and select Send for Review.
An e-mail is created. The subject of the e-mail is "Review of report (MS Word) <name of the report (MS Word)>" and the e-mail includes the report (MS Word).
2. Enter e-mail addresses of the recipients as follows:
Person/org-unit role | To | Cc |
|---|---|---|
Writer | ||
Checker | X | |
Approver | X | |
Writer/Approver | X | |
Writer/Checker | X | |
Approver/Checker | X | |
For action | ||
For information |
Sending for validation
To send a report (MS Word) for validation:
1. Right-click the report (MS Word) and select Send for validation.
An e-mail is created. The subject of the e-mail is "validation of report (MS Word) <name of the report (MS Word)>" and the e-mail includes the report (MS Word).
2. Enter e-mail addresses of the recipients as follows:
Role | To | Cc |
|---|---|---|
Writer | ||
Checker | X | |
Approver | X | |
Writer/Approver | X | |
Writer/Checker | X | |
Approver/Checker | X | |
For action | ||
For information |
Revising reports (MS Word)
In the properties dialog box of a report (MS Word), the Revisions tab allows you to indicate the date and sender of the revision request as well as the version number.
You can create revision notes to keep trace of the various report (MS Word) revision phases. Usually, the user creates a revision note when it has been decided to modify the MS Word report or the corresponding object. It is however possible to create a revision note at any time, for example when incorporating an existing procedure in HOPEX.
To create a revision note:
1. In the report (MS Word) properties dialog box, select the Revisions tab.
2. In the Document Version field, enter the current version of the report (MS Word).
3. Click Apply.
4. Click New  .
.
.5. Create the note:
• In the Note field, enter the name of the note.
• in the Type drop-down list, select the note type.
• In the Comment field, enter a comment for the note.
• Click OK.
In the Revision Request Date, the current date is automatically specified.
In the document Revision Version, the document version (if specified step 2) is automatically specified.
6. (Optional) If needed, modify the Revision Request Date.
7. (Optional) If needed, modify the Revision Version.
8. Click in the Sender field, then the arrow and use the query tool to select the note sender.
The note sender name appears in the corresponding field.
9. Click Apply.
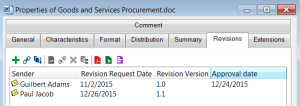
Example of a series of revision notes
Approving an MS Word report revision
You can approve the report (MS Word) revision.
Eg: after approving the report (MS Word) currently under revision.
To specify the approval date of a report (MS Word):
1. In the report (MS Word) properties dialog box, select the Revisions tab.
2. Enter (or modify) the date in the corresponding Approval date field.
Creating a distribution list
HOPEX enables preparation for distribution of your reports (MS Word) by creation of a distribution list.
In the report (MS Word) properties dialog box, the Distribution tab enables:
• selection or creation of persons (or org-units of the enterprise).
• specification of the roles of these persons:
• The writer is responsible for originating the report (MS Word).
• The checker is responsible for reviewing the report (MS Word) to check accuracy.
• The approver decides on validity of the report (MS Word), for example that it may be implemented if it is a process.
• "writer/approver"
• "approver/checker" or
• "writer/checker"
• For action, that is they are responsible for implementing the report (MS Word) within the enterprise,
• or simply For information.
To create the distribution list of a report (MS Word):
1. In the report (MS Word) properties dialog box, select the Distribution tab.
2. Click Connect  .
.
. Your distribution list can include org-units or persons.
3. Select the recipient type ("Org-Unit", "Person (system)", or "Business Person") you want to add in your distribution list.
4. In the list that appears, select the recipient.
5. Add other persons or org-units to the distribution list in the same way.
6. Click in the Recipient Role field and use the drop-down list to select the role that each recipient plays.
 .
.