2. Upgrading a HOPEX bundle
This procedure applies to both single server deployment and cluster deployment. It is required to download and install the bundle on each server.
Prerequisites:
• Identify the bundle to install (target bundle).
E.g.: 6.0.1+298 (HOPEX 6.0 SP1 [17.0.1+6658])
This information is usually provided by MEGA Technical Support.
• Identify the url of the HAS Instance Manager Console
E.g.: http://localhost:30100/
• Identify the HAS instance to upgrade (target HAS instance)
E.g.: preproduction instance http://svr0101:5001/
This information is provided by the project.
• Know the credentials for the HAS Console of this instance.
This information is provided by the project.
• Know the credentials for the Instance Manager Console.
This information is provided by the project.
• Check that no user is connected to the HAS instance.
2.1. Update of Instance Manager
Certain SPs require an update of the Instance Manager.
|
Condition
|
Update of Instance Manager
|
Comment
|
|
From HOPEX Aquila
to HOPEX Aquila SP1
|
Not needed
|
|
|
…
|
|
|
Update of Instance Manager is performed systematically if you run HOPEX installer (e.g.: new installation, offline installation.
To perform a new installation, see HOPEX Application Server Installation document in online documentation.
Note that, if the expected version of .NET core is not installed, the Instance Manager will not restart. Verify that this prerequisite fulfilled before running the setup.exe.
2.2. Online procedure (internet access)
The procedure applies to a HAS instance.
Prerequisites:
• You can access HOPEX store: https://store.mega.com.
• You have an installation key.
For each HAS instance:
1) Enter the url of the HAS Agent Console.
E.g.: http://localhost:30100/
2) In the left menu, select HAS Versions.
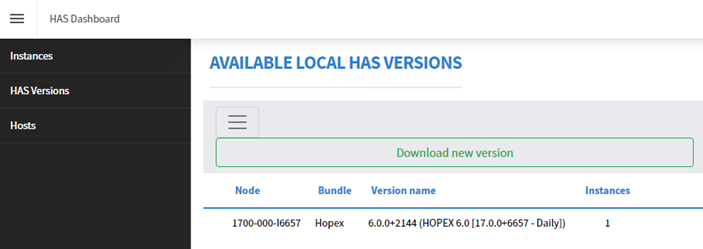
3) Click  > Download new version.
> Download new version.4) In the list, select carefully the version to install.
E.g.: 6.0.1+298 (HOPEX 6.0 SP1 [17.0.1+6658])

5) Click Download.
Wait a few minutes up to the end of the download (100% then extraction).
A new folder is created in C:\ProgramData\MEGA\Hopex Application Server\.binaries\HOPEX\<version>
A new folder is created in C:\ProgramData\MEGA\Hopex Application Server\.binaries\HOPEX\<version>
E.g.: C:\ProgramData\MEGA\Hopex Application Server\.binaries\HOPEX\V6.0.1+298
6) In the left menu, select Instances.
7) In the target instance row, click Action > Stop and confirm action.

The HAS instance stops (status Stopped)

8) In the target instance row, click Actions > Start.
9) In the Start instance window, select carefully the target bundle and click OK.
E.g.: 6.0.1 +298 (HOPEX 6.0 SP1)
The HAS instance starts.

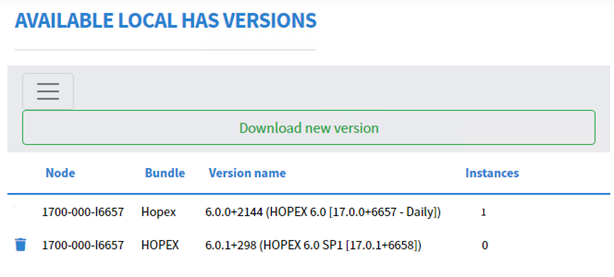
10) In the left menu, select HAS Versions.

11) You can delete previous version, if there is no associated instance: click its corresponding  .
.
.E.g.: 6.0.0+2144 version
12) Access the HAS Console related to the target instance and check that all modules are loaded.
2.3. Offline procedure (no internet access)
The procedure applies to a HAS instance.
Prerequisite: you have received a folder containing an offline package (downloaded previously).
To create an offline package, see HOPEX Application Server (HAS) Installation Guide.
Browse the folder containing the offline package related to the hotfix. It contains:
• a file: has.setup.exe.
• a folder: .haspackages.
Procedure:
1) Run has.setup.exe as an administrator.
2) Check Accept license and click Next.

3) Keep existing settings for HOPEX Agent and click Next.

The package is installed.
A message is displayed: 'Installation completed successfully'.
A message is displayed: 'Installation completed successfully'.

4) Click Next.

5) Click Open Instance Manager console
6) Login to Instance Manager console.
7) In the left menu, select Instances.
8) In the target instance row, click Action > Stop and confirm action.

The HAS instance stops (status Stopped)
9) In the target instance row, click Actions > Start
10) In the Start instance window, select carefully the target bundle and click OK.
E.g.: 6.0.1 +298 (HOPEX 6.0 SP1)
The HAS instance starts.

11) In the left menu, select HAS Versions.
12) You can delete previous version, if there is no associated instance: click its corresponding .
.E.g.: 6.0.0+2144 version
13) Access the HAS Console related to the target instance and check that all modules are loaded.