9. Managing a Team to Move from DEV to PROD
Depending on the size of your company and the complexity of topics you are working on you might choose one way or the other of working.
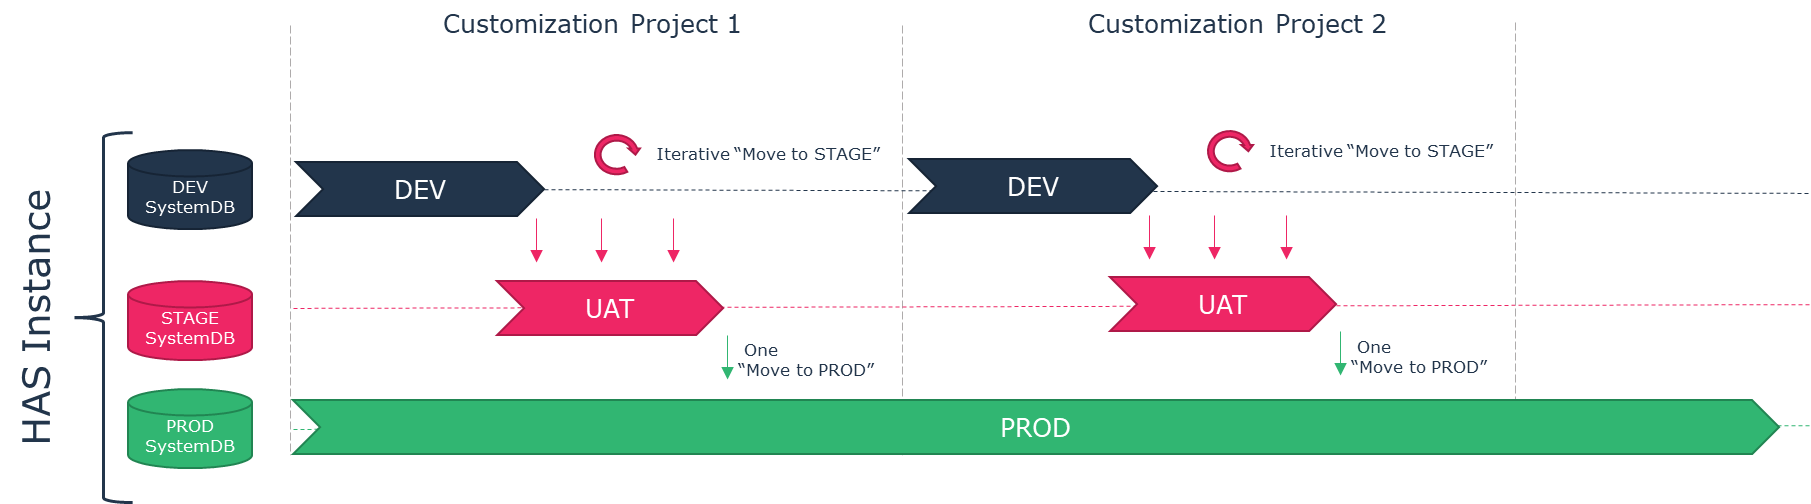
9.1. Most common (recommended) working way
9.1.1. Principle
The most common way of working when dealing with customization is the following:
• You have one DEV platform with one DEV Instance.
• You have one team of people performing all of the customizations.
• All customizations are done with this unique SystemDb.
• All customizations are done using Work Item with a defined naming convention.
• If you have multiple projects, the delivery dates are sequential: one project after the other.
Benefit:
You have a unique source of customization, and all customizations are always coherent among them.
Drawback:
In case of multiple projects, it requires to align sequentially project timeline and delivery.
9.1.2. Dealing with iterative fix
If you have multiple projects, you need to fix customization from previous project. In that case two solutions are possible:
• The fixes of project 1 are included in project 2.
• The fixes of project 1 are done at the end of project 2.

9.2. Multiple team – Multiple Projects – Multiple DEV Instance
In some context you may have:
• Several teams that can perform customizations.
• Several projects with overlapping delivery timeline.
In that context you may not be able to manage your work with only one DEV instance. You need to have multiple DEV instances.
We recommend you try everything to have only one DEV instance
In that situation we recommend having a very rigorous organization and precise delivery time. The key point for such way of working is to ensure each project is totally independent from each other from a functional point of view: no overlaps in customization of objects.
The way of working when dealing with multiple parallel project:
• You have one DEV platform for each project with one DEV instance
• You have one centre DEV Instance to integrate each DEV from each project
• Each project works in their respective DEV instance.
Benefit:
You handle complex organization working on various projects and topics at the same time.
Drawback:
You need to be rigorous in the merging or overlapping customization to avoid regression.
9.2.2. Architecture of multiple project
In such architecture you have first a similar architecture as described in “Most common (recommended) working way” section.
• A DEV instance, a UAT instance, a PROD instance
The DEV instance “zero” will be used to put all common customizations that apply to all projects (e.g.: login background, css stylesheet changes, common jar or DLL).
You have then a “DEV instance” for each project: DEV instance 1, DEV instance 2, DEV instance 3…
Caution: project means functional scope such as Audit, ITPM, BPA. Technical split (e.g.: static website, metamodel, UX) is not suitable for this approach.
In each project you must create a “project custom module”. This module is unique to each project with a unique module ID.
The “default standard” custom module has to be replicated on each project DEV instance 1, 2 and 3.
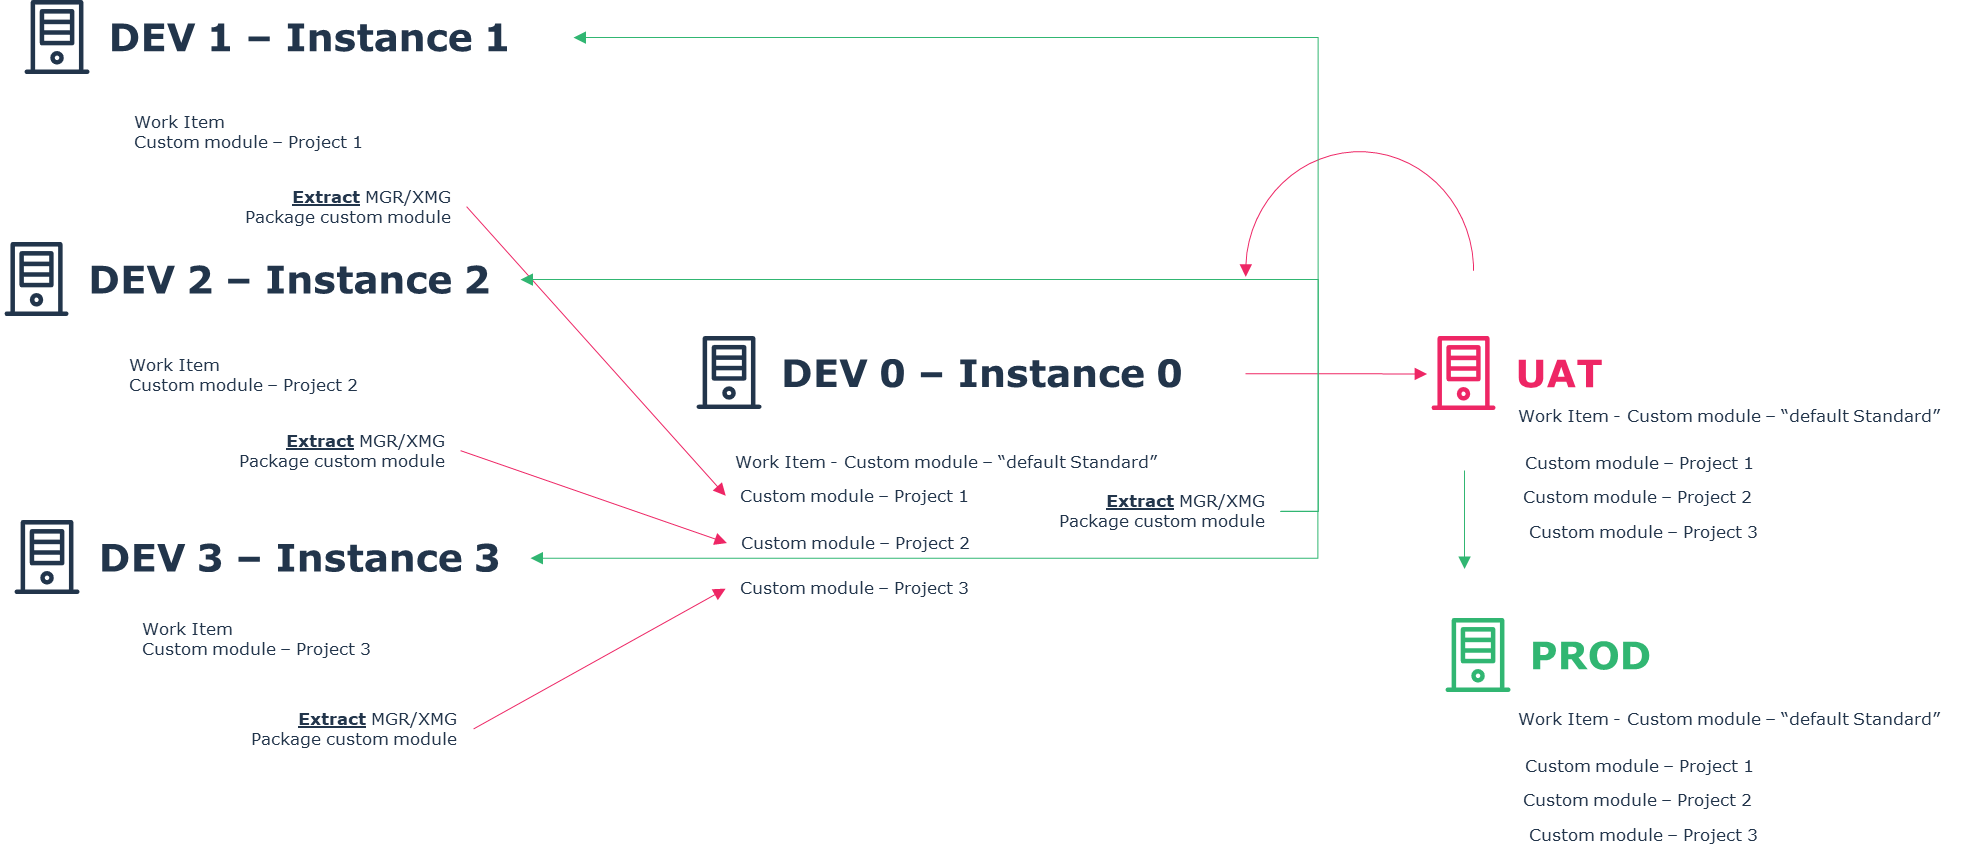
The process to follow is:
1. For project 1, perform all your customizations in “DEV instance 1”.
2. Once ready, push your customizations to “DEV instance 0”.
3. Perform a first test of validity of your customizations, to check particularly any side effect on other project.
4. If no impact, continue with the normal Move to PROD process.
9.2.3. How to create your custom project module
On each DEV instance 1, 2, and 3 you must give a name to your project.
To give a name to your project:
1. Launch Administration.exe.
2. Access the Site options.

3. Access Installation > Company Information options.

4. In Service Name enter your project name.
5. Cick OK.
6. Close Administration.exe.
Avoid specific charset and space
Generate your first extract to create the module:
1. Connect to HOPEX Studio (e.g.: with user MEGA, profile “HOPEX Customizer”).
 è
è 
2. Perform the task as described in chapter “Extracting Customization”.
3. Create a “Project1” Work Item and set it as complete and extract it
 è
è 
A new folder appears in shadowFiles: “Has.custom.project1”

4. Perform the task as described in chapter “Packaging customization”.

A new custom module project 1 is now available for you to put all the customizations for this specific project.
9.2.4. Workflow to manage the project
You must follow these rules:
• On “DEV instance 0” the custom module is the reference.
This module must always be up-to-date and replicated in all “DEV instance 1, 2, and 3.
• For a project push the custom module to “DEV instance 0” first.
• If you want to share element across project, push the project other project instance.