Handling Lists
Repository objects are often presented as lists of objects of the same type.
In lists, you can customize the display of columns and data.
Defining the columns to display
Each column corresponds to an object characteristic. You can select the columns that you want to show or hide.
To display or hide one or several columns:
1. In your HOPEX desktop, access the list of objects.
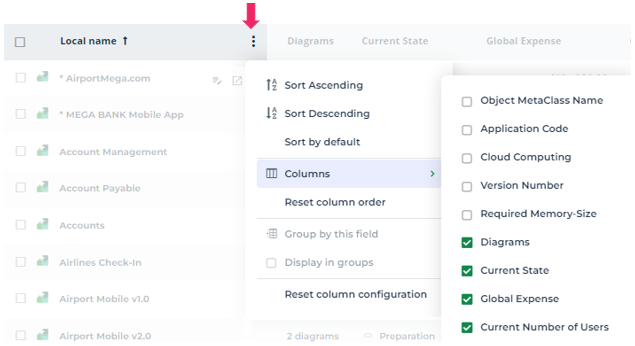
2. Hover the cursor over the column header and click More  .
.
.3. Hover the cursor over Columns and select the columns you want to display.
Modifying the column width
Each column width is adapted to its content.
When you modify a column width:
• the width gets locked
• the width of the column is saved in your customization parameters
To modify the width of a column:
1. In your HOPEX desktop, access the list of objects.
2. Click one of the column header dividers and drag the divider to the desired width.
The width of the column is modified and saved.
Modifying the column order
To modify the column order:
1. In your HOPEX desktop, access the list of objects.
2. Click in the column header and drag-and-drop the column to the required location.
A green cursor indicates that the chosen position is authorized.
The order of the columns is modified and saved for your next connections.
Resetting the column order
If you have modified the column order, you can return to the default order.
To reset the column order:
1. In your HOPEX desktop, access the list of objects.
2. Hover the cursor over the column header and click More .
.3. Select Reset column order.
The columns display in their default order.
Resetting column configuration
In a list, every customization at the column level is saved, even after signing out.
You can reset all the customizations that you have performed on columns, that is:
• displaying/hiding columns
• column width
• column order
• column locking
To reset the column configuration:
1. In your HOPEX desktop, access the list of objects.
2. Hover the cursor over the column header and click More .
.3. Select Reset column configuration.
Grouping data by field
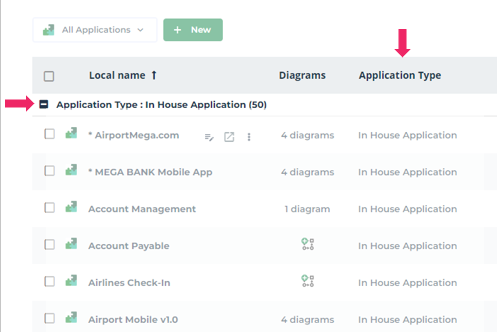
In an object list, you can group the objects that have an identical attribute value.
To group objects:
1. In your HOPEX desktop, access the list of objects.
2. Hover the cursor over the column header and click More .
.3. Select Group by this field.
The objects are ranked according to the chosen value.
In the More menu of all columns, Display in groups is selected.
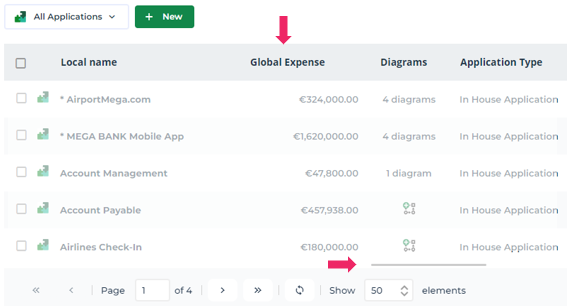
menu of all columns, Display in groups is selected.In the list of applications, you can for example group applications by type.
Freezing a column
In a list, by default, the columns are presented in the following order:
• check box
• icon of the object type of the list
• Local Name
Freezing a column anchors it at one place, irrespective of the scrolling bar. The column scrolling cursor is positioned at the level of the first unfrozen column (by default after Local Name).
If necessary, you can position one or more columns directly to the right of the Local Name column. To do this, you must freeze the column.
To freeze a column:
1. In your HOPEX desktop, access the list of objects.
2. Hover the cursor over the column header and click More .
.3. Click Freeze Pane.
The column is moved to the right of the Local Name (or to the right of the last column already frozen)
The scrolling cursor is positioned after this column.
You can, for example, place the Technology Compliance column directly after Local Name so it remains displayed when you view the other columns. The column scrolling cursor is positioned at the first unfrozen column level (after Global Expense).
Mass modification of the data in a list
HOPEX can be used to assign the same attribute value to several objects in a list.
To assign the same attribute value to several objects:
1. In your HOPEX desktop, access the list of objects.
2. In the list, select the objects concerned.
3. In the column of the attribute concerned, specify the new value in one of the fields of the selected objects.
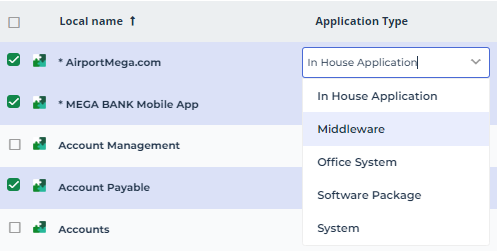
The new value of the field is assigned to all selected objects.