Defining a Data Quality Policy
Creating a Data Quality Policy
Data quality policies are guidelines that describe what criteria data must meet to be useful and reliable within an organization.
A data quality policy is part of a Policy framework. It describes:
• the objects to which it applies
• the dimensions that constitute the quality criteria to be respected
Controls can be put in place to ensure that the quality policy is properly implemented. See Defining Data Quality Controls.
Example
A school policy requires parents of new students to complete a form that includes a medical questionnaire and emergency contact information, as well as confirmation of the student's name, address and date of birth.
A data quality policy is defined: it must respect the "Completeness" dimension, with a threshold whose value must be equal to 100%.
To create a data quality policy in HOPEX Data Governance:
1. Click the Compliance > Data Quality > Policies navigation menu.
2. In the edit area, click New.
3. Specify:
• the name of the data quality policy
• a description
• the subject, which represents the constrained asset
• the dimension
4. Click OK.
The data quality policy appears in the edit area.
Define Data Quality Indicators
You can create indicators to monitor the quality of the data in your repository. You can create them directly on the data and/or associate them with a data quality policy.
Example
As part of the school's regulations, the student information sheet is associated with a quality policy specifying that the sheet must be complete. You can create an indicator whose value indicates whether the form complies with the quality policy.
Create a quality indicator
To create a quality indicator for a data item:
1. Open the properties of the data in question (e.g. a Concept).
2. Click Data Quality > Indicators.
3. Click New.
4. In the wizard that appears, enter the name of the indicator and a description.
5. Click Next.
6. Specify :
• the relevant data quality policy, if applicable
• the indicator's higher and lower thresholds and measurement unit.
Setting the last indicator value
Values represent measurements taken on the dates indicated. They may derive from specific technical tools performing tests and verifications relating to the quality policies of the target data sources.
To set the value of an indicator :
1. Open the indicator properties.
2. Click the Values page.
3. Enter the value of the indicator at the given date.
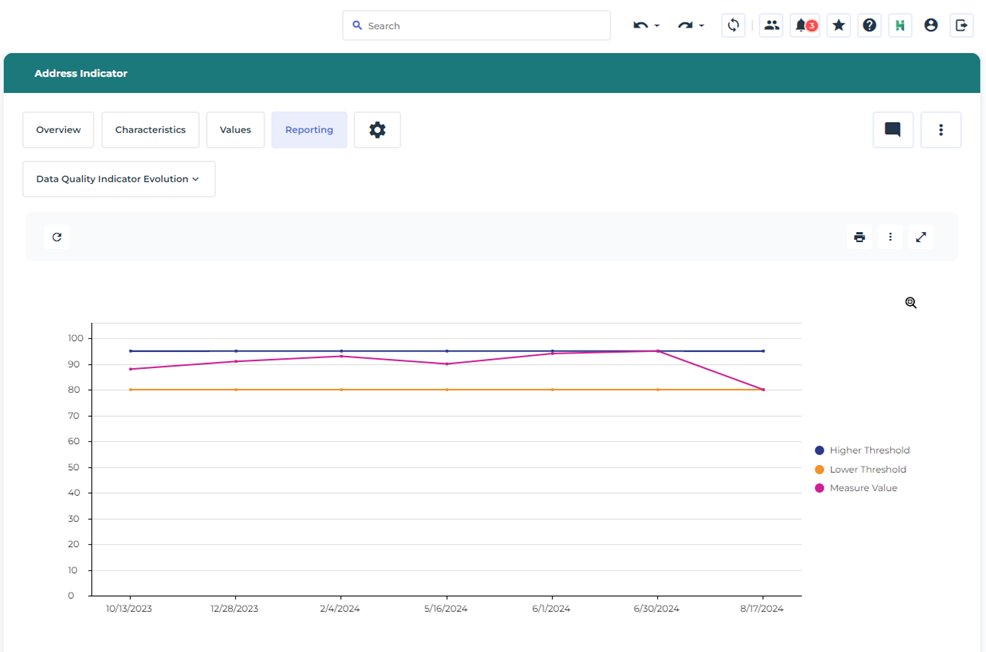
Indicator report
A report displays the evolution of indicator values.
To generate this report :
1. In the indicator properties, click Reporting > Data Quality Indicator Evolution.
The report shows the curves of the indicator's high and low thresholds, as well as the curve of its evaluations over time.
Importing Data Quality Policies and Indicators
From an Excel file, you can create a set of data quality policies in the HOPEX repository, with their associated indicators, thresholds and values, as well as the data assets concerned.
When you import a data quality policy into HOPEX, you can define a container (Policy Framework) in which to create this quality policy. If a data quality policy of the same name exists in the Excel file, but without a container, another object is created for it.
When importing data assets, you can specify for each :
• the container (e.g. a business dictionary)
• the object type (e.g. concept)
• and the object name.
In the _Description sheet of the Excel file, you can consult the list of columns that must be defined, such as the object name.
Downloading the import template
To download the template you will use to import your data:
1. Open the HOPEX Main Menu.
2. Select Import > Excel Template Download.
3. Move the cursor over the line of the template you are interested in.
4. Click Download.
Importing objects into HOPEX
To import the Excel file containing the objects:
1. Click Main menu, then Import > Excel.
2. In the import wizard, select the Excel file and the import mode:
• now: immediate import starts the import process as soon as you click Import.
• in background: background import allows you to schedule the import process so that you can continue to use HOPEX independently of this operation.
You can save the object history.
3. Click Import.
In the same way, you can export the data quality policies contained in your repository via this Excel template.
Example of an import file
The following Excel file contains a list of indicators.

Once imported into HOPEX, they are visible under the Compliance > Data Quality > Indicators menu.
The quality policy and data associated with an indicator are displayed in the Characteristics page of its properties.
Defining Data Quality Controls
Implementation controls may be associated with the control directives.
To create a data quality control:
1. Click the Compliance > Operational Assurance > Data Controls navigation menu.
2. Under the Data Controls tab, click New.
3. Enter the name and an owner if necessary.
4. Click OK.
The control appears in the edit area.
5. Hover the cursor over the control and click the Properties  button to define its characteristics:
button to define its characteristics:• Code: enables unique identification of the control.
• Nature: corrective, detective, preventive
• Frequency: daily, weekly, monthly, at each transaction, bi-monthly
• Control directive associated with the control
• Regulation articles of a the regulatory framework concerned
• Data Quality Measure
• Execution Control
Identifying Data Quality Issues
When data quality controls are found to be unsatisfactory, you can specify quality issues and implement action plans to address them.
To define a data quality ssue:
1. Click the Compliance > Operational Assurance > Data Remediation navigation menu.
2. In the edit area, click the Issues tab.
The list of data issues appears.
3. Click New.
4. Name the issue and click OK.
The issue appears in the edit area.
Addressing the Data Quality Issues Encountered: Action Plans
You can set up action plans to improve a quality control that has been considered unsatisfactory.
To create an action plan:
1. Click the Compliance > Operational Assurance Data Remediation navigation menu.
2. In the edit area, click the Action Plans tab.
The edit area displays:
• All action plans
• Delayed action plans
3. In the All Action Plans tab, click New.
4. Indicate the name of the action plan and possibly a comment as well as the start and end dates.
5. Click OK.
The action plan appears in the list.
6. Hover the cursor over the action plan and click the Properties button to define its characteristics.
button to define its characteristics.Properties of an action plan in HOPEX Data Governance
Main characteristics
You can specify the following information:
• Name: action plan name.
• Owner: this field is specified by default by the user who created the action plan.
• Owner Entity: entity responsible for action plan implementation.
• Approver: user responsible for validation of the action plan when all actions are completed.
• Means: text description of means required/desired for action plan execution.
• Priority: enables indication of a level. Priority can be:
• "Low"
• "Medium"
• "High"
• "Critical"
• Origin: enables definition of the context of carrying out the action plan:
• "Audit"
• "Compliance"
• "Event"
• "Risk"
• "RFC"
• "Other".
• Category: the action plan can for example be connected to:
• risk impact reduction
• project management
• process improvement
• control performance improvement
• etc.
• Other values are available.
• Nature: enables definition of whether the action plan is:
• Corrective
• Preventive
• Comment: supplements information on the action plan and its characteristics.
• Steering Calendar: used for sending reminders to the person responsible for an action plan so that they can indicate action plan progress.
• Action Plan Status : indicates at which stage of the workflow the action plan is located.
Financial assertion
• Forecast Cost: action plan cost estimate.
• Forecast Cost (Man-Days): estimate in man-days of action plan implementation workload.
Responsibilities
The user defined as action plan Responsible is responsible for definition of actions to be carried out and their execution.
This section is defined by the action plan creator or the action plan approver.
Success factors
In the Success Factors section, you can specify in text the success indicators enabling assessment of success of the action plan.
Scope?
To position an action plan in its environment, you can associate objects with the action plan in the Scope section.
You can connect objects of the following types:
• controls
• applications
• risks
• entities
• processes
• problems
Milestones
Milestones are key dates of the action plan.
Actions
The owner of the action plan must define actions enabling execution of the action plan. The owner can create actions and assign these.
7. In the Actions section, click New.
8. Fill in the columns associated with the action.
Attachments
You can attach business documents to an action plan: