Creating a Report Template
You can create a Report Template from:
• a Report DataSet
• a GraphSet
• a TreeSet
• a query
Else you can create a Report Template using a Report Data View.
To answer specific needs, you can also implement a Report Template using macro.
Creating a Report Template from a Report DataSet
In HOPEX Power Studio, you can create a Report Template from a Report DataSet.
From the Data page of the Report DataSet, you can launch an Instant Report, then save the report as:
• a report, to get its Report Template
• a Report Data View, to use it in a Report Template
To create a Report Template from a Report DataSet:
1. Access the Report DataSet properties (from Studio > Other Reports > My Report DataSets).
2. Display its Data page.
3. In the Report DataSet section, click Instant Report  .
.
.4. Select the required instant report type.
E.g.: Breakdown (pie chart, bar chart, set of gauges, word cloud), Matrix (bar chart, radar chart, Quantitative (bar chart, line chart, radar chart), Table.
5. Click OK.
The instant report is displayed in the View edit area, Report section.
6. (Optional) You can customize the report display.
7. In the Report section, click More > Save As Report  .
.
.8. Enter a Name to the report.
A report is created and its Report Template is also automatically created. They both have the same name:
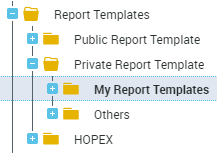
• The Report Template is accessible from Studio > Report Template Definition: Report Templates > Private Report Template > My Report Templates folder.
• The report is accessible in your Home page, from My Reports tile.
Creating a graph-type Report Template from a GraphSet
In HOPEX Power Studio, you can create a Report Template from a GraphSet.
From the Preview page of the GraphSet Definition, you can save the graph as:
• a report, to get its Report Template
• a Report Data View, to use it in a Report Template
To create a graph-type Report Template from a GraphSet:
1. Access the GraphSet Definition properties.
2. Display its Preview page.
3. In the graph, click More > Save as Report.
4. Enter a Name to the report.
The GraphSet is saved as a report.
A report is created and its Report Template is also automatically created. They both have the same name:
• The Report Template is accessible from Studio > Report Template Definition: Report Templates > Private Report Template > My report Templates folder.
• The report is accessible in your Home page, from My Reports tile.
Creating a tree-type Report Template from a TreeSet
In HOPEX Power Studio, you can create a Report Template from a TreeSet.
From the Preview page of the TreeSet Definition, you can save the tree as:
• a report, to get its Report Template
• a Report Data View, to use it in a Report Template
You can save only one tree report at a time:
• a breakdown
• a dendrogram
• a TreeMap
• a TreeTabble
To create a Report Template from a tree report:
1. Access the TreeSet Definition properties.
2. Display its Preview page.
3. Click the renderer type you want to save.
E.g.: Breakdown, Dendrogram, TreeMap, or TreeTable.
4. In the graphic, click More > Save as Report.
5. Enter a Name to the report.
A report is created and its Report Template is also automatically created. They both have the same name:
• The Report Template is accessible from Studio > Report Template Definition: Report Templates > Private Report Template > My Report Templates folder.
• The report is accessible in your Home page, from My Reports tile.
Creating a gauge-type Report Template from a query
In HOPEX Power Studio, you can create a Report Template from a query (without parameters). This Report Template enables to create gauge reports.
To create a gauge-type Report Template from a query:
1. Connect to HOPEX Studio desktop.
2. Click the navigation menu and select Studio > Queries  .
.
.3. In the Queries without mandatory parameters list, right-click a query and select New gauge report.
4. In the Name field, enter a name for your report.
5. Click OK.
The gauge report is displayed and its Report Template (with associated Report Value View) is also automatically created. They all have the same name:
• The Report Template is accessible from Studio > Report Template Definition: Report Templates > Private Report Template > My report Templates folder.
• The report is accessible in your Home page, from My Reports tile.
• The Report Value View is accessible from Studio > Report Template Definition: Public Report Data Views.
Creating a Report Template using a Report Data View
You can create a Report Template right away including a Report Chapter with a Report Data View saved in the Public Report Data Views folder.
Prerequisite: your Report Data View is created.
To create a Report Template using a Report Data View:
1. Access the Report Templates folders.
2. Right-click My Report Templates folder, and select New > Report Template.
Your Report Template Basic Properties window appears.
3. In the Name field, enter your Report Template name.
4. In the drop-down list select the Report Data View you want to fill your first chapter with.
5. Click OK.
The Report Template is created with a single chapter based on the Report Data view selected.
You can:
• add other chapters.
• customize the Report Template.
Implementing a Report Template using a macro
To build your report chapters, you can use an existing macro on condition that parameters are compatible.
To implement a Report Template using a macro:
1. Access the Report Templates folders.
2. Right-click My Report Templates folder, and select New > Report Template.
The Basic Properties page appears.
3. In the Name field, enter your Report Template name.
Example: Application
4. Click Next.
The Parameters definition wizard appears.
Parameter definition indicates the input data type the user must enter for the report calculation (e.g.: Applications).
For each parameter define the available object type that can be instantiated for the report (parameter with HOPEX objects or with simple types).
5. Click Next to continue the Report Template definition:
The Chapters definition wizard appears.
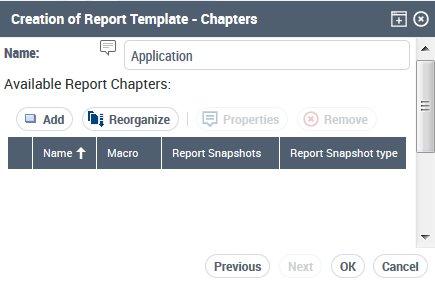
6. Click Add  .
.
. 7. In the Name field, enter the Report Chapter name.
To build your report chapters, you can use an existing macro, provided that parameters are compatible.
MEGA provides in particular the " Analysis - Set of Parameters" macro, which describes report template parameters and the way in which they are interpreted by the report chapter.
Macros have a comment available in the form of a system note.
8. Click Next.
9. In the Based on field, select "Macro".
10. In the Macro field, click the right-oriented arrow and select Add Macro.
11. In the Name field, enter a name for the macro.
12. Click Next.
13. Select Create a Java Macro and click Next.
14. In the Setup JAVA Macro:
• In the Class Name field, enter the class defined in Eclipse when developing the Java macro.
• In the Package Name field, enter the macro path.
Example: "com.mega.modeling.analysis.reports" for those supplied by MEGA.
15. Click OK.
The macro name appears in the Macro field.
The macro appears in the Report Template tree, under the Report Chapter concerned.
ted.
You can:
• add other chapters.
• customize the Report Template.