Describing the Steps of a Customer Journey
A customer journey is described by several sequenced steps.
You can, for example, proceed as follows:
Creating the customer journey steps in tabular input mode
Create a customer journey step
To create a step using tabular entry mode for a customer journey:
1. Click the Step tab.
2. Click New.
The Choose Object Type window appears.
3. Select Steps and click OK.
The new step appears in the list of journey phases.
4. Click on the name of the step to update it.
The step created appears in the diagram outside of the phase area.
Create several steps simultaneously
To create several steps in tabular input mode simultaneously:
1. Click on the step starting from which you wish to create the other steps.
2. Click the Multiple Add button.
A creation window appears.
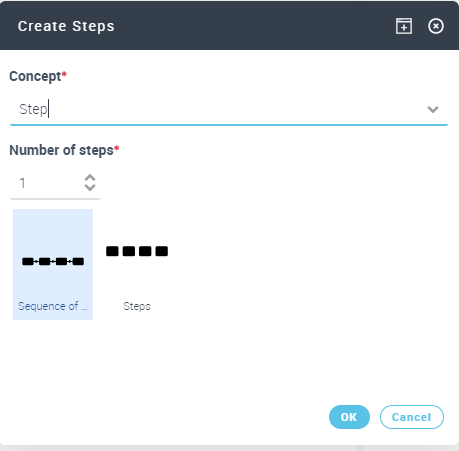
3. Enter the Number of Steps you wish to create.
4. Choose Sequenced Steps or Independent Steps.
5. Click OK.
Organizing the customer journey steps in tabular input mode
By default, steps are not associated with phases and they are not sequenced.
Defining the sequencing of a customer journey
To define the sequencing order of the steps of a customer journey, you must specify the list of predecessors at each step.
To specify the predecessor of a step of a customer journey from its diagram:
1. Click the Steps tab to access the list of diagram steps.
2. Select the step concerned and click OK.
A window opens with the list of steps of the diagram that can be connected.
3. Select the step concerned.
4. Click outside of the selection pane of the steps.
The organization of the steps in the diagram are automatically updated. Connections are created between each other.
Specify the phase of a customer journey step
To specify that a customer journey step is performed within the context of a journey phase:
1. Click the Steps tab to access the list of diagram steps.
2. Select the step that you want to connect to a phase and and click Phase.
Use the down arrow to easily access the list of customer journey phases.
3. Select a phase in the list proposed.
The step is moved to the swimlane that corresponds to the phase.
Defining the channels in a customer journey
The channels of a customer journey are also linked to the steps of the journey that uses them.
To create a customer journey channel in tabular input mode
1. Click the Steps tab of the mapping of the customer journey to access the list of steps of the customer journey.
2. Select the step that you want to connect to a channel and click Channel.
3. Click the right facing arrow and select the Create Channel command.
The Creation of Channel window appears.
4. Enter the Name.
5. Click OK to close this creation window.
The channel is created and appears in the list. The step is automatically moved to the line that corresponds to the channel.
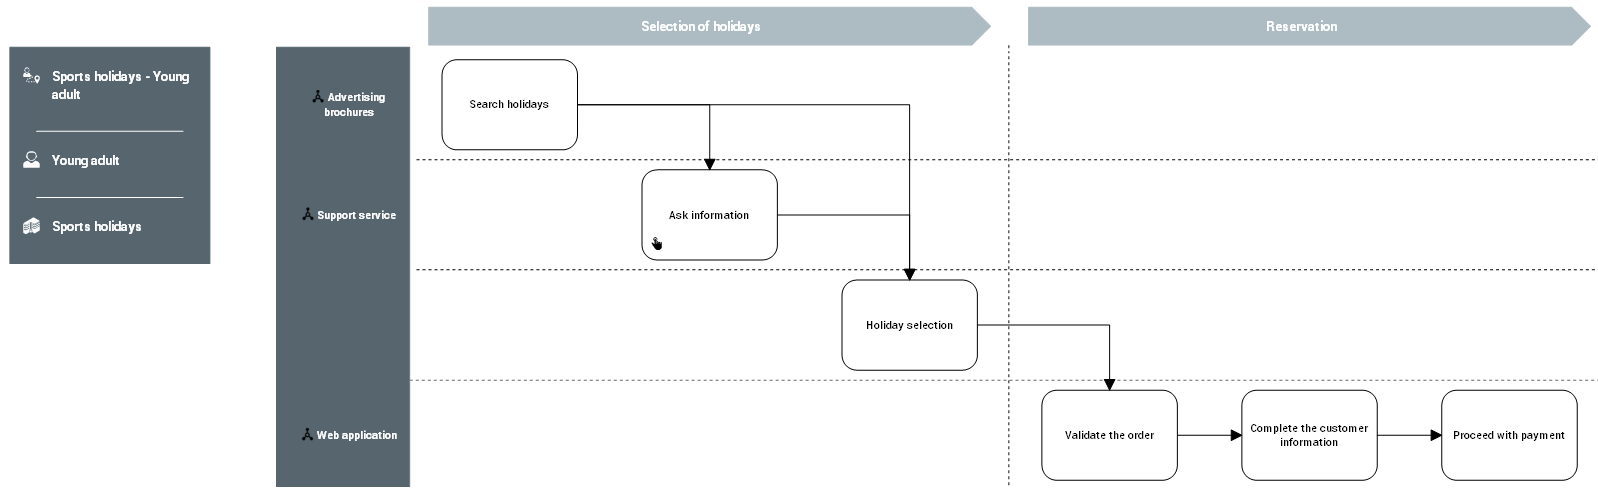
Diagram of customer journey with steps and channels