Creating Users
A user depends on an environment. To create a user, you must connect to the environment to which the user will be attached.
A user is a person with a login. To create a user, you must create a person with its login, or create the login of a person already created.
Once the user is created, he/she automatically receives an e-mail to define his/her connection password.
E-mail of the user:
• If the e-mail of the user is entered after the user creation: initialize the user Web account, so that the user receive the email to define his/her password.
• If the user does not have an email, see Defining a Temporary Password to a User.
You can create the person as follows:
• not predefined
• predefined with one of the following criteria:
• the group to which the person belongs
• a profile
• a writing access area
• a reading access area (if reading access management is activated)
To create a user:
1. Access the User Management pages.
2. You can create:
• either a non-predefined person:
Select the Persons sub-folder then in the edit area go to step 4.
• or a person predefined with a characteristic:
Select the sub-folder:
Persons by group to create a person automatically connected to the group that you are going to select.
Persons by profile to create a person and automatically assign this person the profile that you are going to select.
Persons by writing access area (available if several writing access areas are available) to create a person automatically connected to the writing access area that you are going to select.
Persons by reading access area (available if reading access management is activated) to create a person automatically connected to the reading access area that you are going to select.
3. In the edit area, select the group, the profile, the writing access area or the reading access area that you want to connect to the person.
4. Click New  .
.
.The Creation of Person - Characteristics dialog box opens.
5. In the Name field, enter the name of the person.
E.g.: WOODS William
6. In the E-mail field, enter the e-mail address of the person.
7. In the Login field, enter a login.
E.g.: WWS
8. (If available) In the Password field, enter a temporary password for the user.
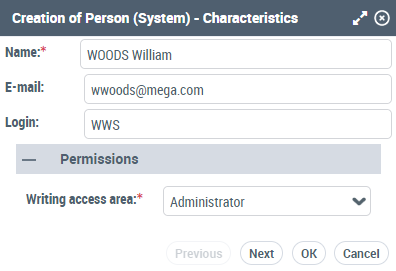
9. (With the HOPEX Power Supervisor technical module) Using the drop-down menu in the Writing Access Area field, select the value of the writing access area of the user.
10. (If required, with the HOPEX Power Supervisor technical module) Using the drop-down menu in the Reading Access Area field, select the value of the reading access area of the user.
11. Click Next.
The Creation of Person - profiles dialog box opens.
12. In the Repository field, select the repository in which you want to assign the profile to the person.
13. Select the profile you want to assign to the person.
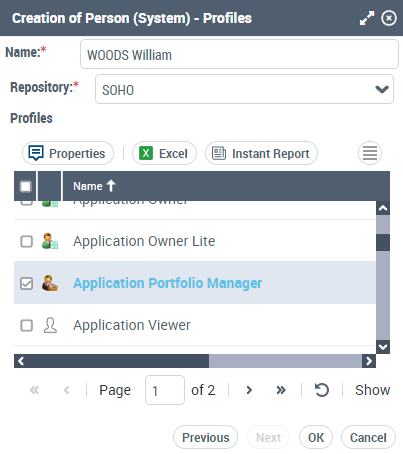
14. Click OK.
The user is created and added to the list of persons.
The user receives an email to define his/her password.
