Upgrading HOPEX programs
The Corrective Pack installation program is an .MSP file embedded as an .EXE file.
Example: HOPEX_V4.00.01.exe.
It must be installed on each machine where the version HOPEX V4 has been previously installed. The components initially installed (HOPEX Kernel and/or IIS components) will be updated.
|
Front-end
|
Deployment
|
Target machine
|
|
Web Front-end
|
Standalone deployment
|
Unique Server where HOPEX programs are installed
|
|
Web Front-end
|
Cluster deployment
|
Each application server of the cluster where HOPEX programs are installed
• HOPEX Front-end
• HOPEX Back-end
• SSP
|
|
Windows Front-end
|
Standard deployment (for customization only)
|
Each workstation where HOPEX programs are installed
|
|
Deployment
|
Machine
|
Windows Service
|
IIS Web site (1)
|
HOPEX processes
|
|
Web standalone deployment
|
Unique server
|
Yes
|
Yes
|
Yes
|
|
Web cluster deployment
|
Server running SSP
|
Yes
|
Yes
|
Yes
|
|
Server running HOPEX Front-end
|
No
|
Yes
|
No
|
|
|
Server running HOPEX Back-end
|
Yes
|
Yes
|
Yes
|
|
|
Windows standard deployment
|
Each workstation
|
No
|
No
|
Yes
|
(1) By default, an application 'HOPEX' is configured for 'Default Web Site'.
Upgrading Web Front-end
Pre-install
• Identify the target machine(s).
The machine varies with the chosen deployment: see the above table.
The machine varies with the chosen deployment: see the above table.
• Archive key configuration file of IIS application (web.config file) and HOPEX installation (Megasite.ini).
• Login in as administrator of the machine.
• Verify ‘Control Panel > Administrative tools > Services'.
On the SSP server, the service HOPEX Site Service Provider must be set to 'Stopped'.
On the SSP server, the service HOPEX Site Service Provider must be set to 'Stopped'.
On all the servers, the service HOPEX Service Watchdog must be set to 'Stopped'.
• Verify ‘Internet Information Services (IIS) Manager'.
The web site hosting the IIS applications (by default it is 'Default Web Site') must be stopped.
The web site hosting the IIS applications (by default it is 'Default Web Site') must be stopped.
• Verify the Task Manager.
No HOPEX process (mgw*.exe, or HOPEX*) must be running.
No HOPEX process (mgw*.exe, or HOPEX*) must be running.
• Verify 'Control Panel > Add or Remove programs'.
The required update level must be installed.
For example, HOPEX V4 is a requirement before installing Corrective Pack 1 on HOPEX V4 (HOPEX_V4.00.01.exe).
The required update level must be installed.
For example, HOPEX V4 is a requirement before installing Corrective Pack 1 on HOPEX V4 (HOPEX_V4.00.01.exe).
Note: you can also use the utility Hopex Server Supervisor and R click > HOPEX > Stop HOPEX Processes Services and Web Application.
Procedure
For each machine:
1. Select the .EXE file of the Corrective Pack.
Example: Select HOPEX_V4.00.01.exe.
2. R click > Run as administrator or Open.
The wizard can take more than one min to load.
3. Click Update >.
The installation process can take one minute to initialize.
Wait until the processing is complete.
4. Click Finish.
Notes:
o The location of the installation folder can be found after a search is conducted in the machine registry. This location is not visible on the machine during installation or in the control panel.
o If the expected update level is not identified for the HOPEX programs registered on the machine, an error is displayed.
Upgrading HOPEX Data
Most changes apply to HOPEX programs. However, some changes apply to the systemdb repository. It is therefore necessary to update all HOPEX environments to benefit from all the changes and fixes. The procedure varies depending on the storage.
Pre-upgrade
• Verify that no workspace exists in read/write mode.
• Verify ‘Control Panel > Administrative tools > Services'.
On the SSP server, the service HOPEX Site Service Provider must be set to 'Stopped'.
On the SSP server, the service HOPEX Site Service Provider must be set to 'Stopped'.
On the all servers, the service HOPEX Service Watchdog must be set to 'Stopped'.
• Verify the Task Manager.
No HOPEX process (mgw*.exe, or HOPEX*) must be running.
No HOPEX process (mgw*.exe, or HOPEX*) must be running.
Procedure
With RDBMS storage, the technical format of the system repository and data repositories may change when installing update. In this case, a warning is displayed:
You cannot access repository XXX. Its internal structure is not up to date. …

For each HOPEX environment:
1. Start the Administration Console (Administration.exe).
2. Select the environment to be upgraded.
3. R click > Open.
4. If a warning is displayed (You cannot access repository "SystemDb". Its internal structure is not up to date. …), click 'Cancel', then :
• Select the environment in the administration tree.
• R click > Perform SQL conversions on the repository
A window 'MEGA RDBMS Technical Conversion' is displayed.
A window 'MEGA RDBMS Technical Conversion' is displayed.
• Click 'OK'.
• Wait until the processing is complete (it takes a few minutes) and click 'Close'.
5. Select the environment to be upgraded.
6. R click > Open.
7. Login with the System identifier.
8. If warnings are displayed (“You cannot access repository "XXX". Its internal structure is not up to date…”), for each data repository (ex: ProductionData):
• Select the data repository in the administration tree.
• R click > RDBMS Administration > Perform SQL conversions on the repository.
A window 'MEGA RDBMS Technical Conversion' is displayed.
A window 'MEGA RDBMS Technical Conversion' is displayed.
• Click 'OK'.
• Wait until the processing is complete (it usually takes a few minutes) and click 'Close'.
9. Select the environment
10. R click > Environment automatic update
A wizard 'Environment updating center - Welcome' is displayed:
A wizard 'Environment updating center - Welcome' is displayed:

11. Read the information, check the option 'I have taken note of the above text' then click Next. A list of actions is displayed. It is recommended to keep them checked.
12. Click Run to start the update. Duration can vary according to various parameters (source and target versions, infrastructure performances, number of data repositories). It usually lasts about 15 min. A list of reports is displayed (one tab for each action).
13. Review reports and click Close to exit the wizard.
14. Close the environment.
15. Exit the Administration Console.
Post-installation and data upgrade
• Verify that data reading access compilation (ex-confidentiality) if necessary.
See below.
See below.
• Update HOPEX configuration if necessary.
See below.
See below.
• Verify ‘Control Panel > Administrative tools > Services'.
On the SSP server, the service HOPEX Site Service Provider must be set to 'Automatic (Delayed Start)' and be started.
On the SSP server, the service HOPEX Site Service Provider must be set to 'Automatic (Delayed Start)' and be started.
On the all servers, the service HOPEX Service Watchdog must be set to 'Automatic (Delayed Start)' and be started.
• Verify ‘Internet Information Services (IIS) Manager'.
The web site hosting the IIS applications (by default it is 'Default Web Site') must be started.
The web site hosting the IIS applications (by default it is 'Default Web Site') must be started.
Note: you can also use the utility Hopex Server Supervisor and R click > HOPEX > Restart HOPEX Processes Services and Web Application.
Verify data reading access compilation (ex-confidentiality) if necessary
If you use data reading access management feature (ex-confidentiality), check that data reading access is compiled
1. Start the Administration Console (Administration.exe).
2. Select the environment to be upgraded.
3. R click > Open.
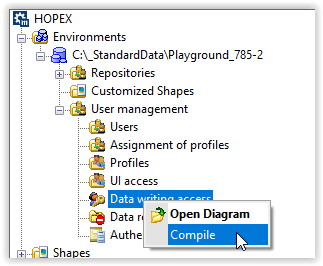
• In the administration tree, select the folder User management > Data writing access.
• R click > Compile
Wait for end of processing (compilation completed)
Wait for end of processing (compilation completed)
4. Exit the Administration Console (Administration.exe).
Note this feature is not active by default
Check configuration files
Web.config files are created for IIS Applications when installing HOPEX from a master.
Such files can possibly be updated by a CP installation.
It is therefore recommended to compare new web.config files with archived web.config files.
Verify compilation state
Environment automatic update does not compile permissions.
If permissions where not compiled or are left uncompiled after environment automatic update, it is required to compile them again.
1. Start the Administration Console (Administration.exe).
2. Select the environment to be upgraded.
3. R click > Open.
• In the administration tree, select the environment
• R click > Metamodel > Translate and Compile
• Review the status for the following options
1. Compile Metamodel
2. Compile Technical data
3. Compile Permissions…
• If 3 checkboxes are unchecked, click Cancel to exit
• If one checkbox at least is checked, click Start to trigger compilation.
Wait for end of processing (compilation completed)
Wait for end of processing (compilation completed)
4. Exit the Administration Console (Administration.exe).