Using Design Tasks
A design task enables assignment of execution of work to be done in the modeling repository. The design task assures traceability and check of work carried out by modelers by associating dispatched modifications with a motive.
Management of design tasks integrated in HOPEX improves control and analysis of repository modifications. In particular it is used to:
• check user dispatch rights (the user can be obliged to associate private workspace modifications with a design task).
• identify modifications to be transferred from one repository to another.
Prerequisites for using design tasks
To be able to use design tasks, you must:
• Activate task management.
• Activate the logfile of the repository and/or the system repository for which you want to keep history of modifications associated with tasks.
To activate task management:
1. From the administration application, open the desired environment.
2. Right-click the environment and select Options > Modify.
3. In the Collaborative Environment > Change Management option group, select the "Enabled" value for the Associate modifications with a design task option.
Task management is activated.
The Associate modifications with a design task, option has three values:
• if task management is Disabled, the user cannot dispatch his/her private workspace as a task
• if task management is Enabled, the user can use tasks, and can choose whether or not to associate a task with the work dispatched
• if task management is Mandatory, the user can only dispatch his/her work by associating it with a task.
When dispatching the private workspace as a task, the user associates all dispatched modifications with the assigned task.
Design Task Workflow
HOPEX delivers a design task management workflow as standard. This workflow enables management of the life cycles of the different assigned design tasks.
According to this standard workflow:
• A design task is created.
• It can be:
• assigned to a user responsible for its execution (the executor): it passes from status New Task to status Assigned Task.
• assigned later
• The executor can:
• complete the design task:: it passes to status Completed Task
• request its reassignment.
The creator of the design task can reassign it to another user.
• A reviewer can decide to reassign a design task to another user.
The design task then passes from status Completed Task to status Assigned Task.
• A design task in Completed Task status can be:
• approved: it passes to status Approved Task.
• refused: it passes to status Refused Task.
Accessing Design Tasks
In HOPEX Web Front-End
To access design tasks:
HOPEX enables you to view:
• tasks to complete: these are tasks assigned to the current user
• tasks to validate: these are tasks that the current user must validate, or not
• requested tasks: these are all design tasks assigned to the current user
In HOPEX Windows Front-End
To access design tasks:
1. Click View > Navigation Windows > Collaboration.
2. In the Collaboration navigation window, select one of the task categories mentioned above.
To view design tasks connected to a project:
The project sub-folder includes tasks connected to the project.
Creating Design Tasks
To create a design create:
1. See Accessing Design Tasks.
2. Click one of the following buttons:
• (Windows Front-End) In the Collaboration navigation window, click Assign a Task  .
.
.• (Web Front-End) In Collaboration > My Tasks, select Expected Tasks in the drop-down menu and click 
The dialog box for creating a design task appears.
3. Enter the name of the design task.
4. If applicable, specify the design task motive and due date and the EA project connected to the design task, then click OK.
5. In the dialog box that appears, specify if you want to:
• create the task and assign it
• create the task and assign it later
6. In the next dialog box, enter a comment and click Next.
7. Select the user who must execute the task and click Finish.
The design task is created and if specified, assigned to the selected user.
Specifying design task motive
Design tasks can be created from:
• a request for change
• a requirement
These two object types constitute the motive of a design task.
It can be useful, from a request for change, to create and assign a design task to the person responsible for its execution.
To create a design task from its motive (here, a request for change):
1. See Accessing Requests for Change.
2. Expand the navigation folder corresponding to the request for changes.
3. (Windows Front-End) Right-click the desired change request and select New > Design Task.
4. (Web Front-End) In the page corresponding to your change request, click Expand to create a design task.
5. In the dialog box that appears, enter the name of the design task and indicate the task due date.
6. Click OK.
7. In the dialog box that appears, specify if you want to:
• create the task and assign it
• create the task and assign it later
8. Enter a comment for the design task, then click Next.
9. Select the design task assigned user if required, then click Finish.
The design task is created.
Creating a design task from a project
Design tasks can be created in the framework of a project.
To create a design task from a project:
1. In the Projects navigation window of the Enterprise Architecture desktop, right-click a project and select New > Design Task.
2. In the dialog box that appears, enter the name of the design task.
3. Enter the design task motive and due date if required.
4. Click OK.
5. In the wizard that appears, indicate if you want to assign the design task or not to a person responsible for its execution.
6. Enter a comment and click Next.
The design task is created and connected to the project.
A design task workflow instance is triggered.
Assigning and Aborting a Design Task
Assigning a design task later
When you created the design task, you were able to create it without immediately assigning it.
To assign a design task after creation:
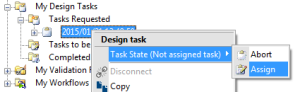
 . In the right part of the window, click on the button used to move on to the next step in the workflow.
Discarding a design task
If a design task has been created but not immediately assigned, it can be aborted.
To abort an unassigned task:
. In the right part of the window, click on the button used to move on to the next step in the workflow and select Abandon.Viewing design task properties (Windows Front-End)
To consult design task properties:
The Characteristics tab allows you to view:
• in the Standard subtab: the design task assigned user.
• in the Advanced subtab:
• the assigner
• the project with which the design task is associated
• the design task motive (requirement or request for change)
• the assignment date
• the completion date (date on which task is completed)
• the resolution date (date on which task is validated)
• the design task due date
The Workflows tab lets you consult the history of triggered workflow transitions:

Selecting a design task (Windows Front-End)
Once a private workspace is open, you can select the design task with which modifications to the current private workspace will be associated.
To select the design task associated to the current private workspace:
Dispatching as a Design Task
A user can dispatch work in a private workspace as an assigned design task if the task management function is activated.
When dispatching work in the private workspace as a task, the user associates all dispatched modifications with the assigned task.
To dispatch work in a private workspace as a design task:
1. In the following desktop:
• HOPEX Windows Front-End, select File > Dispatch.
• HOPEX Web Front-End, save and quit while dispatching.
2. In the dialog box that appears, select the required design task if you have not already done so.
3. If this dispatch contains all the modifications necessary for resolution of the design task, select the Complete Task check box.
4. Select Yes.