Using Assessment Campaigns
See also: Steps of assessment workflow with campaign.
Creating Assessment Campaigns
You can create an assessment campaign:
• From a template
Creating a campaign from a template allows:
• factorization and application of the same template to all assessment sessions
• campaign planning and distribution of elements to be controlled between the different assessment sessions
• without a template
Creation of a campaign without a template offers greater flexibility and enables definition of a different template in each session.
To create a campaign:
1. In the Assessment Definition tree, select Assessment Campaign > New.
The campaign creation page appears.
2. In this page, indicate:
• the Campaign Owner
• the Assessment Template
• a calendar
• a Begin Date and End Date
3. Click Next.
4. If you have selected an assessment template, select the Assessed Parameter that corresponds to the object from which the object list to be assessed will be established.
5. In the preview window, click Refresh the Report.
Elements that will be assessed appear.
In particular, you can view:
• assessed characteristics (defined in the assessment template)
• assessed objects (controls)
• the context objects (processes or entities, for example)
• assessment nodes, corresponding to objects to be assessed placed in different context objects, associated with respondents.
• respondents
6. Click OK.
Deploying Assessment Campaigns
Campaign deployment consists of creating assessment nodes with a view to planning campaign sessions.
To deploy a campaign:
1. In the list of campaigns, click the icon of the campaign you created and select Assessment Campaign (In Preparation) > Deploy.
2. In the deployment window, indicate that you want to deploy the campaign Now.
The other choices are:
• as soon as possible (after dispatch)
• at a later date
3. Click OK.
The assessment nodes are created.
You can now define assessment campaign scope. See Defining assessment campaign scope.
Defining assessment campaign scope
Having deployed the assessment campaign, you must validate the scope, that is, select the assessment nodes you want to include in your campaign.
To access the campaign scope and validate the assessment nodes:
1. In the properties of the campaign, select the Effective Scope tab.
The list of assessment nodes from your deployment appears.
2. Select the values you want to remove from the campaign and click the Validate button.
You must also specify respondents.
Planning Assessment Campaigns
When campaign scope has been defined and validated, the session is in "To Be Planned" status. You can then plan campaign sessions.
This consists of distributing assessments between the different assessment sessions.
To plan the campaign:
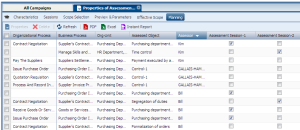
1. In the properties of the assessment campaign, select the Planning tab.
2. In the right pane, select the assessment sessions in which you want to assess which object in its context (process or entity for example).
Validating Assessment Campaigns
When you have planned the assessment campaign, you must validate it.
The effect of assessment campaign validation is to freeze its parameters (for example scope or planning).
To validate the campaign:
You can now prepare start of assessment sessions. See Creating a Session From a Campaign.
Creating a Session From a Campaign
You can create an assessment session from a campaign if the campaign is not started automatically.
If an assessment template is connected to the campaign, the session is created from this template. Otherwise, you must specify the creation mode of the assessment session.
To create an assessment session from a campaign connected to an assessment template:
1. Open the properties page of the campaign and select the Sessions tab.
A report on planning of sessions in progress appears at the top of the edit area.
2. In the Assessment Session section, click New.
The session creation page appears.
3. Indicate the Name of the session.
4. The Session Manager is initialized with the name of the user that created the session, but this value can be modified.
5. Click Next.
6. Select the name of the entity (or process, depending on the assessment template used) from which the list of objects was established.
7. Click Next.
A preview report of scope calculated for the session is presented for information.
8. Click OK.
Having planned and validated your campaign, you can deploy assessment sessions created from the campaign.
Session deployment consists of preparing creation of questionnaires to users.