Common configuration
This section describes configurations that will be necessary for standard deployment or Citrix/TSE deployment.
Checking the HOPEX License
Consult your sales representative to obtain a license. You will get a license file and instructions to install it.
|
License type
|
Requirement
|
|
Must license (.must)
|
• It should be installed in the UNC folder for which it has been programmed. Example: folder \\server001\Apps\Licenses containing the file License-000001.must.
• The must license folder must be accessible with full control to all Windows users that should share this configuration.
|
|
Elf license (.elf)
|
• It should be installed in a shared folder. Example: folder \\server001\Apps\Licenses containing the file License-000002.elf
• The Elf license file must be accessible with at least read access to all Windows users that should share this configuration.
|
For more details about HOPEX license, see the article 'Must License Installation Guide HOPEX V2R1 EN'.
Creating a shared configuration folder
The configuration of the HOPEX installation can be local or shared:
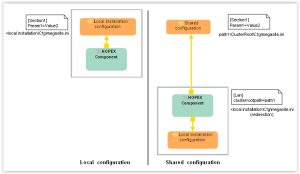
When Windows Front-End is run by an end-user:
1. A configuration file (Megasite.ini) is read.
2. If it contains a redirection (clusterrootpath=YYY, ex clusterrootpath=\\mega\data), a different configuration files (Megasite.ini) is read in the shared folder.
Procedure:
• Create and share a folder that will contain configuration files (Example: \\mega\data\ClusterRoot\Cfg).
• Manually create a text file called 'megasite.ini'.
Notes:
• The folder must be accessible with full control to all Windows users that should share this configuration.
• The file megasite.ini must be copied in a subfolder (\ClusterRoot\Cfg) of the path set for clusterrootpath. Ex: \\mega\data\ClusterRoot\Cfg\megasite.ini
• The file megasite.ini should at least contain a section for the license, according to the type of license used. See below:
|
License type
|
Example
|
|
Must license (.must)
|
[Must license]
Path = \\server001\Apps\Licenses
|
|
Elf license (.elf)
|
[MegaLicenseFile]
FileLongName = \\server001\Apps\Licenses\License-000002.elf
|
If you do not have the technical skills or the authorization required for this step, contact your system administrator.
Copying the installation program on a network folder
You need to copy the HOPEX installation programs (often called ‘installation master') on a network folder. Example: \\Srv001\Master\HOPEX
This folder contains a subfolder \DISK1\HOPEX V2R1.msi.
Important notice:
Choose a folder that persists in time (do not delete it after installation). Indeed this path will be saved in the registry of the machines where HOPEX programs are installed. When such installations are upgraded (CP upgrade), this path can be tested and errors can occur if the master is no longer available.
Building an installation command line
Installing on several machines requires batching the execution of an installation command line.
The command line should be executed with the privilege 'Run as administrator'.
Execute the command line with the privilege Run as administrator:
With recent operating system it is required that the installation is performed not only by a user that belongs to the group of 'Administrators' but also that the installation program is executed with the privilege 'Run as administrator'.
It is important to verify that, in the procedure used, the .MSI/.MSP program is executed with the privilege 'Run as administrator'. Otherwise, the HOPEX Programs may not be fully installed or upgraded and various problems can occur especially with HOPEX Web Front-end.
Different procedures are available and only one is described below:
• Create a text file with the .Bat extension.
• Edit the .Bat file, add the command lines and save the file.
• Select the .Bat file and right-click > Run as administrator.
Full installation command line syntax for HOPEX V2R1.msi:
<path of msiexec.exe> /package "<Folder of the HOPEX MSI file>\HOPEX V2R1.msi" /passive /levw "<path of installation log>"
SELECTED_LANGUAGE="<language code>"
ADDLOCAL="<feature list>" REMOVE="<feature list>"
ALLUSERS="1"
INSTALLDIR="<installation path>"
CLUSTERDIR="<configuration folder>"
HOPEXDIR="<installation path of IIS HOPEX application>"
HOPEXMWAS="<installation path of IIS MWAS>"
MSSPDIR="<installation path of IIS SSP>"
IS_NET_API_LOGON_USERNAME_HOPEX="<HOPEX service account name>" IS_NET_API_LOGON_PASSWORD_HOPEX="<HOPEX service account password>"
IS_NET_API_LOGON_USERNAME_API="<HOPEX API service account name>" IS_NET_API_LOGON_PASSWORD_API="<HOPEX API service account password>"
WEBPORTAL_USERNAME="<name of administrator of the machine>"
WEBPORTAL_PASSWORD="<password of administrator of the machine>"
WITHSSL="<0 or 1>"
|
Element
|
Comment
|
|---|---|
|
/package "<Folder of the HOPEX MSI file>\HOPEX V2R1.msi"
|
Required. To specify the path of the .msi file. Ex: \\Srv001\Master\HOPEX\DISK1\HOPEX V2R1.msi.
|
|
/passive
|
Optional. To trigger not interactive mode
|
|
/levw "<path of installation log>"
|
Optional. To generate installation log
Ex: /levw "C:\tmp\ScriptInstall.log"
|
|
SELECTED_LANGUAGE="<language code>"
|
Optional (English by default). To control installation language. Languages codes: 1031 (German language), 1033 (English language), 1036 (French language), 1040 (Italian language)
|
|
ADDLOCAL="<feature list>" REMOVE="<feature list>"
|
Recommended. To list the features to install: feature X, feature Y… See table 'Complete list of installation features' later in this document
|
|
INSTALLDIR="<installation path>"
|
Optional. To control target folder of HOPEX core programs. Ex: C:\Apps\MEGA\HOPEX
|
|
CLUSTERDIR="<root configuration folder>"
|
Optional (empty by default). To set a root configuration folder for the installation
Ex: "\\mega\data"
|
|
HOPEXDIR="<installation path of IIS HOPEX application>"
|
Optional (by default C:\inetpub\wwwroot\HOPEX). To control target folder of IIS HOPEX application folder when installing Web Front-End.
Ex: C:\Apps\MEGA\wwwroot\HOPEX
|
|
HOPEXMWAS ="<installation path of IIS MWAS>"
|
Optional (by default C:\inetpub\wwwroot\HOPEXMWAS). To control target folder of IIS MWAS folder when installing Web Front-End.
Ex: C:\Apps\MEGA\wwwroot\HOPEXMWAS
|
|
MSSPDIR="<installation path of IIS SSP>"
|
Optional (by default C:\inetpub\wwwroot\MegaSSP). To control target folder of IIS SSP folder when installing SSP.
Ex: C:\Apps\MEGA\wwwroot\MegaSSP
|
|
IS_NET_API_LOGON_USERNAME_HOPEX ="<HOPEX service account name>"
|
Required with HOPEX Web Front-End
Ex: mydomain\myuserhopex
|
|
IS_NET_API_LOGON_PASSWORD_HOPEX="<HOPEX service account password>"
|
Required with HOPEX Web Front-End
Ex: mypasswordhopex
|
|
IS_NET_API_LOGON_USERNAME_API="<HOPEX API service account name>"
|
Required only to deploy web services with HOPEX Web Front-End.
Ex: mydomain\myuserhopexapi
|
|
IS_NET_API_LOGON_PASSWORD_API="<HOPEX API service account password>"
|
Required only to deploy web services with HOPEX Web Front-End.
Ex: mypasswordhopexapi
|
|
WEBPORTAL_USERNAME="<login of administrator of the machine>"
|
Required to control access later. Choose the name of administrator of the machine
Ex: mydomain\myadminuser
|
|
WEBPORTAL_PASSWORD="<password of administrator of the machine>"
|
Required to control access later. Choose the password of administrator of the machine
Ex: mydomain\myadminpassword
|
|
WITHSSL="<0 or 1>"
|
0 to disable SSL at installation
1 to enable SSL at installation
If no certificate is installed on the web server, disable installation with SSL. This can be configured after installation.
|
You can use such a command line to install HOPEX Windows Front-End and/or HOPEX Web Front-End. The appendix of this document contains:
• Examples of command line for Web Front-End.
• A complete description of installation features.
See also Microsoft documentation, for example:
Installing a test environment
A HOPEX Environment is required to run connection scenarios. To facilitate this step, it is created in the GBMS storage format. It can also be created in the RDBMS storage format. Of course, the HOPEX Environment used for production can be created in the RDBMS storage format.
For more details about RDBMS storage format, see the article 'RDBMS Repository Installation guide HOPEX V2R1 EN'.
Pre-requisites:
• 800 MB free space on a shared folder.
On the server disk, create a folder (example \\svrname\data) and share it with a few end-users (full control).
• Local HOPEX installation.
Procedure:
From the File Server:
• Run Administration.exe
Example: C:\Program Files (x86)\MEGA\HOPEX V2R1\Administration.exe
• In the tree, select the 'Environments' folder.
• Right-click > New.
• A window 'Environment installation (Create/Update)' is displayed.
o Enter a value for 'Name:', (example: 'TestEnvironment').
o For 'Location:', select the shared folder (example \\svrname\data).
o For 'Repository storage support', keep 'Gbms'.
o Click 'OK' and wait until installation is complete.
• In the tree, select the 'Environments' folder.
• Right-click > Open.
• In the window Identification, enter the identifier System (no password) and click 'OK'.
• In the tree, below the environment, select the 'Repositories' folder.
• Right-click > New.
• A 'Create repository' window is displayed.
o Enter a value for 'Name:', (example: 'TestRepository').
o For 'Repository storage support', keep 'Gbms'.
o Click 'OK' and wait until installation is complete.
• Exit the Administration Console with Menu File > Exit.
Post installation scenarios
Once HOPEX Programs and HOPEX Licenses are installed, it is important to verify that connection to the Windows Front-End is technically possible.
A HOPEX Environment and a HOPEX Repository are required. If no environment or repository is available at this step, see the section 'Installing a test environment' in this document.
|
Scenario
|
Steps
|
|---|---|
|
Scenario #1
• Check license
• Connection to Administration console
|
• Run Administration.exe.
A window 'HOPEX - Administration' is displayed
• Click the menu help > About HOPEX
A window 'About HOPEX is displayed
• Check the type (ex: Must license) and name (ex: 'License HOPEX.must') of the license in the bottom of the page (1).
If you can run Administration console and display the name of the licence, test is a success. Otherwise, test is a failure.
• Select the test environment
Ex: xx\TestEnvironment.
• R click > Open
• In the window Identification, enter the identifier System (no password) and click 'OK'.
If you can display the folders 'Repositories', 'Customized Shapes' and 'User accounts', test is a success. Otherwise, test is a failure.
• Click the menu File > Exit.
|
|
Scenario #2
• Connection to Windows Front-End
• Check dispatch
|
• Run HOPEX.exe.
• In the window 'Connection to HOPEX', enter the identifier Mega (no password) and click 'OK'.
A window 'HOPEX' is displayed
• Select a repository
Ex TestRepository
• Select the profile 'Enterprise Architect' and click 'OK'.
The desktop is loaded
If the desktop is displayed, test is a success. Otherwise, test is a failure.
• Click the menu View > Navigation Window > Home
A tab 'Home' is displayed
• Select the library 'MEGA' (icon of open blue book)
• Right-click New > Sub-library and confirm creation
• Click the menu File > Exit and answer 'Yes' to the question 'Do you want to dispatch modifications?'
If the object is created and the dispatch is correct, test is a success. Otherwise, test is a failure.
|
|---|---|
|
Scenario #3
• Check creation of diagram
|
• Run HOPEX.exe.
• In the window 'Connection to HOPEX', enter the identifier Mega (no password) and click 'OK'.
A window 'HOPEX' is displayed
• Select a repository
Ex TestRepository
• Select the profile 'Enterprise Architect' and click 'OK'.
The desktop is loaded
• Click the menu View > Navigation Window > Home
A tab 'Home' is displayed
• Select the library 'MEGA' (icon of open blue book)
• Right-click New > Sub-library and confirm creation
• For this Library object, right-click New > Diagram.
A wizard called 'New diagram' is displayed.
o Check that it is possible to select 'Library diagram' and to click 'Create' (1). A diagram will be created.
• Click the menu File > Exit and answer 'Yes' to the question 'Do you want to dispatch modifications?'
If the diagram is created, test is a success. Otherwise, test is a failure. In this case, change options at environment level, group 'Compatibility > Diagram' and set 'Diagram creation interface' to 'Menu (Compatibility mode)' (3) as a work-around. See also the Embedded Internet Explorer section p. 38.
|
(1) Check the type and name of the license in the bottom of the page
(2) Check that is it possible to select 'Library diagram' and to click 'Create'.

(3) Change options at environment level, group 'Compatibility > Diagram' and set 'Diagram creation interface' to 'Menu (Compatibility mode)'.
