|
License type
|
Requirement
|
|
Must license (.must)
|
• It should be installed in the UNC folder for which it has been programmed. Example: folder \\server001\Apps\Licenses containing the file License-000001.must.
• The must license folder must be accessible with full control to all Windows users that should share this configuration.
|
|
Elf license (.elf)
|
• It should be installed in a shared folder. Example: folder \\server001\Apps\Licenses containing the file License-000002.elf
• The Elf license file must be accessible with at least read access to all Windows users that should share this configuration.
|
License type | Example |
Must license (.must) | [Must license] Path = \\server001\Apps\Licenses |
Elf license (.elf) | [MegaLicenseFile] FileLongName = \\server001\Apps\Licenses\License-000002.elf |
Element | Comment |
/package "<Folder of the HOPEX MSI file>\HOPEX V2.msi" | Required. To specify the path of the .msi file. Ex: \\Srv001\Master\HOPEX\DISK1\HOPEX V2.msi. |
/passive | Optional. To trigger not interactive mode |
/levw "<path of installation log>" | Optional. To generate installation log Ex: /levw "C:\tmp\ScriptInstall.log" |
SELECTED_LANGUAGE="<language code>" | Optional (English by default). To control installation language. Languages codes: 1031 (German language), 1033 (English language), 1036 (French language), 1040 (Italian language) |
ADDLOCAL="<feature list>" REMOVE="<feature list>" | Recommended. To list the features to install: feature X, feature Y… See table 'Complete list of installation features' later in this document |
INSTALLDIR="<installation path>" | Optional. To control target folder of HOPEX core programs. Ex: C:\Apps\MEGA\HOPEX |
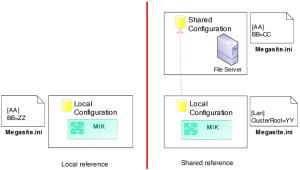
CLUSTERDIR="<configuration folder>" | Optional (empty by default). To set a shared configuration for the installation Ex: "\\mega\data\config" |
HOPEXDIR="<installation path of IIS HOPEX application>" | Optional (by default C:\inetpub\wwwroot\HOPEX). To control target folder of IIS HOPEX application folder when installing Web Front-End. Ex: C:\Apps\MEGA\wwwroot\HOPEX |
HOPEXMWAS ="<installation path of IIS MWAS>" | Optional (by default C:\inetpub\wwwroot\HOPEXMWAS). To control target folder of IIS MWAS folder when installing Web Front-End. Ex: C:\Apps\MEGA\wwwroot\HOPEXMWAS |
MSSPDIR="<installation path of IIS SSP>" | Optional (by default C:\inetpub\wwwroot\MegaSSP). To control target folder of IIS SSP folder when installing SSP. Ex: C:\Apps\MEGA\wwwroot\MegaSSP |
IS_NET_API_LOGON_USERNAME_HOPEX ="<HOPEX service account name>" | Required with HOPEX Web Front-End Ex: mydomain\myuserhopex |
IS_NET_API_LOGON_PASSWORD_HOPEX="<HOPEX service account password>" | Required with HOPEX Web Front-End Ex: mypasswordhopex |
_00_MEGA_HOPEX_API | Optional with HOPEX Web Front-End. Required only to deploy web services. |
_00_MEGA_HOPEX_API_MWAS | Optional with HOPEX Web Front-End. Required only to deploy web services. |
Scenario | Steps |
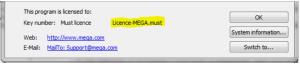
Scenario #1 • Check license • Connection to Administration console | • Run Administration.exe. A window 'HOPEX - Administration' is displayed • Click the menu help > About HOPEX A window 'About HOPEX is displayed • Check the type (ex: Must license) and name (ex: 'License HOPEX.must') of the license in the bottom of the page (1). If you can run Administration console and display the name of the licence, test is a success. Otherwise, test is a failure. • Select the test environment Ex: xx\TestEnvironment. • R click > Open • In the window Identification, enter the identifier System (no password) and click 'OK'. If you can display the folders 'Repositories', 'Customized Shapes' and 'User accounts', test is a success. Otherwise, test is a failure. • Click the menu File > Exit. |
Scenario #2 • Connection to Windows Front-End • Check dispatch | • Run HOPEX.exe. • In the window 'Connection to HOPEX', enter the identifier Mega (no password) and click 'OK'. A window 'HOPEX' is displayed • Select a repository Ex TestRepository • Select the profile 'Enterprise Architect' and click 'OK'. The desktop is loaded If the desktop is displayed, test is a success. Otherwise, test is a failure. • Click the menu View > Navigation Window > Home A tab 'Home' is displayed • Select the library 'MEGA' (icon of open blue book) • Right-click New > Sub-library and confirm creation • Click the menu File > Exit and answer 'Yes' to the question 'Do you want to dispatch modifications?' If the object is created and the dispatch is correct, test is a success. Otherwise, test is a failure. |
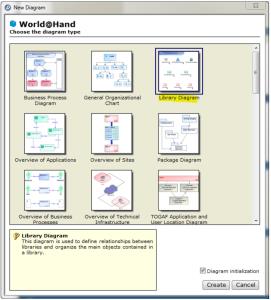
Scenario #3 • Check creation of diagram | • Run HOPEX.exe. • In the window 'Connection to HOPEX', enter the identifier Mega (no password) and click 'OK'. A window 'HOPEX' is displayed • Select a repository Ex TestRepository • Select the profile 'Enterprise Architect' and click 'OK'. The desktop is loaded • Click the menu View > Navigation Window > Home A tab 'Home' is displayed • Select the library 'MEGA' (icon of open blue book) • Right-click New > Sub-library and confirm creation • For this Library object, right-click New > Diagram. A wizard called 'New diagram' is displayed. o Check that it is possible to select 'Library diagram' and to click 'Create' (1). A diagram will be created. • Click the menu File > Exit and answer 'Yes' to the question 'Do you want to dispatch modifications?' If the diagram is created, test is a success. Otherwise, test is a failure. In this case, change options at environment level, group 'Compatibility > Diagram' and set 'Diagram creation interface' to 'Menu (Compatibility mode)' (3) as a work-around. See also the Embedded Internet Explorer section p. 36. |