Organization Viewpoint

The Organization viewpoint focuses on the (internal) organization of a company, a department, a network of companies, or of another organizational entity (i.e. a Business Actor). It is possible to present models in this viewpoint as organizational charts. The Organization viewpoint is very useful in identifying competencies, authority, and responsibilities in an organization.
With this viewpoint, you will learn how to describe your first viewpoint diagram.
This presentation is based on the example of the "ArchiSurance" fictional insurance company, which is represented below.
Concepts and Relations
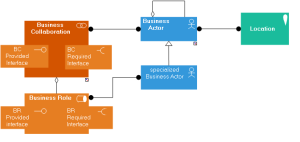
The ArchiMate concepts used in an Organization viewpoint Diagram and their relations are described.
This Viewpoint describes a Business Actor.
A
Business Role is defined as a named specific behavior of a
Business Actor participating in a particular contex
A
Business Role is assigned to a
Business Actor.
A
Business Collaboration is defined as a named specific behavior a (temporary) configuration of two or more business roles resulting in specific collective behavior in a particular context

A
Business Collaboration is a specialization of a
Business Role. A
Business Collaboration is an aggregation of several
Business Roles.
A
Business Actor is defined as an organizational entity capable of (actively) performing behavior.
A
Business Role uses the
Business Interfaces which are associated with it.
A
Business Interface declares how a business role can connect with its environment
Example Presentation
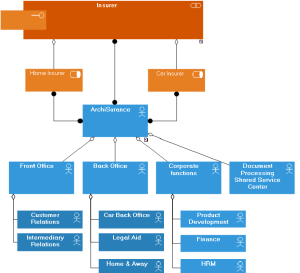
The diagram below describes the ArchiSurance organization.
The company is composed by :
• A front office, comprising departments for managing relations with customers on the one hand, and intermediaries on the other hand.
• Three separate back offices:
• Home & Away: this department was the original pre-merger ArchiSurance, responsible for home and travel insurance.
• Legal Aid: this is the old LegallyYours, responsible for legal aid and liability insurance.
• Car: this department is the core of the old PRO-FIT and handles car insurance, including some legal aid.
• Furthermore, ArchiSurance is in the process of setting up a Shared Service Center for document processing, which will handle all document streams and performs scanning, printing, and archiving job.
Organization viewpoint diagram
Creating an Organizational Viewpoint Diagram
In HOPEX Archimate, the "organizational viewpoint" is a materialized by diagram describing a Business Actor.
Creating a diagram
To create an organizational viewpoint diagram:
1. In the Business Layer pane, select the Organization accordion item.
2. Unfold the Objects folder.
3. Right click on the Business Actor folder and select New > Business Actor.
The Add Business Actor dialog box appears.
4. In the Name box, enter "ArchiSurance".
5. Right-click on the "ArchiSurance" Business Actor and select New > Organizational ViewPoint.
Creating Business Actors
You will define the Business Actors that defines the ArchiSurance organization structure
To create a Business Actor, for example the entity "Front Office".
1. In the insert toolbar, click the Business Actor button.
2. Click in the diagram.
The Add Business Actor dialog box appears.
3. In the Name box, enter "Front Office"
4. Click Create.
The actor appears in the diagram.
Creating several Business Actors
To create the other actors :
1. Double-click the Business Actor button and then click in the diagram
The new actor appear in the diagram.
2. Press key <Esc> to stop the Business Actors creation.
3. To rename the actors, click the name of the actor, press key <F2> and enter a new name.
Assigning Sub-Actors to a Business Actor
To assign a Business Actor to another Business Actor, for example "Front Office" and "Back Office" to "ArchiSurance" actor:
1. Click on the
Link button

2. Click the parent business actor and, holding down the mouse button, drag the cursor to the child business actor to be connected and release the mouse button.
The two Business Actors are highlighted and a dotted line indicates the path that will be taken by the graphic link.
If several paths are possible: simply move the cursor to within the frame of the destination operation. Creating Business Roles
You will create Business Roles and connect each of these to the Business Actors responsible for their execution.
To create a Business Role participating, for example "Car Insurer".
1. In the insert toolbar, click the Business Role button.
2. Click in the diagram.
The Add Business Role dialog box appears.
If the business role that you wish to add already exists, click the arrow next to the "Name" field and find the business role that you are interested in (
Query > Find).
3. In the Name box, enter "Car Insurer".
4. Click Create.
The role appears in the diagram.
Create the other business roles "Home Insurer" and "Insurant" in the same way.
To connect a business role to a business actor, use the same operating mode as before to connect business actor. An assignement relation link, connecting the nodes, appears in the diagram.
Creating Business Collaborations
Similarly create the Business Collaborations, as well as connection with dedicated Business Roles.
Creating a Business Interface
A Business Interface is used to describe the communication between two Business Roles. For example the Business Interface "Claim Request Handling" is used for communication between the "Insurant" and the "Insurer".
With HOPEX Archimate, a Provided Business Interface must be created for the "Insurer" and a Required Business Interface must be created for the "Insurant".
The process for creating a Provided Business Interface or Required Business Interface is identical.
To create a Provided Business Interface for the Business Collaboration "Insurer":
1. Select the Business Collaboration "Insurer" and open its Actor Co-operation viewpoint diagram,
2. In the insert toolbar of the diagram, click the Provided Business Interface button.
3. Click in the diagram.
The Adding a Provided Business Interface dialog box appears.
4. Enter the Name of the new Interface and click Add.
The Creation of Provided Interface Protocol dialog box appears.
5. Click the arrow at the right of the Interface Protocol field to define the interaction protocol enabling activation of this provided interface.
6. Select Create Interface Protocol.
The Creation Business Interface dialog box appears.
7. Enter the Name of the new Interface Protocol. For example, "Claim Request Handling", and click Ok.
8. Click OK to close this dialog box.
The Interface Protocol is automatically created.
9. Click OK.
The Provided Interface appears in the diagram.
Saving a Diagram
To save your drawing, click the Save button

.