Links Between Projects
Interconnecting projects
In a project scheduling diagram, you can easily interconnect different projects.
To connect projects:
1. In the insert toolbar, click the reel.
2. Click on the first project and, keeping the mouse button pressed down, draw a line to the second.

If the "Composition" view is activated, an intermediate dialog box appears in which you must select a link type. For more details, see
"Splitting a project".
The direction of the link is important. In the case above, the link indicates that "Project 1" precedes "Project 2".
If you draw the arrow in the wrong direction, you must delete the link.
To delete the link:
1. Right-click the link.
2. Click Delete.
Creating a project by linking with other projects
To create a project linking it with two other projects:
1. Click Project.
2. Click on the first project and, keeping the mouse button pressed down, draw a line to the second.
The new project is created and connected to the two others.
Splitting a project
To split a project:
1. Select Views > Views and Details.
2. In the dialog box that opens, select the Splitting check box then click OK.
3. Draw a link between two sub-projects.
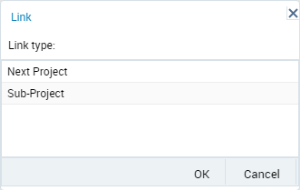
The Create Link page appears.
It offers a choice between a "Next Project" link which indicates a sequence between two projects, and a "Project Step" link which indicates splitting.
4. Select the "Project Step" link. A dotted arrow line is displayed between the two projects.

An alternative approach to project splitting is via
New > Sub-Project.