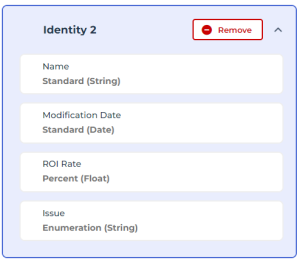
Attribute Creation
You can create your own attributes. As long as the page is not confirmed (or draft mode) you can still modify or delete these attributes.
Once the page is confirmed (dispatched):
• you can still modify the name, display name, and description of these attributes, but not their types, formats, or values
• you can remove these attributes from the page, but not delete them from the repository
Attribute name and display name
An attribute Name must be unique.
If needed, you can also define a Display name for an attribute. To improve understanding, it is recommended that this Display name be unique as well and different from any attribute Name. If a Display name is already used by another attribute (for its Name or Display name), a warning message is displayed.
Differences in letter case (uppercase/lowercase) are not taken into account when determining whether a name is unique.
Example: the names CODE and Code are considered identical.
Attribute types and formats
You can create attributes of the following types and formats:
Attribute type | Description | Format |
|---|---|---|
String | Alphanumeric or numeric character string (if not used to compute data) with a length between 0 and 1024 | Standard Enumeration: with creation of values |
Boolean | Boolean (true or false) | Standard |
Short | Integer between 0 and 65535 Integer between -32767 and +32767 | Standard Percent Signed Number |
Long | Integer between 0 and 4294967295 Integer between -2147483647 and +2147483647 | Standard Percent Signed Number |
VarChar | ASCII text for long texts (e.g.: a description) | Standard (HTML or UTF8) |
Float | Decimal number or percentage | Standard Percent |
DateTime64 | Date | Standard “YYYY-MM-DD" Date with Time “YYYY/MM/DD HH:MM:SS" Duration "HH:MM:SS" |
Translation of created attributes
Your attributes are created in the compilation language. If needed (multilingual context), you can translate them into another user interface (UI) language from Hopex Studio using the Hopex Customizer profile.
 The available UI languages are English, French, German, Italian, Portuguese, and Spanish.
You can translate:
• Name
• GUIName (Display name)
• Description
Attribute translation is performed in the same way as data translation (General > Translation menu of the attribute properties).
For more information, see Entering Data in Several Languages.Creating an attribute
To create an attribute:
1. In the property page customization window, click Create an attribute.
2. Enter the Name of the attribute.
An attribute name is unique. If an attribute with this name already exists, you must enter another one.
The name of the attribute must be entered in the user interface language. If your data is in a different language, a flag reminds you of the language used when entering the name.3. (Optional) Enter the Display name.
The display name of the attribute must be entered in the user interface language. If your data is in a different language, a flag reminds you of the language used when entering the name.If not defined, the Name is displayed in the user interface.4. Enter the Description of the attribute.
 This description facilitates the understanding and use of the attribute.
 If needed, you can modify or enter it after its parameterization.
5. Select:
• its Type
• its Format
6. ('"string" Type attribute) Enter its maximum Length.
7. Click Create.
The attribute is created and added to the section.
If needed, you can modify or delete the attribute later (as long as the page is in draft mode).Creating an enumeration type attribute
For an enumeration type attribute, you must define the attribute values.
You can also define:
• a default value
• a color palette and select a color for each value
E.g.: E.g.: Frequency, Gradient, Indicator, Ranking, or No palette.
To create an enumeration type attribute:
1. In the property page customization window, click Create an attribute.
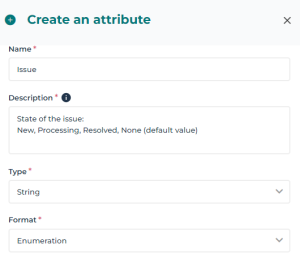
2. Enter the Name of the attribute.
An attribute name is unique. If an attribute with this name already exists, you must enter another one.
E.g.: Issue
The name of the attribute must be entered in the user interface language. If your data is in a different language, a flag reminds you of the language used when entering the name.3. (Optional) Enter a Display Name.
E.g.: Current issue.
4. Enter the Description of the attribute.
You can for example detail its values.E.g.:
State of the issue:
New, Processing, Resolved, None (default value)
5. Select:
• its Type: “String”
• its Format: "Enumeration"
• its Color palette
E.g.: Indicator
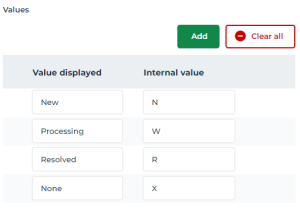
6. Define its values: for each value, click Add and in each field:
• enter the Value displayed in the interface
The name of the value must be entered in the user interface language. If your data is in a different language, a flag reminds you of the language used when entering the name.• enter the associated Internal value
• (where applicable) select the associated Color
7. (If needed) To remove:
• a value, hover the cursor over the attribute row and click Remove  .
.
.• all of the values, click Clear all  .
.
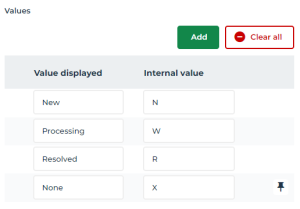
.8. (Optional) Define a default value: hover the cursor over the row of the value concerned and click Set as default value  .
.
.
The value is indicated as default value.
9. Click Create.
The attribute is created and added to the section.
If needed, you can modify or delete the attribute later (as long as the page is in draft mode).