8 Configuring the desktop
By default, no pop-up menu (right-click on object) is available in the desktop.
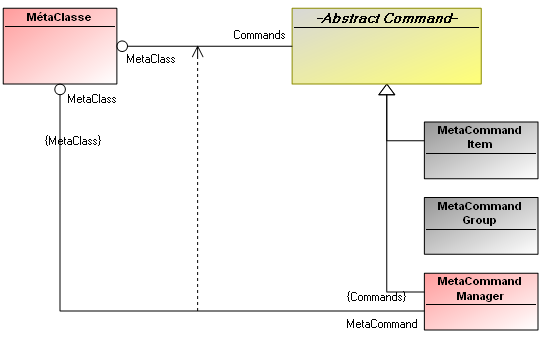
The MetaModel linked to commands is the following:
8.1 Creating pop-up menus on an object
A pop-up menu is a set of commands (MetaCommand Manager/MetaCommand Item) accessible by right-click on a desktop object. Each command is characterized by a Category.
Note: if necessary, you can restrict a pop-up menu to a specific desktop, see Restricting a command to a specific desktop
To define pop-up menus accessible (by right-click) from an object (MetaClass) of the desktop, you must define commands accessible from this object (MetaClass).
For each command (of MetaCommand Item or MetaCommand Manager type) you must define its name (_GUIName) and display icon (MetaPicture) in the user interface, as well as the Command Category to which it belongs. This category is one of the standard categories supplied by MEGA.
The pop-up menu (defined by the command) is classified in a category.
To define a pop-up menu (of MetaCommand Item type) of a desktop object:
1. In HOPEX, run a query on MetaClass.
2. Right-click the MetaClass you want to configure (example: Org-Unit) and select Properties.
3. Select the User Interface tab and the Menu Command subtab.
4. Click New  .
.
. The Choice of MetaClass Abstract Command appears.
5. In the MetaClass field, select MetaCommand Item.
The new command appears in the frame listing commands (MetaCommand Item and MetaCommand Manager).
6. In the Short Name field, enter the command name (example: « Risk»).
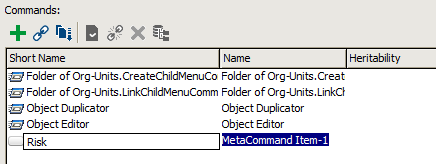
Command characteristics appear.
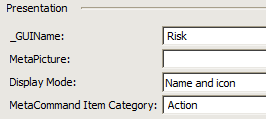
7. In the Presentation frame, enter the following fields:
• in the _GUIName field, enter the display name of the command in the user interface.
• in the MetaPicture field, click the arrow and specify the icon of the command.
• in the Display Mode field, select the display mode.
• in the MetaCommandItem Category field, select the command category (example: "Action").
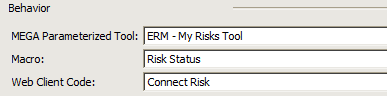
8. In the Behavior frame, specify one of the following fields. Click the arrow in field:
• MEGA Parameterized Tool and select the MEGA Parameterized Tool that will implement the command (example: "ERM – Risk Consequences").
• Macro and select/create the macro that will implement the command (example: "Risk Status").
• Web Client Code and select/enter the JavaScript _Code Template (example: « Connect Risk »).
9. Click OK.
 If you want a pop-up menu command to be specific to a single desktop, see Restricting a command to a specific desktop.
8.2 Restricting a command to a specific desktop
When a command defined on a MetaClass should be accessible from a particular desktop only, you must define this restriction in the desktop properties.
1. In HOPEX, display the MetaStudio navigation window.
2. Expand the MEGA Application folder, then the application concerned.
3. Right-click the desktop (example: "Desktop MA A") and select Properties.
4. Select the Commands tab.
5. In the Specific Command frame, click Connect  (or New
  if the command is not yet created) and select the command you want to restrict to this desktop (example: "Desktop MA A").
(or New if the command is not yet created) and select the command you want to restrict to this desktop (example: "Desktop MA A").8.3 Examples of macros
8.3.1 Creating commands of a MetaClass
In the pop-up menu, MetaCommand Manager and MetaCommand Item coexist:
• MetaCommand Manager is implemented by a macro with Sub cmdInvoke:
Sub cmdInvoke(oBookPart, number)
End Sub
For more information, refer to the MEGA Studio guide.
• MetaCommand Item is implemented by a macro with Function invokeOnObject:
Function InvokeOnObject(oRoot, sUserData)
End Function
8.3.2 Implementing a group of dynamic commands
The following is an example of a group of commands enabling addition of commands dynamically and specification of their behavior when clicked by a user.
• Associate the following macro with MetaCommand Group:
'=======================================================================
'Macro : ~j3IwNEVIGTfA[Languages.Implementation]
'-----------------------------------------------------------------------
'MegaContext(Fields,Types)
Option Explicit
Class Language
Public idabs
Public guiname
Public picture
End Class
Class ScannerLanguages
Public mgResource
Public mgToolkit
Public mgbTrouve
Public mgLanguages()
public nbLanguages
Public Sub OnItem(Context, Id)
mgbTrouve = True
nbLanguages = nbLanguages + 1
ReDim Preserve mgLanguages(nbLanguages)
Dim aLanguage
Set aLanguage = New Language
aLanguage.idabs = mgToolkit.getString64FromID(Id)
aLanguage.guiname = mgResource.name(Context, "GuiName")
Dim mgScannerMP
Set mgScannerMP = New ScannerMetaPicture
mgScannerMP.mgbTrouve = False
mgResource.ScanCollection Id, "~A1mUbldyx840[MetaPicture]", mgScannerMP, 1, ""
If mgScannerMP.mgbTrouve Then
aLanguage.picture = mgToolkit.getString64FromID(mgScannerMP.idPicture)
End If
Set mgLanguages(nbLanguages) = aLanguage
'Context.Abort
End Sub
End Class
Class ScannerMetaPicture
Public mgbTrouve
Public idPicture
Public Sub OnItem(Context, Id)
mgbTrouve = True
idPicture = Id
Context.Abort
End Sub
End Class
Function GetLanguages(mgRoot As MegaRoot)
Dim mgScanner
Set mgScanner = New ScannerLanguages
Set mgScanner.mgResource = mgRoot.CurrentEnvironment.Resources
Set mgScanner.mgToolkit = mgRoot.currentEnvironment.toolkit
Dim idDepart
Dim idLink
Dim listAttributes
idDepart = "~I9o3by0knG00" '~I9o3by0knG00[Neutral]
idLink = "~41000000CW30[_Lower]"
listAttributes = ""
mgScanner.mgbTrouve = False
mgScanner.nbLanguages = 0
mgScanner.mgResource.ScanCollection idDepart, idLink, mgScanner, 1, listAttributes
if (mgScanner.mgbTrouve) Then
GetLanguages = mgScanner.mgLanguages
else
GetLanguages = null
end if
end function
Function count (mo, CommandGroupID, strUserData )
Dim mgLanguages
mgLanguages = GetLanguages(mo.GetRoot)
If (Not IsNull(mgLanguages)) Then
Dim i
count = 0
For i = 1 To UBound(mgLanguages)
If mo.GetRoot.CurrentEnvironment.Toolkit.IsAvailable(mgLanguages(i).idabs) Then
count = count + 1
End If
Next
End If
End Function
Sub CommandEnum(mo, CommandGroupIDParent, vCommandGroupID, oGenContext, oMenuContext, strUserData)
dim idabsMaCommande
dim strTitle
dim idabsImageMoniker
dim strTooltip
dim dwCategory
dim dwStyle
dim idabsMacro
dim idabsParameterizedTool
dim strToolbarPosition
dim idabsCodeTemplate
dim mgLanguages
mgLanguages = GetLanguages(mo.GetRoot)
dim i
dim res
If (Not IsNull(mgLanguages)) Then
For i = 1 To Ubound(mgLanguages)
If mo.GetRoot.CurrentEnvironment.Toolkit.IsAvailable(mgLanguages(i).idabs) Then
idabsMaCommande = mgLanguages(i).idabs
dwCategory =10
strTitle = mgLanguages(i).guiname
idabsImageMoniker = "~" & mgLanguages(i).picture
idabsMacro = "~m3IwTHVIGDjA" '~m3IwTHVIGDjA[Set Current Language.Macro]
res = oMenuContext.CommandAdd(mo, "~3uw6D72eErUS[Command]", idabsMaCommande, strTitle, idabsImageMoniker, strTooltip, dwCategory , dwStyle, strUserData , idabsMacro, idabsParameterizedTool , strToolbarPosition, idabsCodeTemplate)
End If
Next
End If
end sub
This macro uses scanners to browse available languages. But commands essential to MetaCommand Group are CommandEnum and Count, which enable addition of commands dynamically.
• The macro called when a user clicks any button dynamically creates:
'=======================================================================
'Macro : ~m3IwTHVIGDjA[Set Current Language.Macro]
'-----------------------------------------------------------------------
'MegaContext(Fields,Types)
Option Explicit
'-----------------------------------------------------------------------------
' FUNCTION : InvokeOnObject
' Function called when the command is triggered from a MegaObject.
' Example : click on a menu.
'
' @param mgobjSource
' MegaObject on which the command is applied.
'-----------------------------------------------------------------------------
Function InvokeOnObject(mgobjSource as MegaObject, sUserData As Variant)
End Function
'-----------------------------------------------------------------------------
' FUNCTION : InvokeOnRoot
' Function called when the command is triggered from a mgRoot.
' Example : click on a menu.
'
' @param mgRoot
' mgRoot on which the command is applied.
'-----------------------------------------------------------------------------
Function InvokeOnRoot(mgRoot as MegaObject, sUserData As Variant)
Dim JSON
Set JSON = mgRoot.GetRoot.CurrentEnvironment.GetMacro("~j0Iw0fWIGLnA[GetCommandIdFromJSON]")
Dim languageId
languageId = JSON.getCommandId(sUserData)
If languageId <> "" Then
languageId = "~" & languageId
mgRoot.GetRoot.CurrentEnvironment.SetCurrentLanguage languageId
InvokeOnRoot = "{refresh :true}"
End If
' The desktop will be refreshed. To display the current language, you can use the Macro ~52IwefUIGXMA[Get Current Language] that can be displayed in a static zone tool
End Function
This macro operates the change of language based on the command clicked.
• To recover the command id, create a JavaScript macro, which will enable recovery of this information in the form json in the sUserData variable. Its code is the following:
'=======================================================================
'Macro : ~j0Iw0fWIGLnA[GetCommandIdFromJSON]
'-----------------------------------------------------------------------
//Language:JavaScript
function getCommandId(szJSON) {
var jsonObject = eval('(' + szJSON + ')');
var szId = jsonObject.commandId;
return szId;
}
'Macro : ~j0Iw0fWIGLnA[GetCommandIdFromJSON]
'-----------------------------------------------------------------------
//Language:JavaScript
function getCommandId(szJSON) {
var jsonObject = eval('(' + szJSON + ')');
var szId = jsonObject.commandId;
return szId;
}
A macro enables addition of commands.
You cannot have groups of commands in groups implemented by a macro.Example: the macro Languages.Implementation
In the example below:
• the count function should return >0 for CommandEnum to be called.
• count indicates the number of commands that will be added to CommandGroup CommandGroupID.
• in CommandEnum you can add commands to CommandGroupID by calling function CommandAdd of oMenuContext.
Idabs = j3IwNEVIGTfA
Sub CommandEnum(mo, CommandGroupIDParent, CommandGroupID, oGenContext, oMenuContext, strUserData)
dim idabsMyCommand
dim strTitle
dim idabsImageMoniker
dim strTooltip
dim dwCategory
dim dwStyle
dim idabsMacro
dim idabsParameterizedTool
dim strToolbarPosition
dim idabsCodeTemplate
Dim res
res = oMenuContext.CommandAdd(mo, "~3uw6D72eErUS[Command]", idabsMyCommand, strTitle, idabsImageMoniker, strTooltip, dwCategory , dwStyle, strUserData , idabsMacro, idabsParameterizedTool , strToolbarPosition, idabsCodeTemplate)
End sub
Function count (mo, CommandGroupID, strUserData )
End function
8.4 Configuring click (left)
By default, a (left) click manages change of standard current. It applies to MEGA occurrences.
You can configure alternative behavior of the (left) click on:
• a desktop, or
• a MEGA Parameterized Tool
To configure a (left) click:
1. Open the Properties of the desktop (example: "Desktop MA A") or of MEGA Parameterized Tool.
2. Select the Characteristics tab.
3. In the Click Manager field, click the arrow and select Create (or List if the implementation macro is already created).
4. (Optional) Enter the Name of the click manager.
5. In the Implementation Macro field, click the arrow and select Create Macro (or List if the macro is already created).
a. In the Creation of Macro dialog box, select Create (VB)Script Macro.
b. Click Next.
c. Enter the Name of the macro.
d. (Optional) Select Reusable if you want to be able to reuse the macro.
e. Click Finish.
The name of the implementation macro appears in the Implementation Macro field.
6. In the Implementation Macro field, click the arrow, select the macro you have just defined and select Edit.
7. In the script edit dialog box, enter the macro script:
Sub GenerateStream(oObject, oContext, sUserData, oStream)
End Sub.
• oObject: object to which command is applied
• oContext: defines execution context
• sUserIn: defines any additional information that may be required to define action on object click
• oTextStream returns:
- the JSON corresponding to the command to be executed, or
- the JSON after which simple current management is required:
{setCurrent: true).
Example of click on a tree element:
Sub GenerateStream(mgobjSource , oContext , sUserData , oStream)
oStream.Write("{setCurrent:true}")
End Sub
• mgobjSource: Mega object to which command is applied
• oContext: defines generation context
• sUserData: defines any additional parameter that may be required to decide to run the action.
• oStream contains the result of JSON to be sent in return to the client
- a standard JSON is returned for the setCurrent action:
{setCurrent:true}
- a dedicated JSON is returned if a command must be executed
The JSON awaited in return of the function is the JSON of a command. To do this, MEGA provides a standard function enabling recovery of the JSON associated with a MetaCommand Item: GetJSONCommand
Sub Generate(mgobjSource , oContext , sUserData , sResult )
'Dim oRoot
'Set oRoot = mgobjSource.GetRoot
'sResult = oRoot.GetJSONCommand("CommandIdabs")
End Sub
8.5 Configuring behavior on an event
You can configure your desktop to generate a specific behavior at opening, at closing and/or at backup of your desktop.
Example:
• when first opening the desktop, you can run a questionnaire HTML formatter.
• when closing the desktop, you can run a dispatch wizard.
1. Open the Properties of the desktop (example: "Desktop MA A") or of MEGA Parameterized Tool.
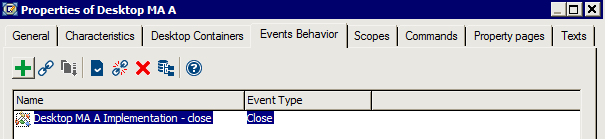
2. Select the Events Behavior tab.
3. Click New  .
.
.4. Select Manage Macro (VB)Script.
5. Click Next.
6. Enter the Name of the macro (example: "Desktop MA A Implementation – Close").
7. Click Finish.
8. In the Event Type field, select Close.
9. Open the Properties of the macro you have just created (example: "Desktop MA A Implementation – Close").
10. Select the VB Script tab and enter the code of the macro.
For example:
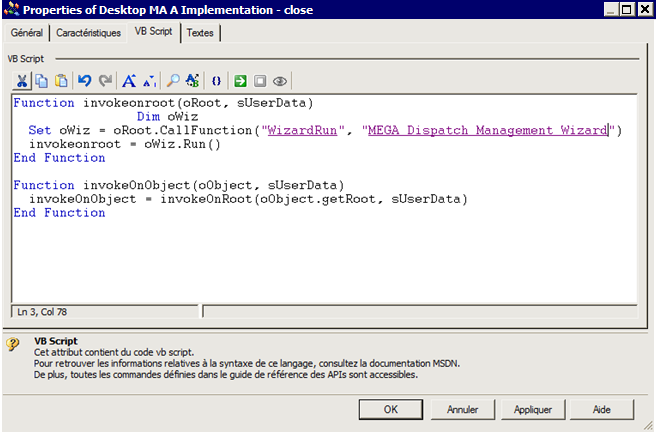
 is the dispatch wizard, of which the identifier is:
 ~)pVZ5wu47b00[MEGA Dispatch Management Wizard]
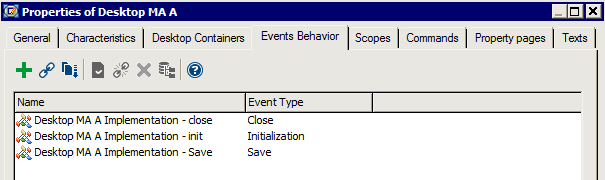
For Save Event Types and the initialization macro, the prototype of functions to be implemented is the same:
Function invokeonroot(oRoot, sUserData)
End Function
Function invokeonobject(oRoot, sUserData)
End Function
Do not omit Function invokeonobject; although empty, it is necessary for operation.
8.6 Creating a toolbar
A toolbar comprises commands, groups of commands and/or MEGA Parameterized Tools. These components can be grouped by themes (tool groups).

Example of a toolbar
A tool group is a MetaCommand Group (example: "View") which can contain:
• MetaCommand Groups
Example: "Language"
Example: "Language"
• MetaCommand Items
Example: "Favorites", "Properties"
Example: "Favorites", "Properties"
• MEGA Parameterized Tools
Example: "Navigation Trees Manager"

Example of a toolbar tool group ("View")
Creating a toolbar consists of creating a Desktop Container of Container of Tool type. This Container of Tool will contain the Toolbar desktop component (MEGA Parameterized Tool).
To create a toolbar, you should proceed as follows:
Step | Action | See |
1. | ||
2. | ||
3. | ||
4. | ||
5. |
Note: See Command group configuration examples.
8.6.1 Creating your toolbar structure
To create your toolbar, you must create a Desktop Container of Container of Tool type.
You will define this Container of Tool by a desktop component (MEGA Parameterized Tool) of Toolbar type, which has a group of commands as its parameters.
You will create the group of commands (MetaCommand Group) representing your toolbar, and define representation of your toolbar (ribbon, ribbon without frame or drop-down menus):
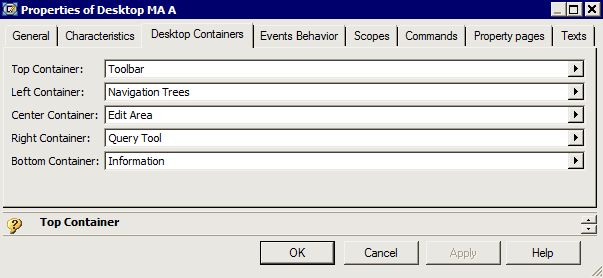
1. From the Creation of Desktop – Desktop Containers dialog box (see Creating a desktop), in the Top Container (Left, Right, Center or Bottom) field, click the arrow and select New.
The first step of the Creation of Desktop Container wizard appears: Usage.
2. Enter the Name of the Container (example: "Toolbar").
3. Select the type of Container of Tool Desktop Container.
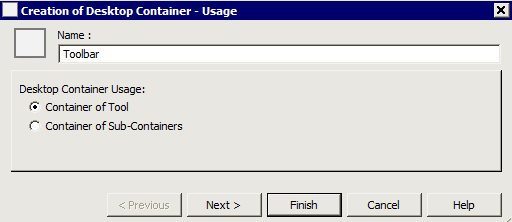
4. Click Next.
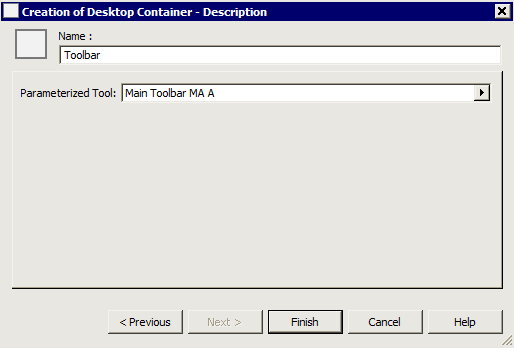
The second step of the Creation of Desktop Container wizard appears: Description.
5. In the Parameterized Tool field, click the arrow and select Create MEGA Parameterized Tool (or List MEGA Parameterized Tool if the Parameterized Tool is already created).
The first step of a new Creation of MEGA Parameterized Tool wizard appears: Description.
6. Enter the Name of the desktop/Parameterized Tool component (example: "Main Toolbar MA A").
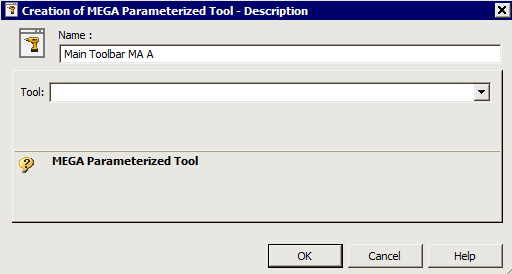
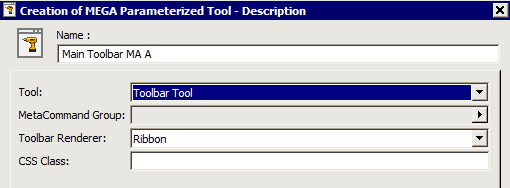
7. In the Tool field, click the drop-down menu arrow and select Toolbar Tool.
Toolbar Tool is displayed in the Tool field. Fields MetaCommand Group and Toolbar Renderer appear.
8. In the MetaCommand Group field, click the arrow and select Create MetaCommand Group  (or List MetaCommand Group
  if the required MetaCommand Group is already created).
(or List MetaCommand Group if the required MetaCommand Group is already created). The MetaCommand Group creation dialog box appears.
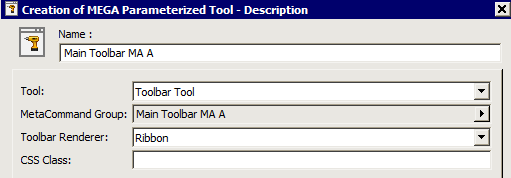
9. Enter the Name of the MetaCommand Group (example: "Main Toolbar MA A").
10. Click OK.
11. (Optional) In the Toolbar Renderer field, you can modify the toolbar type selected by default ("Ribbon").
The toolbar can be presented in the form of a "Ribbon", a "Ribbon Without Frame" or a "Dropdown Menu.
12. Click OK.
13. Click Finish.
The toolbar structure is created.
8.6.2 Creating toolbar tool groups
To create tool groups (MetaCommand Groups) and other components (MetaCommand Item and/or MEGA Parameterized Tool) of your toolbar:
1. Open your toolbar properties (example: MetaCommand Group "MA A Main Toolbar").
2. In the Component tab, click Create  (or Connect
  ).
).
(or Connect ).3. Select the type of MetaClass you want to create MetaCommand Group, MetaCommand Item or MEGA Parameterized Tool.
4. Click OK.
5. Enter the Name of the MetaCommand Group, MetaCommand Item or MEGA Parameterized Tool.
6. Repeat steps 2 to 5 and create (or connect) all the MetaCommand Groups, MetaCommand Items or MEGA Parameterized Tools required.
7. By default, the toolbar components are aligned left in the toolbar; to align a component on the right, click in the Toolbar Position field of the MetaCommand Group, MetaCommand Item or Parameterized Tool, and select Right (example: disconnection command "Logout Command").
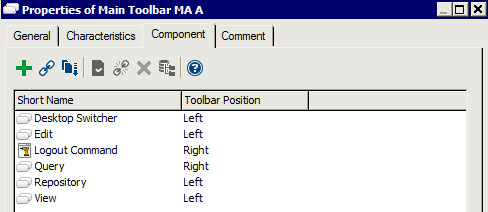
The order of presentation of the MetaCommand Groups in the list reflects the order of appearance of the tool groups and/or commands in the toolbar.
The value of the position of a MetaCommand Group (left/right) takes priority over its appearance order in the list.To modify organization of tool groups and/or commands, see Modifying the position of a tool group in the toolbar.
8.6.3 Configuring toolbar tool group display
To configure display of a toolbar tool group:
1. In HOPEX, display the MetaStudio navigation window.
2. Expand the MEGA Application folder, then the application and desktop (example: "Desktop MA A").
3. Right-click the desktop tool group (example: "Main Toolbar MA A") and select Properties.
4. Select the Description tab.
5. In the MetaCommand Group field (example: "Main Toolbar MA A"), click the arrow and select Properties of MetaCommand Group (example: "Main Toolbar MA A").
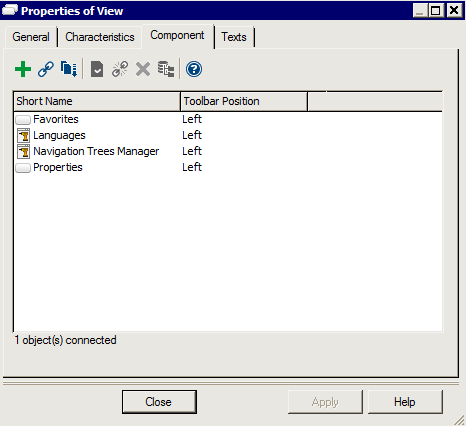
6. Select the Component tab.
7. In the list of components, right-click a tool group (example: "View") and select Properties.
8. Select the Characteristics tab.
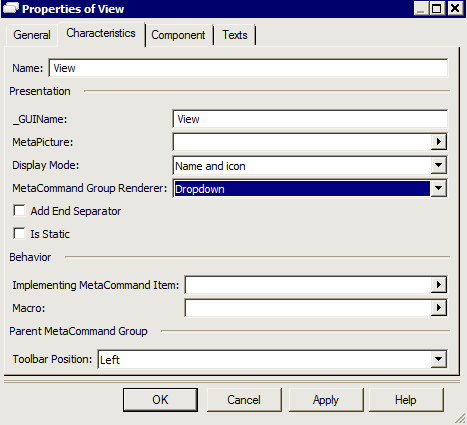
9. In the Presentation frame:
- in the _GUIName field, enter the name under which the MetaCommand Group will appear in the user interface.
- if required, in the MetaPicture field, click the arrow and select the image of the MetaCommand Group that will appear in the user interface.
- In the MetaCommand Group Renderer field, select tool presentation: Dropdown (drop-down) or Flat (horizontal).
Note: this parameter is used essentially for drop-down menus.
- Select Add End Separator if you want to add a separator bar at the end of the tool group.
- Select Is Static to avoid recalculation of the Menu in Web.
10. Click OK.
8.6.4 Defining toolbar tool group commands
To define commands of a toolbar tool group:
1. In HOPEX, display the MetaStudio navigation window.
2. Expand the MEGA Application folder, then the application and desktop (example: "Desktop MA A").
3. Right-click the desktop tool group (example: "Main Toolbar MA A") and select Properties.
4. Select the Description tab.
5. In the MetaCommand Group field (example: "Main Toolbar MA A"), click the arrow and select Properties of MetaCommand Group (example: "Main Toolbar MA A").
6. Select the Component tab.
7. Right-click the tool group (example: MetaCommand Group "View") and select Properties.
8. Select the Component tab.
9. Click Connect  (or New if the MetaCommand Item, MetaCommand Group or MEGA Parameterized Tool does not yet exist).
(or New if the MetaCommand Item, MetaCommand Group or MEGA Parameterized Tool does not yet exist). The MetaClass selection dialog box opens.
10. Select the object type you want to connect. MetaCommand Item, MetaCommand Group or MEGA Parameterized Tool.
11. Click Find.
12. Select the object (MetaCommand Item, MetaCommand Group or MEGA Parameterized Tool) you want to connect.
13. Click OK.
14. Repeat steps 9 to 13 and create and/or connect all the components of the MetaCommand Group (example: "View").
Example: Connect the MetaCommand Items "Favorites" and "Properties" and the MEGA Parameterized Tools "Navigation Trees Manager" and "Languages".
15. To change order of tool group components, see Modifying the position of a tool group in the toolbar.
16. Similarly specify each tool group (MetaCommand Group) of the toolbar.
8.6.5 Configuring toolbar commands display
To configure characteristics of commands (MetaCommand Groups):
1. In HOPEX, display the MetaStudio navigation window.
2. Expand the MEGA Application folder, then the application and desktop (example: "Desktop MA A").
3. Right-click the desktop tool group (example: "Main Toolbar MA A") and select Properties.
4. Select the Description tab.
5. In the MetaCommand Group field (example: "Main Toolbar MA A"), click the arrow and select Properties of the MetaCommand Group (example: "Main Toolbar MA A").
6. Select the Component tab.
7. In the list of toolbar components, right-click a component (example: "View") and select Properties.
8. Select the Component tab.
9. Right-click the MetaCommand Item for which you want to configure display and select Properties.
10. Select the Characteristics tab.
11. In the Presentation frame:
- in the _GUIName field, enter the name under which the command will appear in the user interface.
- in the MetaPicture field, click the arrow and select the image of the command that will appear in the user interface.
- in the Display Mode field, select the display mode (image only, name only, or name and image).
- Select Is Separator to add a separator between commands.
12. Click OK.
8.6.6 Command group configuration examples
Having defined commands of each group of commands of the desktop toolbar, you must configure each command (MetaCommand Group/MetaCommand Item).
Example 1: MetaCommand Group containing a MEGA Parameterized Tool
To configure a MetaCommand Group (example: "Navigation Tree") of a desktop toolbar:
1. In HOPEX, display the MetaStudio navigation window.
2. Expand the MEGA Application folder, then the application and desktop (example: "Desktop MA A").
3. Right-click the desktop tool group (example: "Main Toolbar MA A") and select Properties.
4. Select the Description tab.
5. In the MetaCommand Group field (example: "Main Toolbar MA A"), click the arrow and select Properties of the MetaCommand Group (example: "Main Toolbar MA A").
6. Select the Component tab.
7. Select the MetaCommand Group (example: "View") and open its Properties.
8. Select the Component tab.
9. Click Connect  and select the MEGA Parameterized Tool (example: "Navigation Trees Manager") required.
and select the MEGA Parameterized Tool (example: "Navigation Trees Manager") required.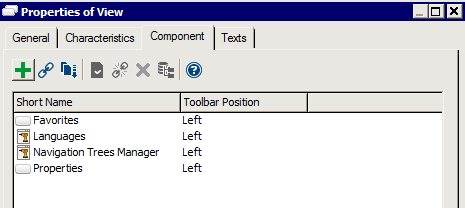
10. Click OK.
In our case, the Left Container of the desktop is the Accordion type Container presenting navigation trees (see Creating a Desktop Container of Accordion type).
The MEGA Parameterized Tool "Navigation Trees Manager" is connected to Left Container. It shows the tools available in the selected Containers and hides the others. The Container is the tool parameter.
Example 2: MetaCommand Group containing a MetaCommand Item implemented by a MEGA Parameterized Tool
To configure a MetaCommand Item (example: "Favorites") of a desktop toolbar:
1. In HOPEX, display the MetaStudio navigation window.
2. Expand the MEGA Application folder, then the application and desktop (example: "Desktop MA A").
3. Right-click the desktop tool group (example: "Main Toolbar MA A") and select Properties.
4. Select the Description tab.
5. In the MetaCommand Group field (example: "Main Toolbar MA A"), click the arrow and select Properties of the MetaCommand Group (example: "Main Toolbar MA A").
6. Select the Component tab.
7. In the list of toolbar components, right-click a component (example: "View") and select Properties.
8. Select the Component tab.
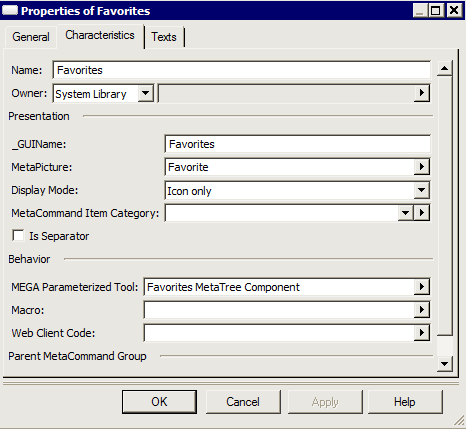
9. Select the MetaCommand Item (example: "Favorites") and open its Properties.
10. Select the Characteristics tab.
11. In the Behavior frame, click the MEGA Parameterized Tool field arrow and select the tool (example: Favorites MetaTree Component) required.
12. Click OK.
Example 3: MetaCommand Group containing a MetaCommand Item implemented by a macro
To configure a MetaCommand Item (example: "Documents") of a desktop toolbar:
1. In HOPEX, display the MetaStudio navigation window.
2. Expand the MEGA Application folder, then the application and desktop (example: "Desktop MA A").
3. Right-click the desktop tool group (example: "Main Toolbar MA A") and select Properties.
4. In the MetaCommand Group field (example: "Main Toolbar MA A"), click the arrow and select Properties of the MetaCommand Group (example: "Main Toolbar MA A").
5. Select the Component tab.
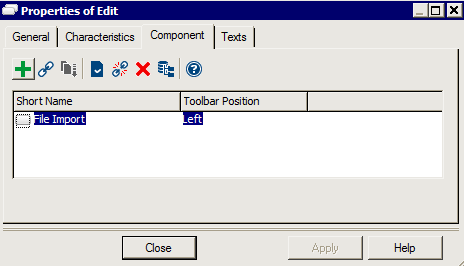
6. In the list of toolbar components, right-click a component (example: "Edit") and select Properties.
7. Select the Component tab.
8. Click New  .
.
.9. In the MetaClass selection dialog box, select MetaCommand item.
10. Click OK.
11. In the Name field, enter the command name (example: "File Import").
12. Open the Properties of the command you have just created (example: "File Import").
13. Select the Characteristics tab.
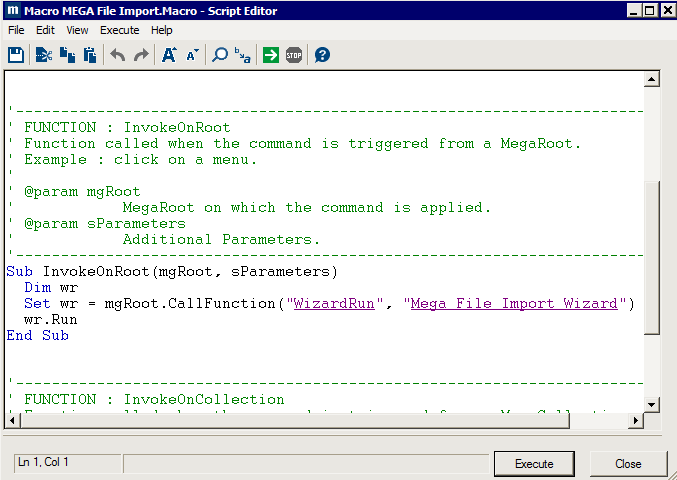
14. In the Behavior frame, click the Macro field arrow and select the required macro (example: "MEGA File Import.Macro").
15. Click OK.
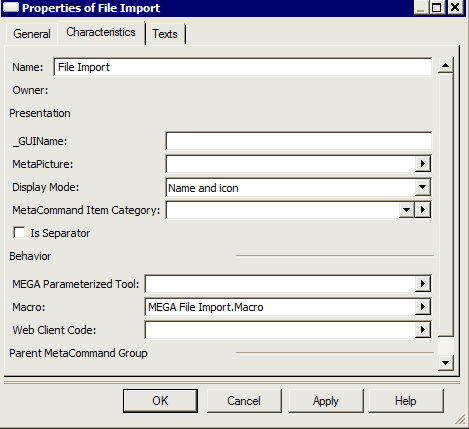
Example: macro "MEGA File Import.macro".
16. Click OK.
Example 4: MetaCommand Group containing a MetaCommand Item implemented by JavaScript code
To configure a MetaCommand Group (example: "Miscellaneous") in a desktop toolbar, containing a command implemented by JavaScript code:
1. In HOPEX, display the MetaStudio navigation window.
2. Expand the MEGA Application folder, then the application and desktop (example: "Desktop MA A").
3. Right-click the desktop tool group (example: "Main Toolbar MA A") and select Properties.
4. In the MetaCommand Group field (example: "Main Toolbar MA A"), click the arrow and select Properties of the MetaCommand Group (example: "Main Toolbar MA A").
5. Select the Component tab.
6. In the list of toolbar components, right-click a component (example: "Miscellaneous") and select Properties.
7. Select the Component tab.
8. Click New  .
.
.9. In the MetaClass selection dialog box, select MetaCommand item.
10. Click OK.
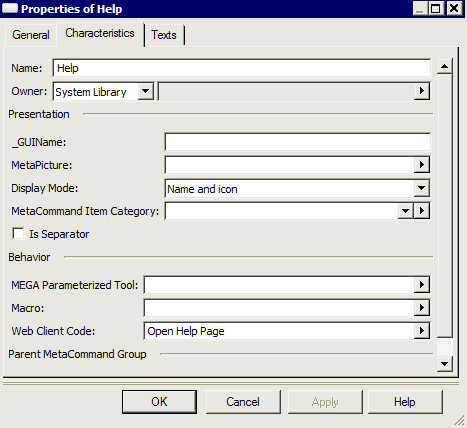
11. in the Name field, enter the command name (example: "Help").
12. Click OK.
13. Open the Properties of the command you have just created (example: "Help").
14. Select the Characteristics tab.
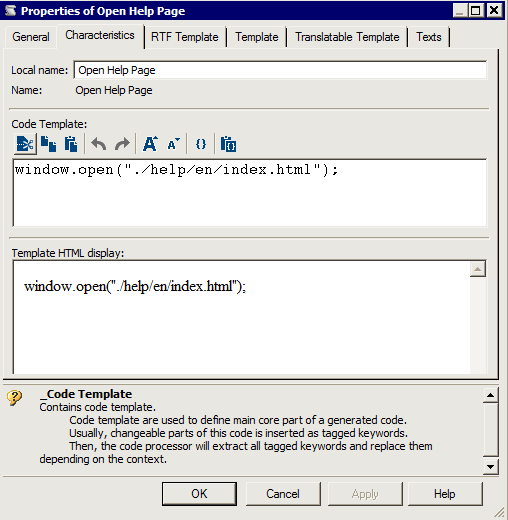
15. In the Behavior frame, click the Web Client Code field arrow and select the _Code Template required (example: "Open Help Page").
Example: _Code Template "Open Help Page"
16. Click OK.
17. Click OK.
8.7 Customizing the Desktop style sheet
According to your needs, you may need to modify the Desktop style sheet. In that case, be careful that its color match with the default icon colors.
Else you can overload the default icons.
8.7.1 Modifying the Desktop style sheet
By default HOPEX (Web Front-End) desktops use the same style sheet. This style sheet is defined in HOPEX Options > Installation > Web Application > Theme used in Web Application.
Some of them already use their own style sheet.
For example: HOPEX Explorer uses “HOPEX Explorer V2R1 Style” style sheet, Solutions like HOPEX GDPR based on Universal Desktop use the “HOPEX V2R1 Style” style sheet).
To modify the desktop style sheet:
1. In HOPEX, display the MetaStudio navigation window.
2. Expand the Desktops folder, and access the properties of the desktop concerned.
3. in the Characteristics tab, in HOPEX Style Sheet field, click the arrow and select Connect HOPEX Style Sheet.
4. Connect the HOPEX Style Sheet.
When you change the style sheet, be careful that its color match with the default icons. Else you can customize the icons.
8.7.2 Customizing icons for a specific style sheet
You can customize icons according to a Solution. To customize icons for a specific style sheet, you need to define a type, and connect it to the style sheet.
Example:
“HOPEX Explorer V2R1 Type” is connected to “HOPEX Explorer V2R1 Style” style sheet. It includes 14 pictures, which overload the corresponding 14 standard pictures in the context of “HOPEX Explorer V2R1 Style”.
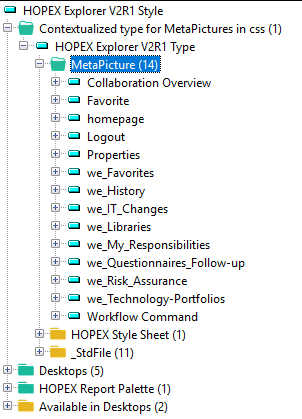
An object MetaPicture (icon) is associated with an _StdFile. The icon displayed depends on the desktop style sheet.
Example:
For “Collaboration Overview”, the MetaPicture used in the context of “HOPEX Explorer V2R1 Style”, is Exp_Collaboration_Overview.ico instead of ud_collabortaion.ico.

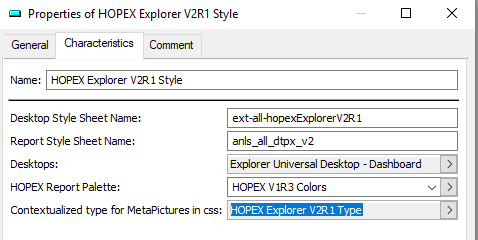
To create a type:
1. Access the HOPEX Style Sheet properties associated with the Desktop concerned.
2. In its Characteristics tab, in the Contextualized type for MetaPictures in css field, click the arrow and select Create_Type.
For example, in the “HOPEX Explorer V2R1 Style” style sheet properties, the “HOPEX Explorer V2R1 Type” is connected.
8.8 Defining a context-specific display for a Desktop Container
You can define the way containers are displayed (Context Display Mode: opened or closed) in a specific context at initialization.
The context applies on:
• tools
• macros: EmitCurrent in a context (e.g.: floating toolbar, Activity feed)
To do so, you need to create a Desktop Container Context.
To customize a Desktop Container default behavior:
1. In HOPEX, display the MetaStudio navigation window.
2. Right-click the Desktop Container Contexts folder and select New > Desktop Container Context.
3. In the Name field enter a name for the context.
4. Click OK.
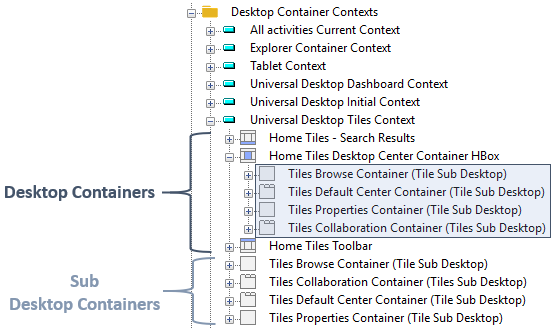
5. Expand the Desktops folder and drag and drop all the Desktop Containers (including needed sub Desktop Containers) concerned in the Desktop Container Context you created.
For example: the four sub Desktop Containers of “Home Tiles Desktop Center Container Hbox” Desktop Container are also added in the Desktop Container Context.
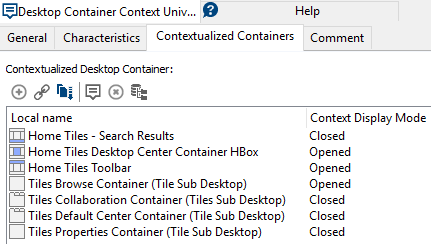
6. In the Desktop Container Context properties, select the Contextualized Containers tab.
7. For each Desktop Container (and sub desktop Container), in its Context Display Mode field select its context display mode.
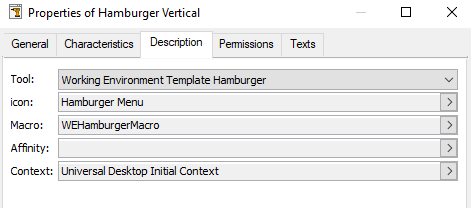
8. Access the properties of the MEGA Parameterized Tool concerned by the context.
9. In its Description tab, in the Context field, connect the Desktop Container Context you created.
Example: in the “Hamburger vertical” Mega Parameterized Tool, the “Universal Desktop Initial Context” Desktop Container Context is connected to:
- the “Working Environment Template Hamburger” Tool and
- the “WEHamburgerMacro” macro
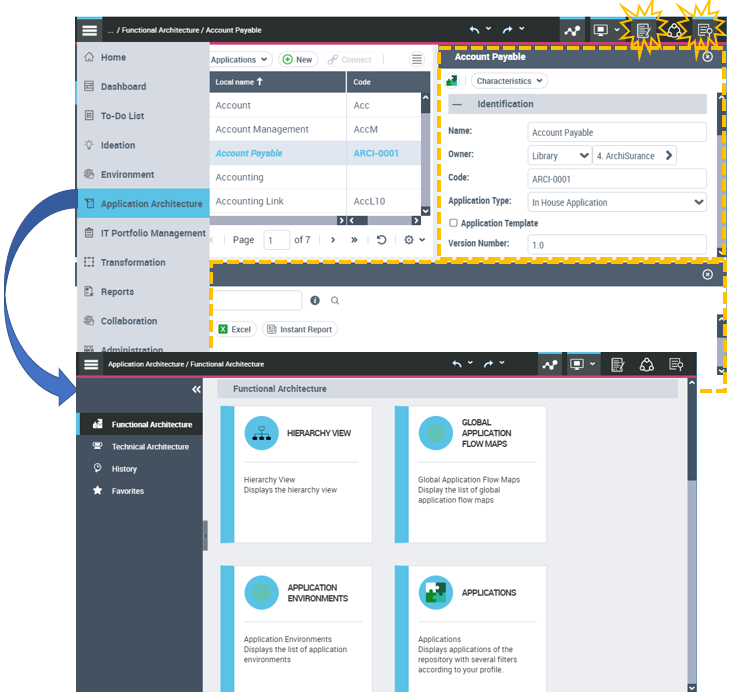
So that, in HOPEX, when the user clicks the Navigation Menu  > a navigation pane, the Edit area is displayed (“Home Tiles Desktop Center Container Hbox and Home Tiles Toolbar”) with its Browse window
  opened only. Other windows like Properties, Search and Results or Collaboration are closed.
> a navigation pane, the Edit area is displayed (“Home Tiles Desktop Center Container Hbox and Home Tiles Toolbar”) with its Browse window opened only. Other windows like Properties, Search and Results or Collaboration are closed.