The Advanced Search
Advanced Search Tool Description
The advanced search tool (Query Tool) is available:
• from the workspace, using the search toolbar or  .
.
.• from other HOPEX tools such as diagrams, the explorer, etc.
Different modes, each corresponding to a tab, are available depending on how the search is run (from the workspace or from another tool).
Use the advanced search tool to enter queries, which define:
• the objects and links browsed.
• the conditions on links and objects making up the repository browsing path.
The subject of the search is called “target”.
A query can be written:
• using a wizard (assistant)
• directly using the repository query language (ERQL)
For information on this language syntax, see Query Syntax.
Querying Using the Query Assistant
The Assistant tab enables creation of multi-parameter searches without needing to know ERQL language.
A search bar similar to that presented in Quick Search section, enables selection of the object type you want to search for.
You can perform a simple search using this bar, or perform a search using the parameters that appear in the tree.
To query using the assistant:
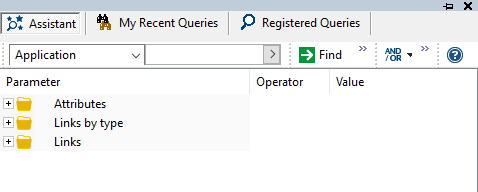
1. Access the advanced search tool.
The advanced search tool appears and displays the Assistant tab.
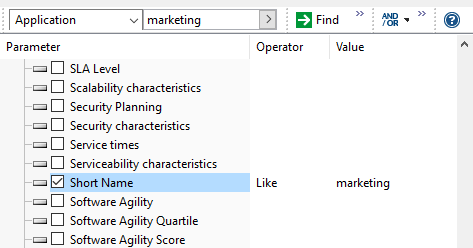
2. In the search bar, in the first field, select the type of object to query.
Example: Application.
3. In the parameter field, select the parameter concerned by the search.
4. In the Operator field, define the operator to be applied.
5. (If necessary) In the Value field, define the parameter value.
6. (If needed) Display the query code.
7. Click Find  .
.
.The result list is displayed.
Using the query assistant tree
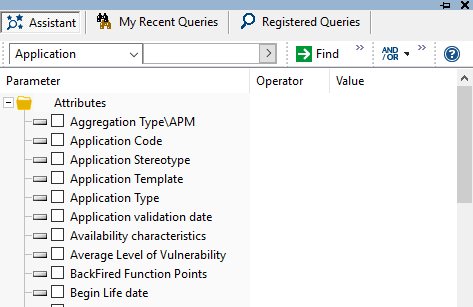
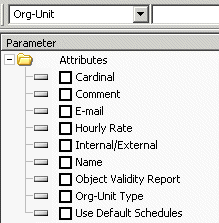
For each target object type, the query assistant proposes:
• its Attributes
• the Links to the types of objects that can be connected.
Target object type characteristics
You can use characteristics (attributes) of the target object type as parameters (for example, name and comment, which are valid characteristics for all object types).
Links
You can also use link characteristics as parameters.
Object types that can be connected to the target object type appear under the "Source" heading.
Each link groups the characteristics of the link and associated objects.

"Involvement", "Follow-up Policy", "RACI", "Performer status" are properties of the link between Org-Unit and Organizational Process in the example below.
Query parameters
The Parameters column contains the names of the query parameters (characteristics, links, associated objects). Check boxes enable indication of the parameters that define the query.
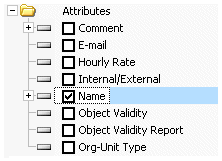
Selected links or properties appear highlighted to facilitate the query build and readability.
 (Remove all query criteria).
When you enter a name in the second field of the assistant query bar, the Name parameter is initialized using this value.
By default, the tree includes the main search parameters only. To extend the list of proposed parameters to:
• the administration properties, see Displaying administration properties.
• (If you work in a multilingual environment) translations, see Displaying translation properties.
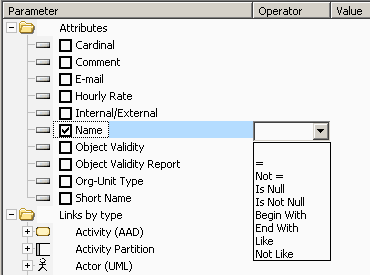
Query operators
Operators are defined as a function of the selected parameter.
And, Or, and Not Operators
In the assistant toolbar of the advanced search tool, the  button enables use of the "And", "Or", and "Not” operators.
button enables use of the "And", "Or", and "Not” operators. These operators concern all parameters selected in the assistant.
The parameters concerned by these operators are highlighted in a color that varies according to the operator (blue for "And", green for "Or", orange for "Not").
• And
The And operator means ALL conditions must be fulfilled.
Select [Project] Where [Progress percentage] ="100%"
And [Project manager names] ="Brown"
And [Project diagram] Is Not Null
• Or
The Or operator means AT LEAST ONE condition must be fulfilled.
Select [Org-Unit] Where [Message-Sent]
Or [Message-Received]
Or [Message-Collected]
• Not
The Not operator means NO condition must be fulfilled.
Select [Org-Unit] Where Not [Message-Sent]
And Not [Message-Received]
And Not [Message-Collected]
Inherited objects
In case of use of object variations (Activating Variations), by default, the Inherited Objects option is selected. The code generated by the query assistant includes a keyword mentioning the inheritance.
Examples of query codes taking account of inheritance:
Select [IT Service] Inherited Where [Defining-Application] = 'Myapplication V2.0"
This query retrieves all services defined for the "Myapplication V2.0" application , including those inherited.
Select application inherited Where [Functionality] = &func
This query retrieves all applications that carry the "My func" functionality either directly or via inheritance.
Deactivating inheritance in the query assistant
To deactivate inheritance in the query assistant:
1. In the query assistant, click .
.2. Clear Inherited Objects.
Query parameter values
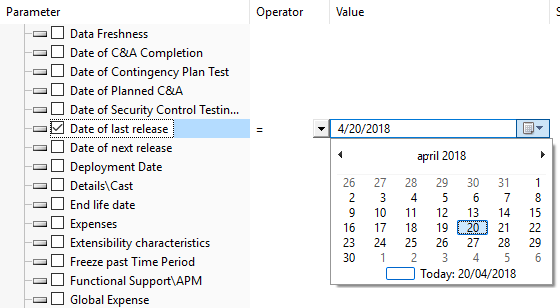
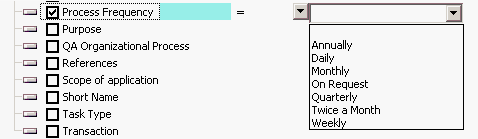
The Value field enables to enter or search for the parameter value.
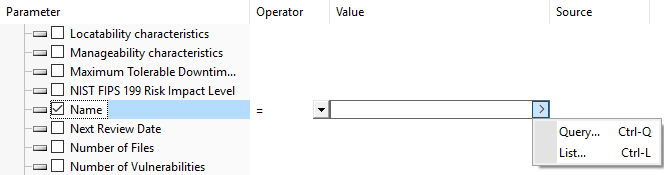
Depending on the parameter type, some tools help you enter its value.
For example:
• to enter a date, a calendar is proposed.
• to enter a frequency, a list of values is proposed.
Displaying the query code
The query code is built as you progressively select the boxes and complete the fields.
Values entered in the fields are kept when you clear the box (so as to note the parameter corresponding to the query code - you can then quickly reintegrate it by rechecking the box).
By default, the query code is not visible in Assistant mode.
To display the query code:
 > Query Code.
The query code is displayed at the bottom of the Assistant tab.
You cannot modify this code.
If needed, you can copy (Ctrl+C) the query code to use it elsewhere or to save it to create a new query.
Saving a query from the assistant
When Show > Query Code is selected, the query code appears at the bottom of the assistant.

You can save it by creating a query.
To create a query from the code obtained in the assistant:
1. Display or create a query.
2. In the assistant menu bar, click Save as  .
.
. The query creation window opens.
3. In the Name field, enter a name for your query.
4. In the Stereotype field, select the query type.
5. Click Next to reread the code of your query.
6. Click Finish.
Your query is available in the Registered Queries tab.