3 Create a Java component
This chapter details the creation of a MEGA plug-in in Java.
The Java APIs provided by MEGA enable access to the possibilities offered by the existing VB Script API.
The HOPEX 1.0 Java APIs allow for the creation of plug-ins written in Java. The component written in Java is deployed in the form of a Jar library referenced via a macro.
The following subjects are covered:
• Using Eclipse as the environment for developing a MEGA plug-in written in Java
• Creating a MEGA component implemented in Java
• Implementing the Java MEGA API using the example of creating a MetaCommand
• Debugging a MEGA plug-in written in Java with Eclipse
3.1 MEGA and Java general considerations
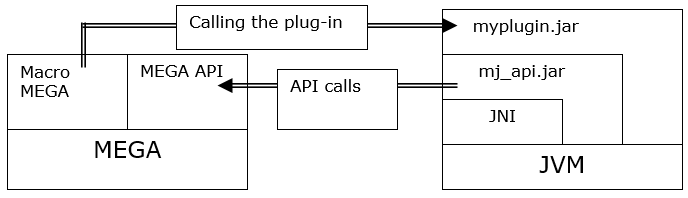
3.1.1 Architecture of a MEGA plug-in written in Java
The following diagram illustrates the call from MEGA of a plug-in written in Java. The plug-in uses repository content via MEGA APIs.
Versions of the applications used in this chapter are as follows:
|
MEGA
|
HOPEX Aquila
|
|
JDK
|
17
|
|
Available at the following location:
|
|
|
Eclipse
|
Eclipse IDE 2021‑03
|
|
Available at the following location:
|
Calling the plug-in
A macro enables referencing of the plug-in in HOPEX. It identifies the class to be instanced.
Depending on the macro use case, the instanced class must implement a specific interface. It is via this interface that the plug-in will be called. In HOPEX, the functionalities that can be implemented in VB script can also be implemented in Java.
Examples:
• Meta Wizards
• Methods
• Update Tools
• Commands
• etc.
Using the MEGA API in the plug-in
When called, the plug-in can in turn call the MEGA application via the Java MEGA API.
The Java MEGA API is a set of objects and interfaces enabling, via JNI, calling the existing VB script MEGA API (Dispatch, Automation…).
This set of objects and interfaces is available in the mj_api.jar library delivered with HOPEX.
3.1.2 The JVM
In order to function, the Java MEGA API depends on a JVM (Java Virtual Machine).
This JVM is contained in the JRE (Java Runtime Environment) delivered with HOPEX.
Java plug-ins and applications integrating with HOPEX must be developed using a version of Java compatible with the JRE delivered with HOPEX.
3.1.3 The JDK
While the JRE enables only the execution of Java applications, the JDK also enables their creation: its contents include the Java compiler and all elements required for developing a Java application.
To develop a MEGA plug-in in Java, it is necessary to obtain and install the compatible JDK.
To download and install the JDK:
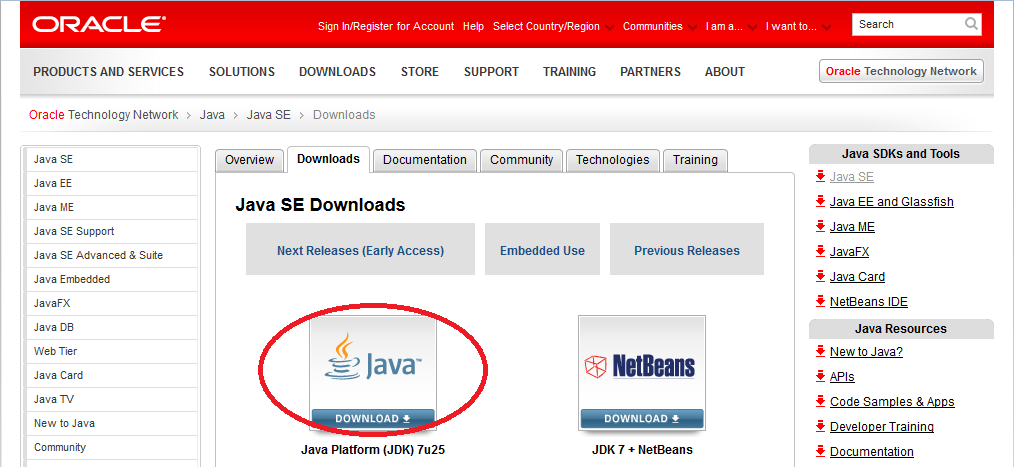
1. Go to the Oracle Web Site.
To get the url path see table in Architecture of a MEGA plug-in written in Java section.
2. Download the JDK.
3.2 Development environment (Eclipse)
Eclipse is the Java-oriented development environment preferred for developing Java components integrated in HOPEX or interfacing with HOPEX.
3.2.1 Installing Eclipse
Downloading
MEGA recommends using the Juno release of Eclipse.
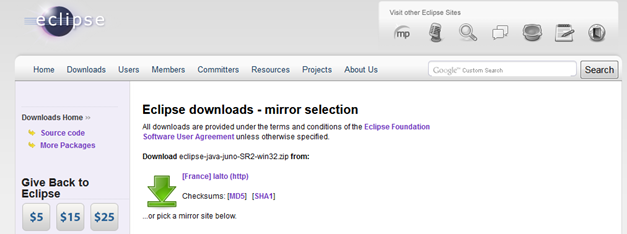
Download Eclipse from the url given in the table in the Architecture of a MEGA plug-in written in Java section.
You obtain a zip Archive file eclipse-java-juno-SR2-win32.
Installing Eclipse
To install Eclipse:
1. Unzip the zip Archive file at the hard drive root or in the Program Files folder.
Note: Certain versions of Eclipse are delivered with a JRE, for others you must obtain it.
2. Launch Eclipse.

3. (optional) In the Workspace Launcher, modify your workspace folder.

4. Click OK.
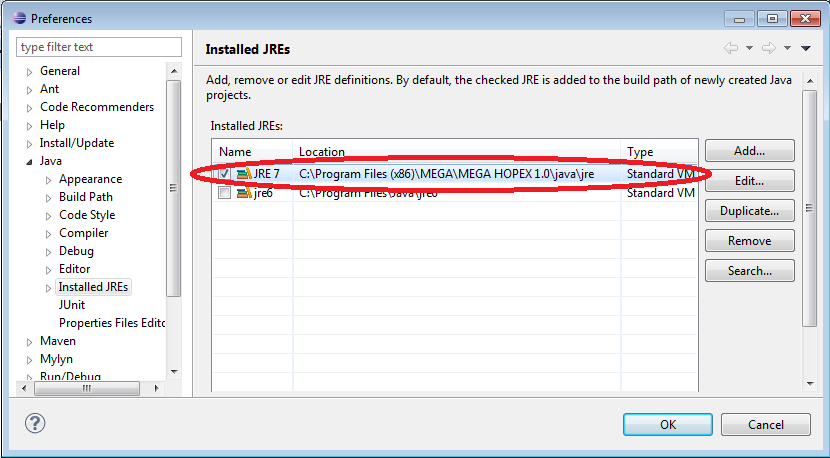
Selecting a JRE compatible with HOPEX in Eclipse
Selecting the JRE to be used by default in Java projects avoids using an incorrect JRE in new Java projects.
Using a JRE version delivered with HOPEX insures total compatibility.
To select in Eclipse a JRE compatible with HOPEX:
1. From the Eclipse menu bar, select Window > Preferences.
2. From the Preferences dialog box, in the left pane, expand Java node and select Installed JREs.
3. In the Installed JREs right pane, add a reference to the HOPEX compatible JRE.
3.2.2 General writing conventions
Compliance with a writing convention is highly recommended.
The Eclipse "CheckStyle" plug-in enables integration in Eclipse of automatic management of Java source style validation.
Installing the writing style validation plug-in
To install the writing style validation plug-in:
1. From Eclipse, in the menu bar, select Help > Install New software.
The Install wizard appears.
3. Click Add.
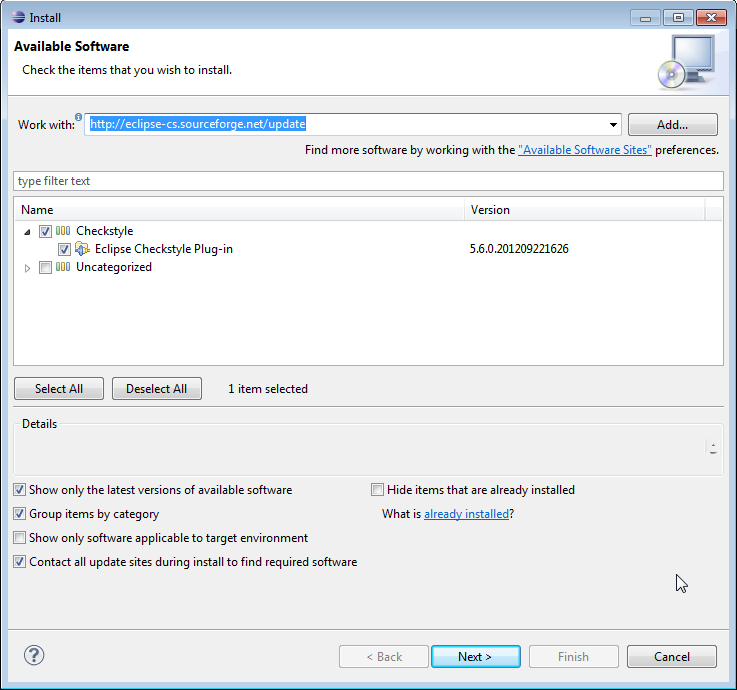
4. In the pane, select Eclipse CheckStyle Plug-in.
5. Click Next.
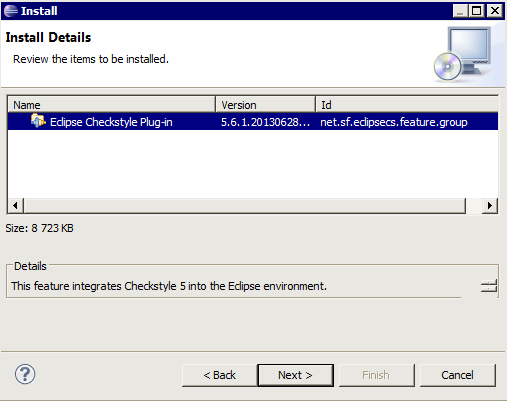
6. Click Next.
7. Accept the plug-in installation to execute the plug-in setup.
Configuring writing style check
To configure writing style check:
1. From Eclipse, in the menu bar, select Window > Preferences.
The Preferences dialog box appears.
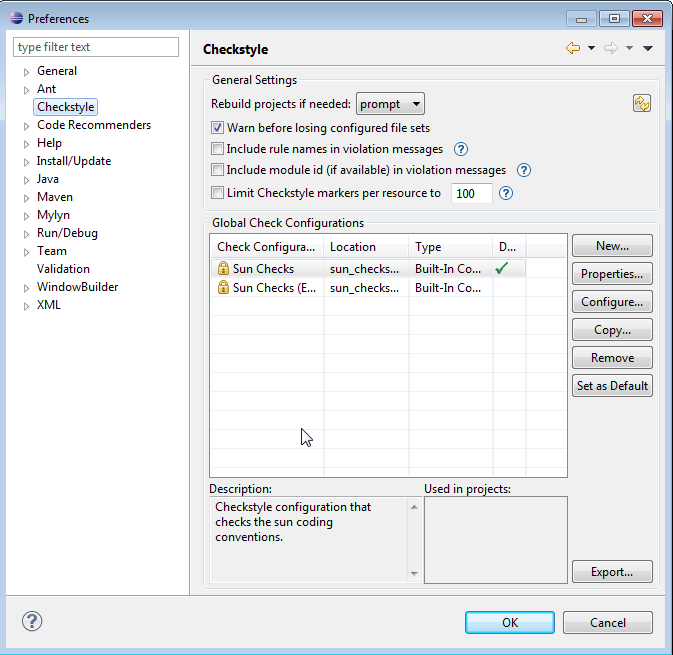
2. From the Preferences dialog box, in the left pane, select Checkstyle.
3. In the Checkstyle right pane, select an encoding standard. Standards supplied with the plug-in are:
- Sun development conventions.
- Sun conventions slightly modified, adapted to Eclipse default formatting.
3.3 Calling a component written in Java from HOPEX
This section illustrates a call on a Java component using an example of how to create a MEGA macro implemented in Java.
This macro enables writing of text in a file.
3.3.1 Creating a Java macro in HOPEX
Configuring macros implemented in Java
All macros implemented in Java must reference the target class instanced and called via the macro:
1. From the macro properties dialog box, in the Characteristics tab, set the SystemComponent attribute value to "Dispatch”.
2. Attribute a value of form "java:Package/Class" to the "_ObjectFactory" property (see example in the next chapter). Package is the name of the Java package in which the referenced class is defined. Period characters (‘.') of the package name must be replaced by slash characters (‘/'). The name of the class is separated from the name of the package by the slash character (‘/').
To create and configure a Java macro in HOPEX:
1. From the main HOPEX menu bar, select View > Navigation Windows > Utilities.
2. In the Utilities tab, to create a new macro folder, select Macro > New > Folder of Macros, and name it, for example “JAVA”.
3. From your “JAVA” folder, create a new Java Macro.
The Creation of Macro wizard appears.
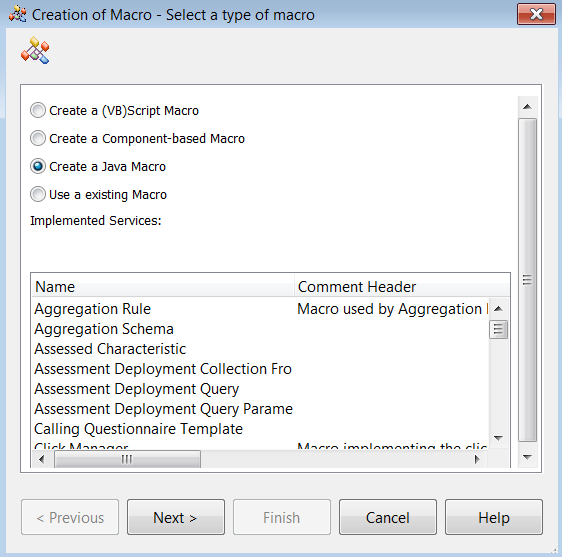
4. Click Next.
5. In the Setup Java Macro:
a. In the Class Name field, enter for example “MegaPlugin”.
b. In the Package Name field, enter for example “com.mega.tutorial”.
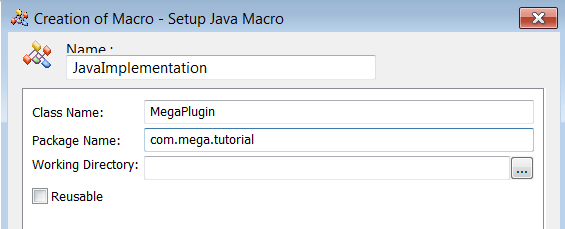
6. Click Finish to terminate the wizard.
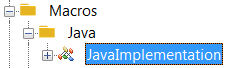
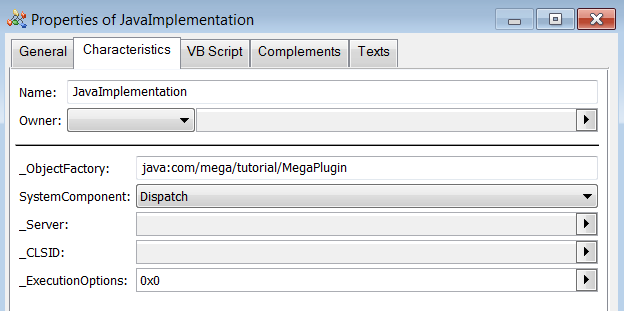
7. Open the “JAVAImplementation” macro properties, and check that:
- the SystemComponent attribute value is "Dispatch”.
- the _ObjectFactory attribute contains the package and class name with the syntax defined in the above section.
The value here is defined as "java:com/mega/tutorial/MegaPlugin" (identifies the "MegaPlugin" class of the "com.mega.tutorial" package):
3.3.2 Creating an Eclipse project
To create the Java component, the "Java" perspective should be used (in Eclipse online Help, see the information relating to use of perspectives).
To create a new Java project:
1. From the Eclipse menu bar, select File > New > Java project.

2. Enter the Java Project name.
3. Ensure that the JRE used is compatible with the MEGA version for which the Java component is created ("Configure JREs").
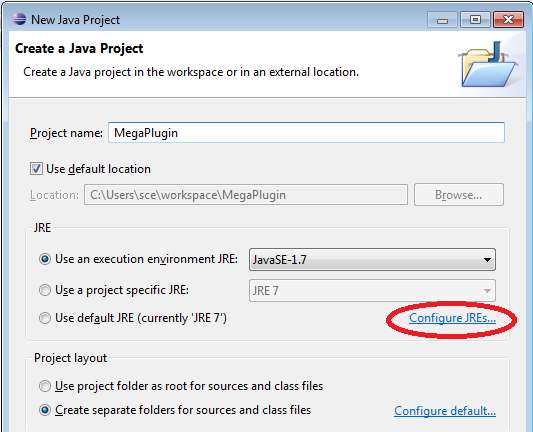
4. Click Finish to validate the Java project creation.
Creating implementation class of the macro
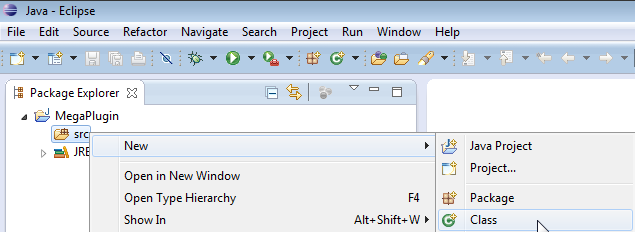
To create an implementation class of the macro:
1. From the Eclipse menu bar, select Window > Show View > Package Explorer.
2. In the Package Explorer tab, expand the MegaPlugin project
3. Right-click the src folder and select New > Class.
4. In the Package field, enter "com.mega.tutorial".
5. In the Name field enter the class name "MegaPlugin":
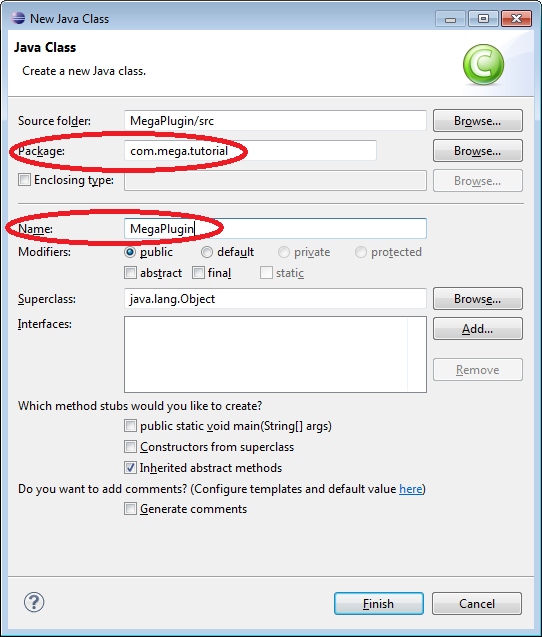
6. Click Finish.
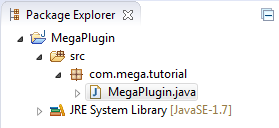
Note: As previously seen, the package and class created are those identified in the _ObjectFactory" parameter of the corresponding MEGA macro.
3.3.3 Implementing the macro
Implementation of the macro consists of a class exposing the writeInFile public method that can be called from HOPEX:
|
// Package containing the implementation class.
package com.mega.tutorial;
// Need to write some text in a file.
import java.io.FileWriter;
// Need to throw exception managed by MEGA.
import java.io.IOException;
/**
* MegaPlugin Macro implementation class.
*/
public class MegaPlugin {
/**
* MegaPlugin Macro implementation class.
* @param filename Name of the file created.
* @param text Some text that will be passed from MEGA.
* @throws IOException Method called from MEGA must throw
* IOException exception.
*/
public void writeInFile(String fileName, String text) throws IOException
{
FileWriter writer = null;
// Open a FileWriter with file name
writer = new FileWriter(fileName);
// Write the text in the file
writer.write(text);
//Close the file
if(writer!=null)
{
writer.close();
}
}
}
|
Compiling and deploying the Java component
To compile the Java component in the form of a JAR file
1. In the Java project, right-click MegaPlugin and select Export.
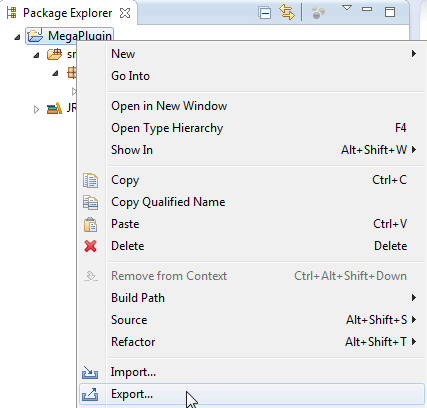
2. In the Export wizard, expand the Java folder and select JAR file.
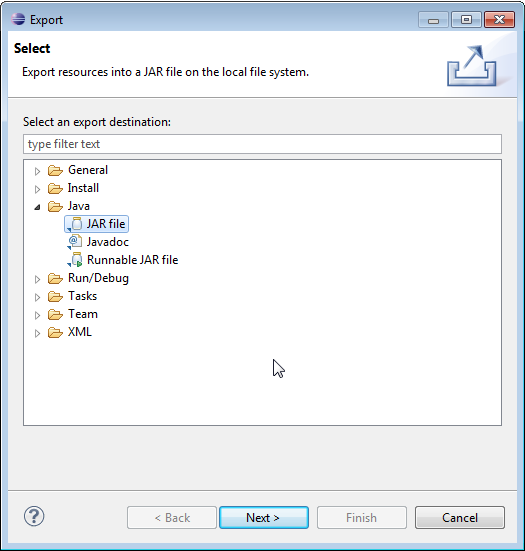
3. Click Next.
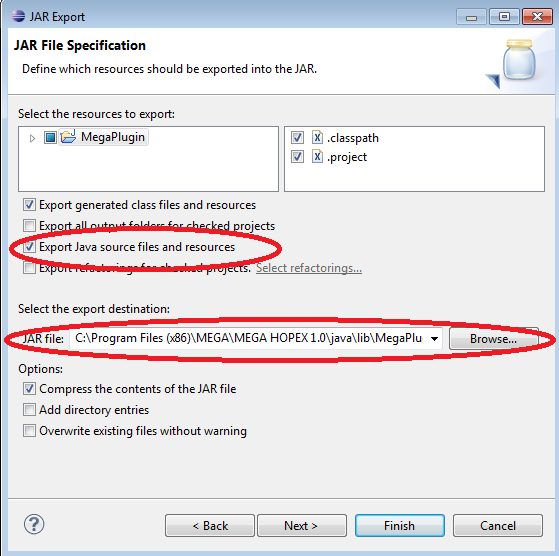
4. Make sure Export Java source files and resources is selected.
5. In the Select the export destination field, click Browse and indicate the location of the JAR file to be generated.
6. Click Finish.
|
|
Note 1: The JAR file must be generated (or copied after generation) in the "java\lib" directory of the HOPEX installation site.
|
 |
Note 2: It is important to export your Java source files. Indeed, once the project is delivered, the end user may encounter problems and call MEGA Technical Support. This will enable the Support to better diagnose the problem. Also, the customer may ask you to add additional customizations. It would be a shame to have to rewrite the full code. With this option, the code is kept and can be reused.
|
3.3.4 Executing the macro
When the JAR file has been deployed in the HOPEX "java\lib" directory, the macro can be tested.
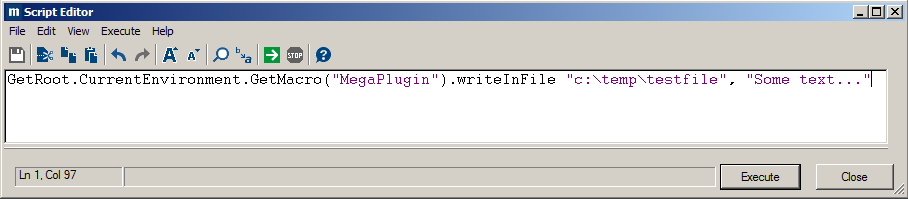
To test the macro:
1. In the HOPEX script editor, perform the following command:
GetRoot.CurrentEnvironment.GetMacro("MegaPlugin").writeInFile "c:\temp\testfile", "Some text..."
3.4 Using the MEGA API in a component written in Java
This chapter is an introduction to implementation of Java MEGA APIs using the example of the creation of a "Command" that can be executed from a Business Process's contextual menu.
The effect of this Command is to export the hierarchy of Business Processes into a text file.
Note: The Java MEGA API is not detailed in this document. Java MEGA API documentation is provided in the HOPEX installation "java\doc" directory and is also accessible from HOPEX online documentation (HOPEX Customization (Windows) > Using APIs > JavaDoc).
3.4.1 Creating the Command
To create the command:
1. From HOPEX MetaStudio, open the "Business Process" MetaClass properties.
2. In the UserInterface tab, select the Menu Command sub tab, and create a new MetaCommand Item named "ExportPlugin":
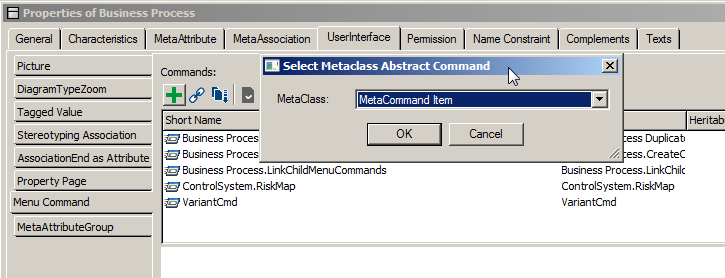
3. Create a macro from the Macro field of the MetaCommand:

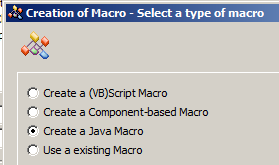
4. Select the creation of a Java macro:
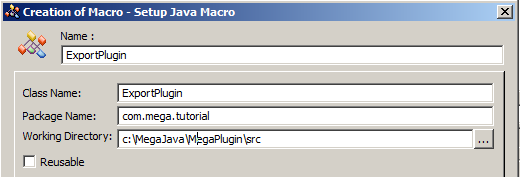
5. Name the macro "ExportPlugIn" and specify the following parameters:
a) “Class Name” identifies the Java class called, specify “ExportPlugin”.
“Package Name” identifies the package of the Java class called, specify “com.mega.tutorial”.
b) “Working Directory” identifies the directory in which to generate the Java class initialized with the functions to be implemented.
6. Creation of the macro initializes the ”ObjectFactory” and “SystemComponent” properties. In the macro properties, the _ObjectFactory field is specified with the identifier of the MetaCommand implementation Java class (“java:Package/Class”):

7. The Java class is generated, according to the interface to be implemented, in the directory previously specified:
package com.mega.tutorial;
import com.mega.modeling.api.*;
public class ExportPlugin {
/**
* Function called when the command is triggered from a MegaObject.
* Example: click on a menu.
*
* @param mgobjSource
* MegaObject on which the command is applied.
*/
public void InvokeOnObject(MegaObject mgobjSource, Object userData) {
}
}
3.4.2 Configuring the Eclipse project for use of Java MEGA API
In this section, the Eclipse project « MegaPlugin » used in the Creating an Eclipse project section is reused.
Referencing the Java MEGA API access component
So that implementation of the MetaCommand Item can use Java MEGA APIs, the API access component must be referenced by the “MegaPlugin” Eclipse project.
The “java\lib” directory of the HOPEX installation site contains the Java components delivered by MEGA. Among these, file "mj_api.jar" provides access to Java MEGA API.
Note: As previously seen, customized Java components must also be deployed in the "java\lib" directory.
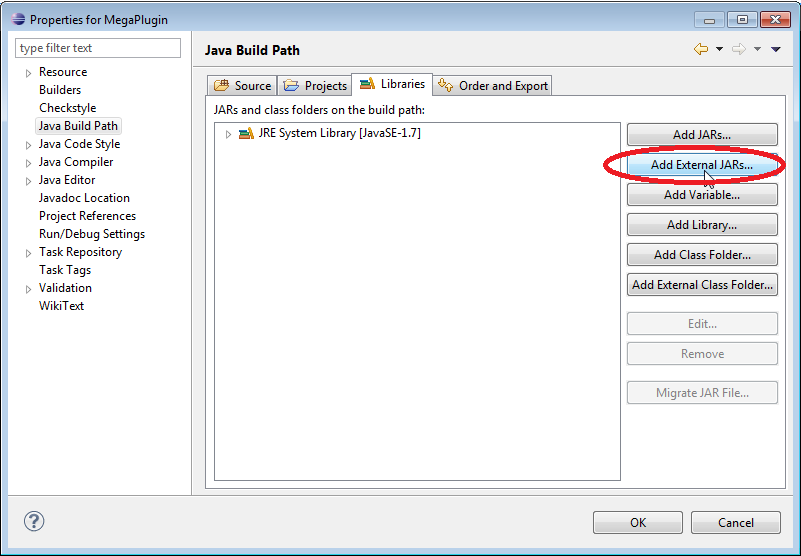
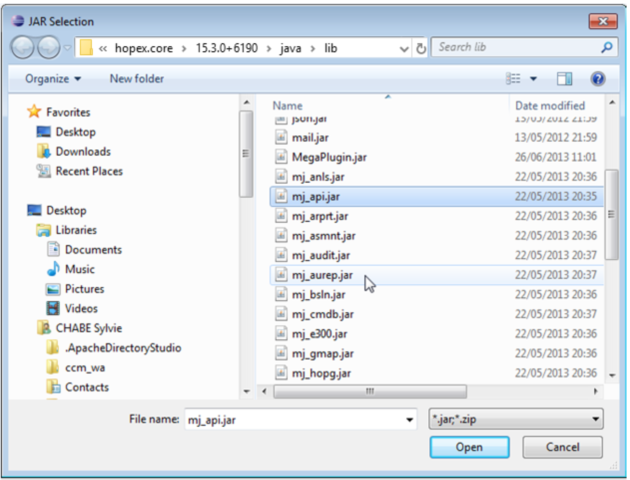
To reference the "mj_api.jar" component:
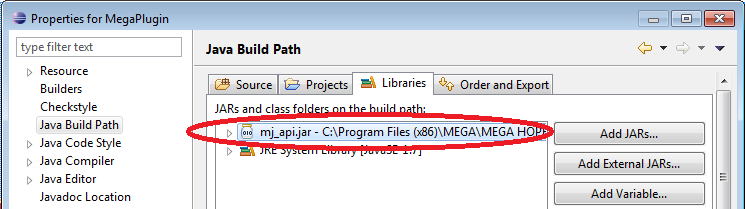
1. In "Package Explorer" select "Properties" of the "MegaPlugin" project to open its properties.
2. In the Java Build Path node, Libraries tab, add the reference to file "mj_api.jar":
Integrating API documentation in the development environment
Java MEGA API documentation is delivered in the form of an archive, file "mj_api.zip" in the "java\doc" directory of the HOPEX installation.
The archive contains documentation in HTML format generated by JavaDoc.
To benefit from total integration of Java MEGA API help, API documentation should be associated by referencing the file "mj_api.jar".
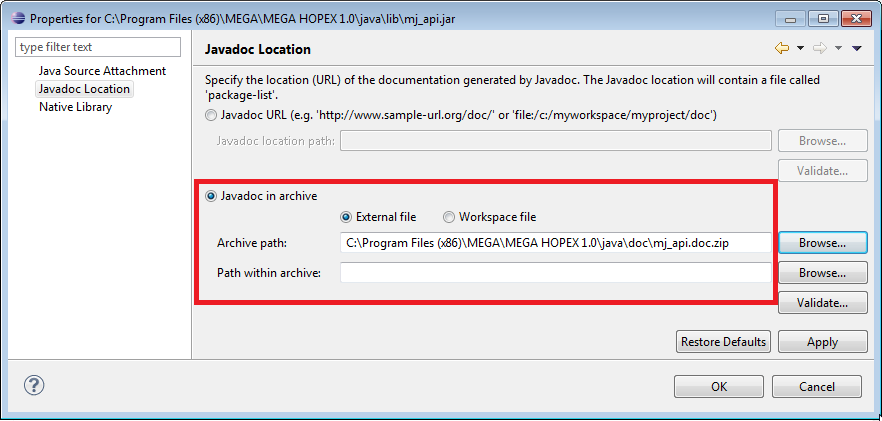
To associate JavaDoc help with the "mj_api.jar" component, specify the location of the archive containing help in the properties of the referenced "mj_api.jar" library:
1. Open the "mj_api.jar" library properties:

2. In the node "Javadoc Location", specify the location of the JavaDoc help (MEGA API JavaDoc help is available as a compressed archive in the "java\doc" directory of the HOPEX installation):
Once the JavaDoc help has been referenced, it may be used by positioning the cursor on documented keywords.
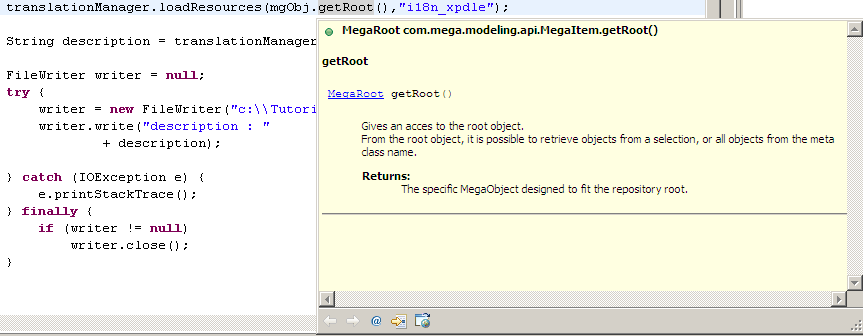
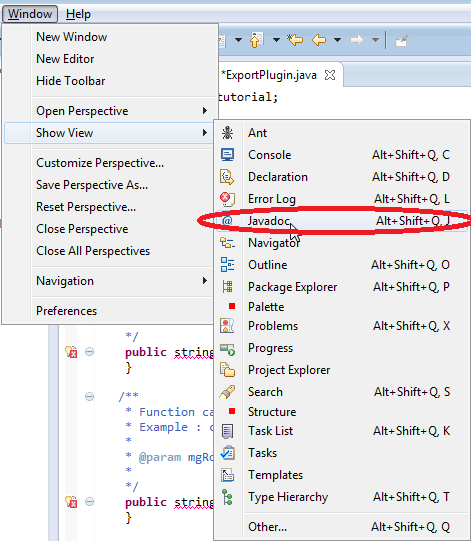
Javadoc help can be permanently displayed in a dedicated window. To display this window, select Window > Show View > Javadoc:
Generating identifiers for the metamodel used
MEGA APIs enable exploration and modification of models described in the HOPEX repository.
The concepts (MetaClasses, MetaAssociationEnds, MetaAttributes, etc.) used through an API can be identified by their name or identifier.
Example finding sub-processes of a business process:
subProcesses = process.getCollection("Component");
It is highly recommended to use the identifiers of concepts to ensure compatibility with languages and potential future metamodel modifications.
The example above can therefore be written as:
// using the identifier in its Absolute Identifier (IdAbs) format
subProcesses = process.getCollection("8l)gvmQ9pKE0");
// using the identifier in its hexadecimal (_HexaIdAbs) format
subProcesses = process.getCollection("ABFBAC39332500E5");
// using the identifier in its MEGA field format
subProcesses = process.getCollection("~8l)gvmQ9pKE0[Component]");
A wizard enables generation of classes defining identifiers to be used for a set of MetaClasses.
To execute this wizard:
1. From HOPEX Tools menu, select Generation of identifiers for Java components.

2. In the wizard, specify:
o the Java classes generation path
o the MetaClasses for which identifiers must be generated.

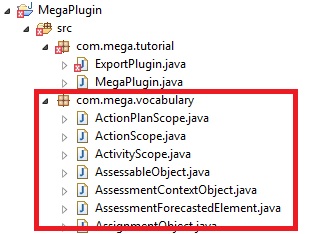
In our example, files will be generated in the directory containing the sources: "C:\MegaJava\MegaPlugin\src".
A package "com.mega.vocabulary" is created containing classes corresponding to declarations of selected MetaClasses as well as their inherited MetaClasses:
3.4.3 Implementing the MetaCommand Item
package com.mega.tutorial;
import com.mega.modeling.api.*;
import com.mega.vocabulary.*;
import java.io.FileWriter;
import java.io.IOException;
public class ExportPlugin {
private static String filePath = "C:\\Temp\\BusinessProcess.txt";
/**
* Function called when the command is triggered from a MegaObject.
* Example: click on a menu.
*
* @param mgobjSource
* MegaObject on which the command is applied.
*/
public void InvokeOnObject(MegaObject mgobjSource, Object userData) throws IOException
{
FileWriter writer = null;
MegaObject process = null;
// Source object is a process
process = mgobjSource;
// Open a FileWriter with file name defined statically in the class
writer = new FileWriter(filePath);
// Writes the source process name
writer.write(process.getProp(BusinessProcess.MA_GenericLocalName) + "\r\n");
// Get the collection of sub-processes
// Uses: MegaObject.getCollection function with the identifier
// of sub-process generated in the com.mega.vocabulary package
MegaCollection subProcessesCollection = null;
subProcessesCollection = process.getCollection(BusinessProcess.MAE_Component);
// Search for all the sub-processes
for (int subProcessesIndex = 1;
subProcessesIndex < subProcessesCollection.size() + 1;
subProcessesIndex++)
{
MegaObject subProcess = null;
// Get the sub process in the collection at subProcessesIndex position
subProcess = subProcessesCollection.get(subProcessesIndex);
// Writes the sub-process name
writer.write(" " + subProcess.getProp(BusinessProcess.MA_GenericLocalName) + "\r\n");
}
if(writer!=null)
{
writer.close();
}
}
}
Compiling and deploying
Follow the Compiling and deploying the Java component procedure described in the Calling a component written in Java from section.
| If changes are taken into account, after Java code modification, regenerate the Jar file and copy it in the MEGA java/lib directory, then exit and restart HOPEX. |
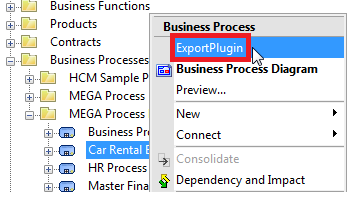
Using the MetaCommand Item
To execute the MetaCommand Item, in the Business Process contextual menu select ExportPlugin:
The result is the creation of a file in the directory c:\temp:
Car Rental Business
Provide Rental Cars
3.5 Debugging a Java component called from HOPEX
Debugging a Java component called from HOPEX uses remote access mode to the Java virtual machine.
This chapter explains how to use this mode of debugging with HOPEX.
3.5.1 Configuration
HOPEX options
To debug a Java component, you need to activate the Java Debugging option.
To activate the Java Debugging option:
1. From HOPEX administration.exe, access the site level options.

2. In the Options tree, select Debugging > Java Debugging folder.
3. In the right pane select Java Debugging option.

Options are:
• JVM path: specify the location of the Java virtual machine to be used.
• Option: enables addition of virtual machine execution options.
• Debugging options: debugging options.
• Heap and stack size: enable the specification of available memory sizing.
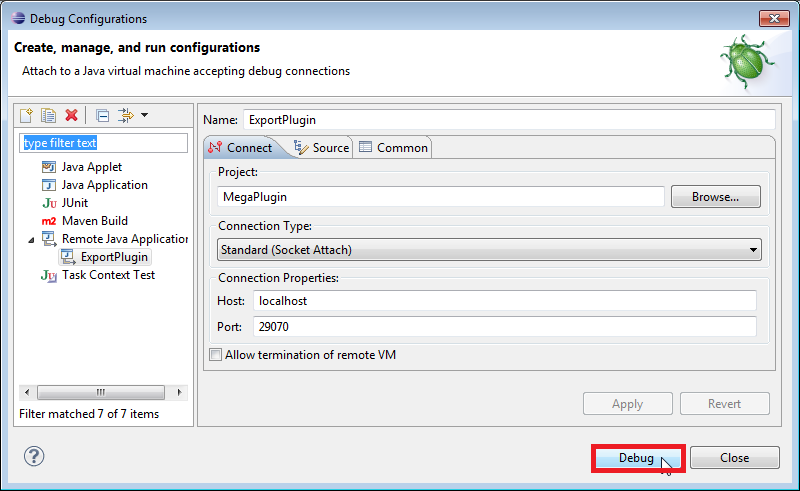
Debugging configuration in Eclipse
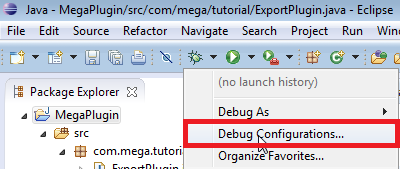
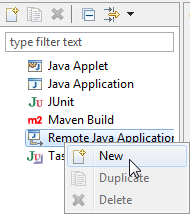
1. From the Eclipse project, open the debugging configuration dialog box (right-click the project and select Debug As > Debug Configurations):
2. Create a new Remote Java Application debug configuration
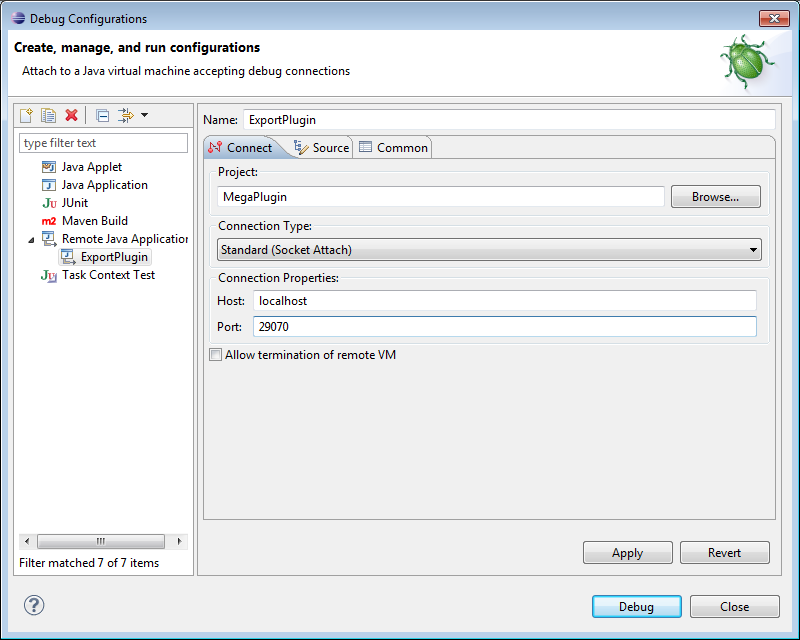
3. Specify parameters enabling debugging by socket attachment:
o Connection Type: Standard (Socket Attach).
o Connection Properties: host and port enabling access to the JVM used by HOPEX.
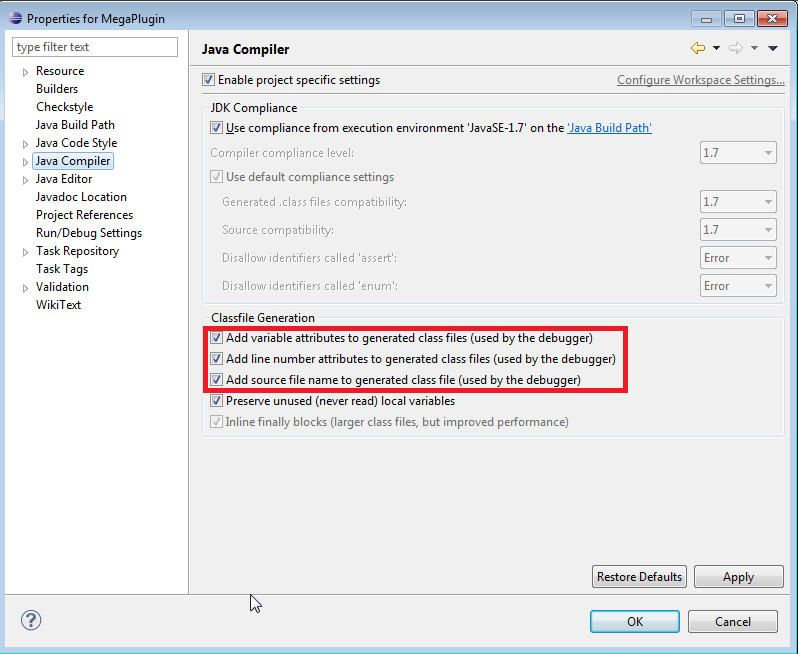
Compiling the project
Check that debugging options are activated:
3.5.2 Debugging
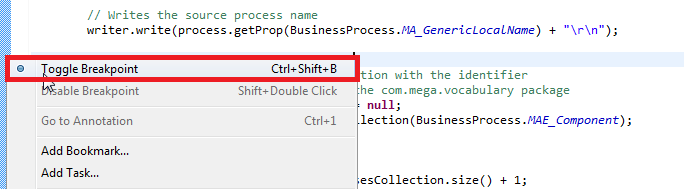
To debug:
1. Add breakpoints where necessary.
2. Execute the project in debug mode:
Note: If debugging is not correctly configured, HOPEX can suddenly close. It is necessary to ensure that the correct port is used, and that the Firewall configuration authorizes access to this port (for example, try port 1044 if port 29070 does not permit debugging).