2. Integrating the Report with an iFrame
You need to:
• Configure the Mega parameterized tool
• (if needed) Authorize external IFrame
2.1. Configuring the Mega Parameterized Tool
To configure the MEGA Parametrized Tool:
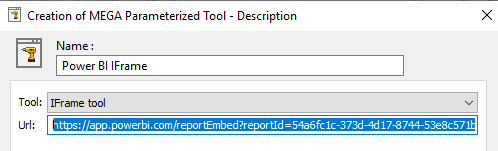
1) In the MEGA Parameterized Tool – Description creation wizard, in the Tool field, select IFrame tool.
2) In the Url field, enter the url given by PowerBI in the previous step.
3) Click Finish.
4) Click OK.
5) Click Close.
6) Cick Close.
7) In HOPEX tool bar click Dispatch  to dispatch your changes.
to dispatch your changes.8) Exit HOPEX.
2.2. Authorizing external iFrame
Depending on HOPEX versions, for security reasons, loading of external iFrame might be disabled or generate a warning.
To authorize Power BI:
1) Edit the Web.Config file of the HOPEX IIS application.
2) If present, change both the Content-Security-Policy-Report-Only and Content-Security-Policy headers to include a frame-src directive specifying the Power BI host source.
<configuration>
<system.webServer>
<httpProtocol>
<customHeaders>
<add name="Content-Security-Policy-Report-Only"
value="block-all-mixed-content; frame-src 'self' https://app.powerbi.com; default-src 'self'; script-src 'self' 'unsafe-eval' 'unsafe-inline'; style-src 'self' 'unsafe-inline'; img-src 'self' data:"/>
<add name="Content-Security-Policy"
value="frame-src 'self' https://app.powerbi.com;"/>
2.3. Testing
To test your customization:
1) Connect to HOPEX (Web Front-End) with the profile corresponding to the Working Environment Template.
E.g.: Enterprise Architect.
2) Click the Navigation menu.
The External Dashbord navigation pane (Environment Group Template) you created is available.
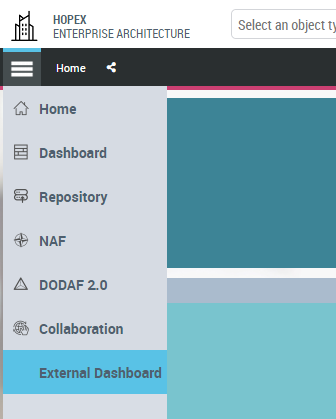
3) Click External Dashboard.
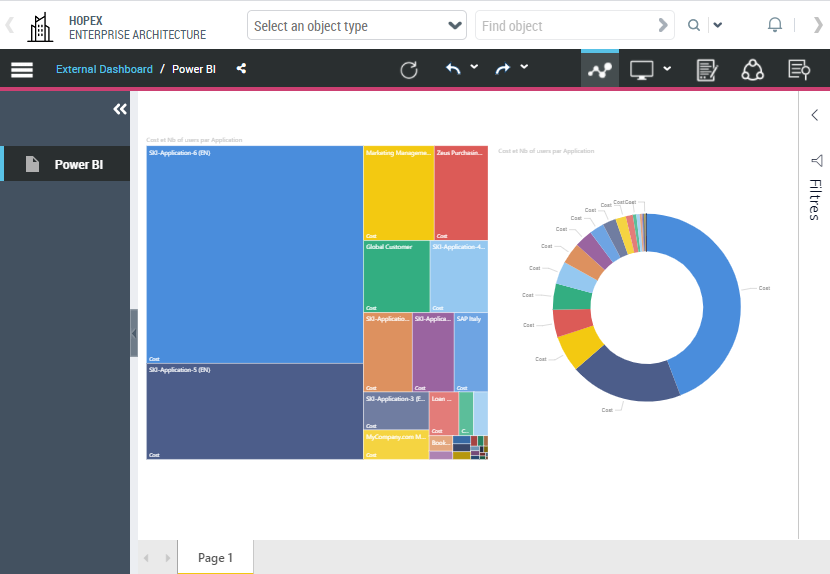
The Power BI topic you created is available.
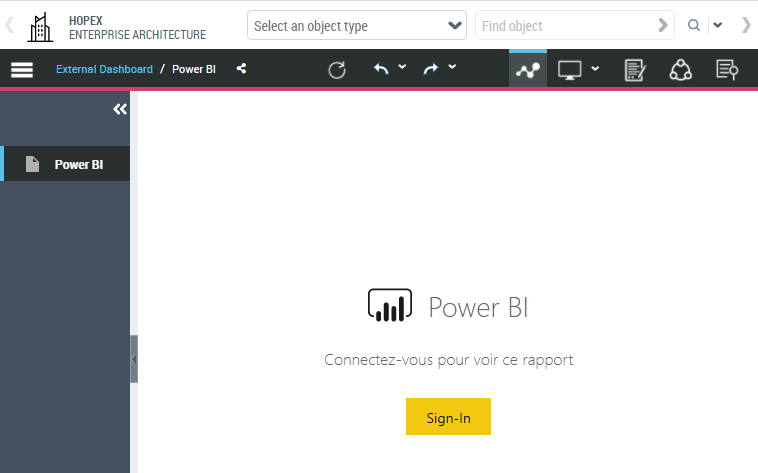
4) Power BI might required re-authentication: click Sign-In and if required, enter your Power BI credentials.
The report you created in Power BI is displayed.