Editing Queries
Registered Queries mode facilitates access to queries by target object type and update. You can also create your own queries from this mode.
Using a Repository Query
Queries can be of two types:
• Internal: includes “technical” queries used in standard supplies (descriptors, report templates (MS Word), matrices, etc.), “Name” and "*".
• Usual: includes queries programmed by users (proposed by default) as well as the queries "*" and “Name”.
To access repository queries:
1. Open the advanced search tool.
2. In the Registered Queries tab, select an object type in the drop-down list.
To filter queries according to their type:
1. In the assistant toolbar of the advanced search tool, click Show  > Query type.
> Query type.The Display Queries window opens.
2. Select the query types you want to be displayed.
Example: “Internal query”.
3. Click OK.
The list of registered queries is updated depending on the type selected.
Creating a query
To create a query:
1. Open the advanced search tool.
2. Click the Registered Queries tab.
3. In the drop-down list, select the object type for which you want to create a query.
4. Click Create New query.
Your query is initialized as follows:
"Select xx where", where "xx" is the name of the target object.
5. Enter your query code.
HOPEX offers help when you are in doubt on the possibilities offered by the ERQL syntax.
 .
.Using Help When Entering Queries
To use help during query code build:
1. Press <Ctrl> + <Space>.
A drop-down list proposes the possibilities for completion of your code.
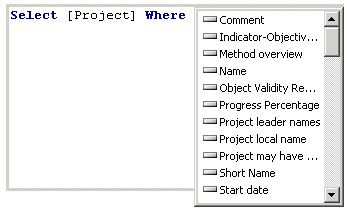
As in Assistant mode, properties proposed in this drop-down list are the most common. To add other properties, modify the display parameters, see:
2. Select an object type to complete your query.
Displaying administration properties
To display the administration properties:
1. Open the advanced search tool.
2. Click the Registered Queries tab.
3. In the assistant toolbar of the advanced search tool, click Show > See administration properties.
> See administration properties.The drop-down list is updated and now includes the administration properties.
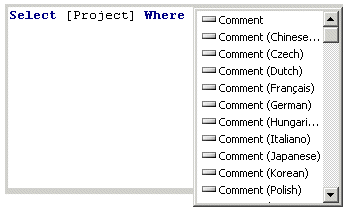
Displaying translation properties
To display language-dependent properties:
1. Open the advanced search tool.
2. Click the Registered Queries tab.
3. In the assistant toolbar of the advanced search tool, click Show > See translation properties.
> See translation properties.The drop-down list is updated and now includes translations of each characteristic in the different languages.
Pasting Object Names in Queries
An object name can be inserted in a query in the form of a field.
In this way, when you enter a query of type:
Select [Org-Unit] Where name = xxx
you can copy the object name and paste it in the query.
So when you modify the object name you have copied, the query will be automatically updated.
To copy an object name, right-click the object (in a diagram or in the navigator) and select Copy.