Adding Physical Properties to Database Objects
When your database has been defined in a relational diagram, you can generate the corresponding SQL scripts for the different DBMSs.
The physical data navigation pane allows you to complete database physical modeling by specifying parameters specific to each DBMS and therefore to produce complete SQL scripts.
In HOPEX, you can also import physical parameters defined on reverse engineered objects. See: Physical Properties Reverse Engineering.
You can adapt the same logical model to several DBMSs. It is not necessary to duplicate objects.
Target DBMSs
To define a target DBMS on a database:
1. Open the properties dialog box of the database concerned.
2. Click the Characteristics page.
3. Specify the target DBMS field in the corresponding field.
See also Importing a DBMS Version.
Creating Physical Properties
To create physical properties on objects of a database:
1. On the desktop, click the navigation menu then Data Architecture > Physical data.
2. In the edit area click Database physical hierarchy.
The list of repository databases appears in the edit area.
3. Expand the folder and the sub-folders of the databases concerned.
Parameters are presented in tree form, conforming to SQL grammar of the DBMS considered (refer to DBMS SQL documentation).
Two folder types are presented in the tree:
• Navigation folders.
• Parameter groups that you must instance.
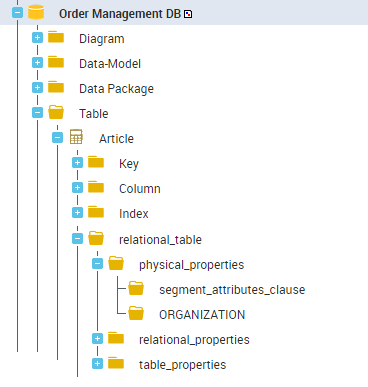
Each parameter group, represented by an "SQL clause" object, has a properties page enabling value definition.
SQL clauses defined in this way are accessible just like repository standard objects. For example it is possible to query SQL objects that have a given parameter value.
By default, clauses cannot be reused from one object to another. It is however possible to define a clause for one object and connect it to other objects. In this case, any modification of the clause affects all objects that use it.
Objects containing physical parameters
Not all objects in HOPEX support physical parameters. These concern only:
• Data groups
• Tables
• Indexes
• Clusters
Creating a new clause
To define object parameters:
1. Right-click the corresponding parameter group and select New > SQL clause.
2. Open the properties window of the clause and specify the value of the parameter to be defined.
Connecting a clause
You can assign the same clause to several objects, on condition that you connect the correct clause type.
Consider the "Order Management" database with Oracle 9i as DBMS.
On the column "Code_catalogue", create "Clause 1" of type "inline_constraint".
You can connect "Clause 1" to another column. Being the same type of clause, this is copied on the new column with no problem.
On the other hand, if you connect "Clause 1" to an object of type different from that initially defined on "Clause 1" - for example "Storage_clause" - then "Clause 1" changes type to take that of the last element connected. In other words, "Clause 1" that was type "inline_constraint" takes type "storage_clause". This change is reflected on the start columns to which "Clause 1" was connected.
Naming clauses
Standard case
By default, the clause takes the name of the clause type to which it is attached. When you attach a clause to another type, the name automatically adapts.
Specific naming
A specific name can be given to a clause. In this case, the clause name becomes static and will not be modified at change of clause type.
Specific naming is essential when a clause is used in different contexts (generic clause).
Multiple clauses
For a given level, several clauses can be attached to the same clause type. To distinguish different clauses, the clause name comprises the name of the clause type followed by its hexaIdAbs.
Naming from a property
It is possible to modify standard behavior by defining an automatic naming rule for an SQL clause type. This configuration is carried out at the clause type _settings property level. In the example below, the configuration on clause type "range_PARTITION" for Oracle 9i indicates that the name of SQL clauses of this type will be built from the value of the PARTITION property.

When the parameter has been executed, names of SQL clauses are automatically calculated from values of the PARTITION property.
 |  |
The name of SQL clauses is not taken into account in SQL generation. In the example provided, it is the value of the PARTITION property that feeds the generated SQL scripts.
Physical Model Customization Example
You can partition a table to simplify data access or to manage the information blocks differently.
Suppose you wish to partition the "Order Line" table of the "Order Management" database using the Oracle by hash method. This method enables dynamic calculation of table partitioning.

Hash partitioning instruction syntax
Check that the database has Oracle 9i as target DBMS.
The DBMS name is indicated in the Target DBMS box.
Display the physical properties of the "Order Management" database:
1. On the desktop, click the navigation menu then Data Architecture > Physical data.
2. In the edit area click Database physical hierarchy.
The list of repository databases appears in the edit area.
3. Expand the folder and the sub-folders of the "Order Management" database to display the parameters linked to the Oracle grammar.
To partition the "Order line" table:
1. Expand the "Order_line" table.
2. Expand the "MEGA_Oracle::relational_table" parameter group.
3. Right-click the "MEGA_Oracle::table_properties" clause type and select New > SQL clause.
4. Name the clause "Order_line/Table_properties".
It appears in the navigation tree.
5. Under this clause, expand the "MEGA_Oracle::table_partitioning_clauses" parameter group. It contains the different partitioning types that can be produced in Oracle.
6. On the "MEGA_Oracle::hash_partitioning" folder, create the clause "Order_line/hash_partitioning".
7. Open its properties page.
8. In the PARTITION BY HASH page, indicate the columns on which breakdown applies. To do this, connect the columns concerned by partitioning.
9. Close the properties dialog box.
10. Under the clause "Order_line/hash_partitioning" two clause types are available:
• individual_hash_partitions: enables naming of each partition.
• hash_partitions_by_quantity: enables definition of the number of partitions you wish to create.
11. Create the clause "Order_line/Hash_partition_by_quantity".
12. Open its properties page.
13. Select the PARTITIONS page.
14. In the Hash partition quantity field, indicate the number of partitions. These partitions are represented by data groups.
15. In the STORE IN field, connect the data groups.
To obtain the script corresponding to this partitioning, right-click the "Order line" table and select Generate the code.
Generating the SQL File
When object customization has been completed, you can generate the corresponding script file to consult the results, without having to regenerate the entire database.
For example, to generate the SQL file of an index:
See also Generating SQL scripts.