Starting an Assessment Campaign
Creating Assessment Campaigns
To create an assessment campaign in HOPEX GRC:
1. In the navigation bar, click Assessment > Campaigns.
2. Click New.
3. To define the object type to which the campaign relates:
• Risk (Risk assessment)
• Control (Control assessment)
4. Click Next.
The campaign creation page appears.
5. Specify the campaign Name.
6. (optional) Select the assessment Template.
7. Modify the Calendar if required.
8. Specify the Begin Date and the End Date.
9. Click Next.
10. In the Scope Selection window, select the objects that define the evaluation context.
The tree allows you to select controls or risks assessed in their context.
A control or risk is assessed in the context of the elements of the branch that extends from the object in question up to the root.
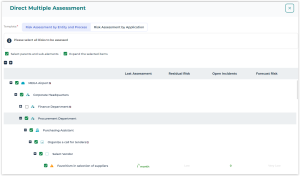
In the above example, if you select the "HR Department" entity, all risks and context objects located at a lower level are selected, as well as all parent context objects up to the tree root.
11. Click Next.
12. Look at the campaign summary.
Elements that will be assessed appear.
In particular, you can view:
• assessed characteristics (defined in the assessment template)
• assessed objects (risks or controls)
• context objects (entities, processes, etc.)
• assessment nodes, which correspond to objects placed in their context objects, associated with respondents.
• respondents
• possible errors (it is not possible to launch the campaign without specifying some specific information, for example respondents)
• Warnings, for information purpose (for example: missing e-mails)
13. Click Next.
14. In the page dedicated to planning, specify when you want the campaign to be started:
• Immediately
• Specific Time and Date
• Not now
15. Click OK.
Creating an Assessment Session Manually
You need to create one or several assessment session(s) manually:
• if you chose not to base your assessment campaign on an assessment template.
• If you selected the scheduling option “Not now” when creating an assessment campaign.
To create an assessment session:
1. In the properties page of the assessment campaign, select the Sessions page.
2. Click New then Next.
3. Select the session scope, that is to say the objects to be assessed in their context.
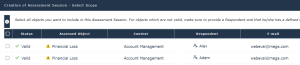
In the example below, “Financial Loss” can be assessed in the “Account Management” context by two respondents. You can therefore select two “assessment nodes” (object+context+respondent).
4. Click Next.
5. In the planning page, select whether you want to send questionnaires:
• Immediately
• at a Specific Time and Date
If you select “Immediately”, an assessment session is started right now.