SQL Server support
SQL Server Requirements
Encoding
After the database has been created, verify that “Collation” is set to “SQL_Latin1_General_CP1_CS_AS”. If the database is created from the HOPEX application, the appropriate encoding is automatically configured.
User management
When the HOPEX application accesses the HOPEX data stored in the RDBMS, it uses an SQL connection string. This connection string refers to a user account that has certain privileges for the instance.
This user can either be a native account, or a Windows account:
• Native account:
o Pros: unique account, configured for everyone that runs the Web Front-End or Windows Front-End clients.
o Cons: thought to be less secure.
• Windows accounts/Domain account: Trusted Connection
o Pros: do not set up any connection string in the tool.
o Cons: need to authorize several Windows accounts to have direct access to the data: the service account that runs the Instance manager, every user that needs to run the Windows Front-End client (Administration.exe or Hopex.exe).
Privileges for native account
You can have several kinds of SQL server users in relation to the customer security policy:
• Standard security policy: the user account is enabled to manage databases. This is the easiest solution especially if the SQL Server instance is dedicated to HOPEX.
|
User type
|
Comment
|
Server roles
|
Database roles
|
Server permissions
|
|
User with maximum privileges
|
Allowed to manage any database (create database, delete database, data read access, data write access, update database structure)
|
dbcreator
|
db_owner (1)
|
View server state (2)
|
• Advanced security policy: only the DBA is allowed to create new databases following specific naming rules. A user is required to use the existing databases.
|
User type
|
Comment
|
Server roles
|
Database roles
|
Server permissions
|
|
User with limited privileges
|
Allowed to use an existing database (data read access, data write access, update database structure)
|
public
|
db_owner (3)
|
View server state (2)
|
(1) db_owner role is automatically assigned by the system when a database is created.
(2) To consult the view 'sys.dm_exec_sessions' for the server.
(3) db_owner role is manually assigned by the DBA after database creation.
The HOPEX application will create table, columns and index objects dynamically. The right to create Procedures is mandatory. Trigger, functions and view objects are not used.
Privileges for Windows accounts
Since this configuration requires to grant access to the different databases to several Windows accounts, and especially to accounts of people running the thick client of the application, it is recommended to limit those rights to a minimum, to reduce the risk of harming the application by directly modifying or deleting data.
• Advanced security policy: only the DBA is allowed to create new databases following specific naming rules. A user is required to use the existing databases.
|
User type
|
Comment
|
Server roles
|
Database roles
|
Server permissions
|
|
User with limited privileges
|
Allowed to use an existing database (data read access, data write access, update database structure)
|
public
|
db_ddladmin, db_datawriter and db_datareader (3)
|
View server state (2)
|
(2) To consult the view 'sys.dm_exec_sessions' for the server.
(3) those roles are manually assigned by the DBA after database creation.
The HOPEX application will create table, columns and index objects dynamically. The right to create Procedures is mandatory. Trigger, functions and view objects are not used.
The Windows users should not have the “db_creator” server role.
Defining a HOPEX SQL Server Connection
A Configure SQL Connection menu is available in the HOPEX Administration application at different levels (site, environment, and repository) if the license contains the Repository Storage (SQL Server) product.
Procedure with a native SQL account
1. Start HOPEX Administration.exe.
2. Right-click HOPEX (the root of the administration tree) and select Configure SQL connection > SQL Server.

3. Enter the connection parameters.
o Instance: <machine network name>\<SQL Server instance name> (1)
Example for a standalone installation with SQL Express: MyMachine\SQLEXPRESS
o User: user enabled to access/update SQL Server
o Password: password of the user enabled to access/update SQL Server
 Warning: Ensure this password is consistent with MS SQL rules, see MS related documentation.
4. Click Connection Test to check the connection parameters.
Procedure when using Windows authentication
1. Start HOPEX Administration.exe.
2. Right-click HOPEX (the root of the administration tree) and select Configure SQL connection > SQL Server.
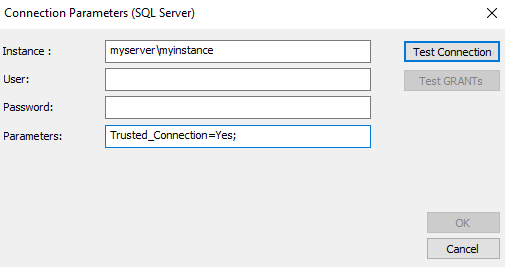
3. Set the connection parameters.
o Instance: <machine network name>\<SQL Server instance name> (1)
Example for a standalone installation with SQL Express: MyMachine\SQLEXPRESS
o User: leave blank
o Password: leave blank
o Parameters : set “Trusted_Connection=Yes;”
You may need to add Encrypt=no or Encrypt=Yes
4. Click Connection Test to check the connection parameters.
Creating an Environment
The environment creation mainly consists in creating a SystemDb repository. For SQL server, two creation modes are available from HOPEX:
• Creating a new database on the SQL Server (standard security policy)
• Using an existing database of the SQL Server (advanced security policy)
Prerequisite
Before creating an environment, download the HOPEX Environment Installation Package Aquila module from HOPEX store (https://store.mega.com/modules/details/hopex.core.install) and import it in HAS Console modules.
Creating a new SystemDb database
Prerequisite:
• Identify the SQL connection parameters (RDBMS instance, user, password)
• Identify the location of the environment folder on the file server
Procedure:
1. Start HOPEX Administration.exe.
2. Right-click the Environments folder and select New.
3. Enter the environment Name.
This creates a folder on the file server.
4. (If needed) Change the Location.
5. Click OK.
6. Confirm or change SQL Connection parameters.
7. As the Repository Creation Mode select “Create Database”.
8. Click Test Connection to check that the SQL Server is reachable. This step must be successful for the process to continue.
9. Click Test GRANTs to check different actions (table creations, indexing columns etc.) that are necessary for HOPEX to be able to work. This step must be also successful for the process to continue.
10. Click OK to start the environment creation.
Result:
• A SystemDb repository stored in the selected RDBMS instance is created.
• A folder (HOPEX environment folder) is created at the selected location.
This folder contains several files and subfolders (Db, Mega_usr, SysDb).
This folder contains several files and subfolders (Db, Mega_usr, SysDb).
Using an existing SystemDb database
Prerequisite:
• Identify the SQL connection parameters (RDBMS instance, user, and password).
• Identify the location of the environment folder on the file server.
• Check that the “Collation” property of the database is set to “SQL_Latin1_General_CP1_CS_AS”.
• Identify the exact name of the user database in the SQL Server. It follows this naming rule:
<EnvironmentName>_SystemDb
Example: MyEnvironment_SystemDb
Note: the environment name must match the environment folder.
Procedure:
1. Start HOPEX Administration.exe.
2. Right-click the Environments folder and select New.
3. Enter the environment “Name” (in this example : “Name” = “MyEnvironment”)
This creates a folder.
This creates a folder.
4. (If needed) Modify the Location.
5. Click OK.
6. Confirm or change the SQL Connection parameters.
7. As Repository Creation Mode select “Uses an existing SQL database (“[dbo]” default schema)”.
8. Click Test connection to check that the SQL Server is reachable.
This step must be successful for the process to continue. If “Use existing database” option was specified, this test tries to connect to the database matching the following pattern: “MyEnvironment_SystemDb”. This test must be successful for the process to continue.
9. Click Test Grants to check different actions (tables creations, indexing columns etc.) that are necessary for HOPEX to be able to work. This test must be also successful for the process to continue.
10. Click OK to start the environment creation.
Result:
• The SystemDb repository is initialized.
• A folder (HOPEX environment folder) is created at the selected location.
This folder contains several files and subfolders (Db, Mega_usr, SysDb).
This folder contains several files and subfolders (Db, Mega_usr, SysDb).
• Default users:
o Identifier: System, Password: Hopex (or empty for previous HOPEX versions)
o Identifier: Mega, Password: Hopex (or empty for previous HOPEX versions)
Creating a Repository
Two creation modes are available from HOPEX:
• Creating a new database on the SQL Server (standard security policy).
• Using an existing database of the SQL Server (advanced security policy).
Creating a new SQL Server database
Prerequisites:
• Identify the SQL connection parameters (RDBMS instance, user, and password).
Procedure:
1. Start HOPEX Administration.exe.
2. Connect to the environment concerned.
Use for example: Identifier: System, Password: Hopex (or empty for previous HOPEX versions).
3. Right-click the Repositories folder and select New.
4. Enter the repository Name.
5. Keep the default Location.
6. Keep the Import module standard data option selected.
This option enables to import the .xmg files of the modules already deployed on the HAS instance.
Note: If you create several repositories, clear the Import module standard data option and once all of your repositories are created launch the Environment Automatic Update. Else, keep the option selected for the last repository creation only.
7. Click OK.
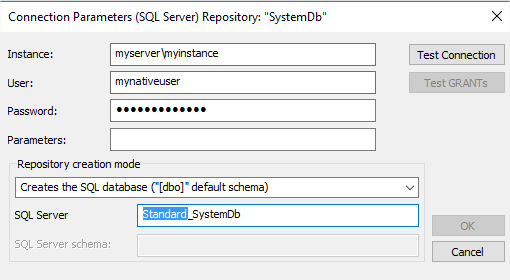
8. Confirm or change the SQL Connection parameters.
9. As Repository creation mode keep “Creates the SQL database ("[dbo]" default schema)".
10. Click Test connection. The test must be successful for the process to continue.
11. Click Test GRANTs. The test must be successful for the process to continue.
12. Click OK to create the new database
Result:
• A repository is created in SQL server. It follows this naming rule:
<EnvironmentName>_<RepositoryName>
Example: MyEnvironment_SQLServerRepository
• A folder is created in the specified location.
This folder contains an EMV and an EMQ file.
Using an existing SQL Server database
Prerequisites:
• Identify the SQL connection parameters (RDBMS instance, user, and password).
• Verify that the property 'Collation' of the database is set to 'SQL_Latin1_General_CP1_CS_AS'
• Identify the exact name of the user database in the SQL Server. It follows this naming rule:
<EnvironmentName>_<RepositoryName>
Example: MyEnvironment_SQLServerRepository
Note that the environment name must match the actual environment folder.
Procedure:
1. Start HOPEX Administration.exe.
2. Connect to the environment concerned.
3. Right-click the Repositories folder and select New.
4. Enter the repository Name.
E.g.: SQLServerRepository
5. Click OK.
6. Confirm or change the SQL Connection parameters.
7. As Repository Creation Mode select “Uses an existing SQL database (“[dbo]” default schema)”.
8. Click Test to check that the login can be performed and that the database exists.
9. Click Test connection. The test must be successful for the process to continue.
10. Click Test GRANTs. The test must be successful for the process to continue.
11. Click OK.
Result:
• A repository is referenced in the SQL server and initialized.
Example: MyEnvironment_SQLServerRepository
• A folder is created in the specified location.
<this folder contains a .EMV and a .EMQ file.
HOPEX Private Workspaces Cleanup
This procedure is used to delete the data of terminated private workspaces of HOPEX Users. It is necessary to clean up these data often in order to reduce database growth and preserve good performances. We recommend running this procedure every week if you have less than 10 users and every night if you have more than 10 users.
Installing the procedure
Warning: You must repeat this procedure for each HOPEX Repository and the SystemDb.
1. Right-click your HOPEX repository and select RDBMS Administration > Remove private workspace temporary data.
This will launch SP_CLEAN_MEGA_DATABASE and if the procedure:
o does not exist, the application will create it.
o already exists, it is overwritten by this action.

HOPEX Historical Data Cleanup
This procedure is used to delete the historical data of the HOPEX repository. Each time a HOPEX object is updated, the previous data is kept in database. That method insures a high data security even when connection to SGBD is interrupted. It is necessary to clean up these data often in order to reduce database growth and preserve good performances. This clean-up will have no impact on the repository logfile. We recommend running this procedure every week if you have less than 10 users and every night if you have more than 10 users.
Before cleaning Historical Data
Historical data are used in the Repository Snapshot mechanism. See HOPEX Common Features > Other Features > Using Repository Snapshots: Repository Snapshot Prerequisites section for more details.
If you need to have Repository Snapshots taken, be aware that it will not be possible anymore for the period of time covered by the cleanings. In other words, if you need Repository Snapshots, be sure to take them before the procedure runs.
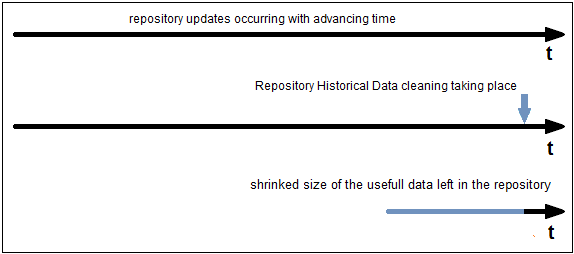
In this first illustrated case, all archived states were deleted, so all the space that these archived states were using is reclaimed physically (an actual delete in the tables was issued for every one of them).
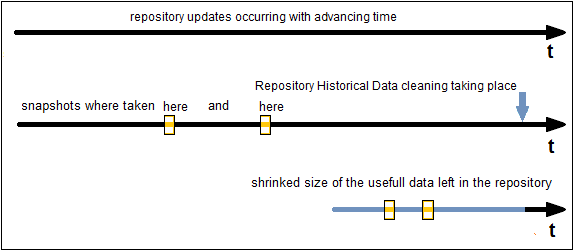
In this second example, all archived states were also deleted except those corresponding to the state of the repository when the 2 Snapshots were taken.
In this case, the data corresponding to the repository state for the Snapshot(s) is saved and it is thanks to this saving that special features will be available within this repository regarding this data.
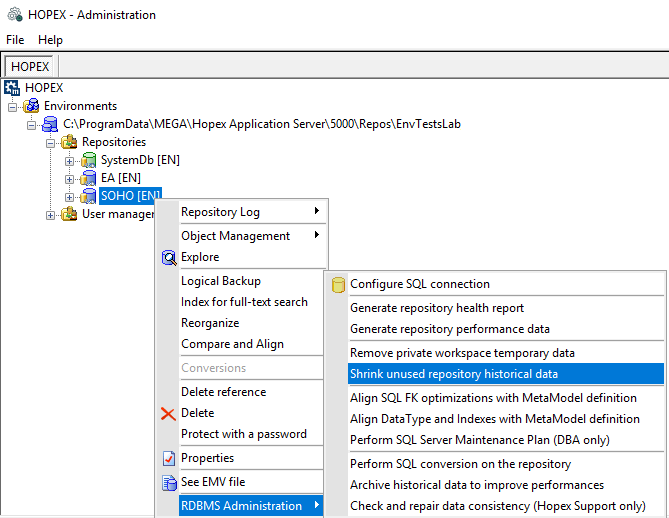
Installing the procedure
Warning : You must repeat this procedure for each HOPEX Repository and the SystemDb.
1. Right-click your HOPEX repository and select RDBMS Administration > Shrink unused repository historical data.
This launches SP_CONSOLIDATE_MEGA_DATABASE and if the procedure does not exist, the application creates it. If the procedure already exists, it is overwritten by this action.
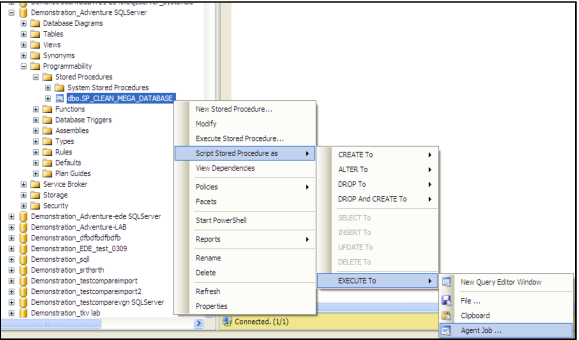
Batching Cleanup procedures for SQL Server
It is very important to run the two procedures on a regular basis. So If you do not want to have to remember to click on the corresponding menus in the Administration.exe program every time that each of the procedure should run, you can batch it using SQL Server agent job.
1. Using SQL Server Management Studio, find the SQL Server database that corresponds to the HOPEX repository for which you want to batch the stored procedure.
Reminder : the database will be named following this rule <EnvironmentName_RepositoryName>.
2. In Programmability > Stored Procedures folder, right-click this procedure and select Script Stored Procedure as > Execute to > Agent job.
Enter a name for the job and the schedule.
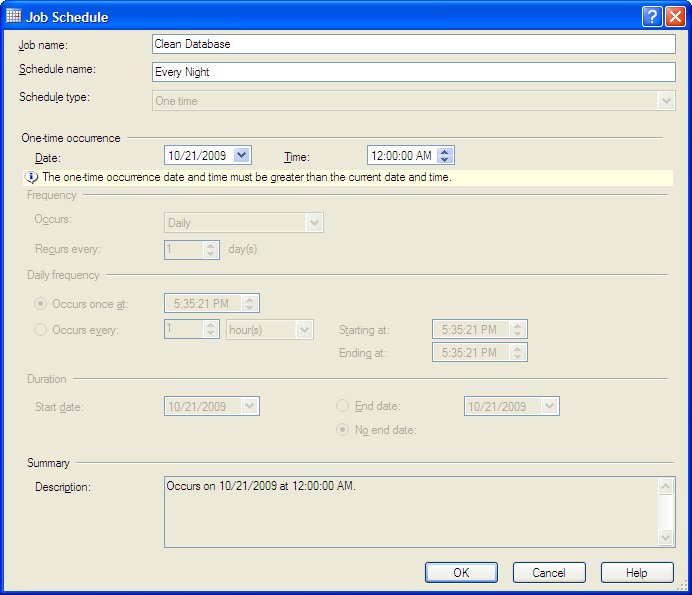
The job is created.
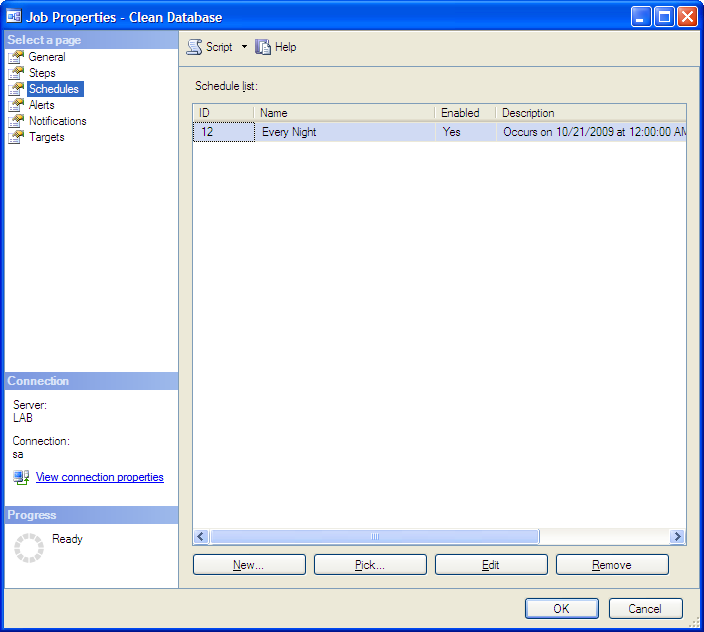
3. Right-click this job and select Properties.
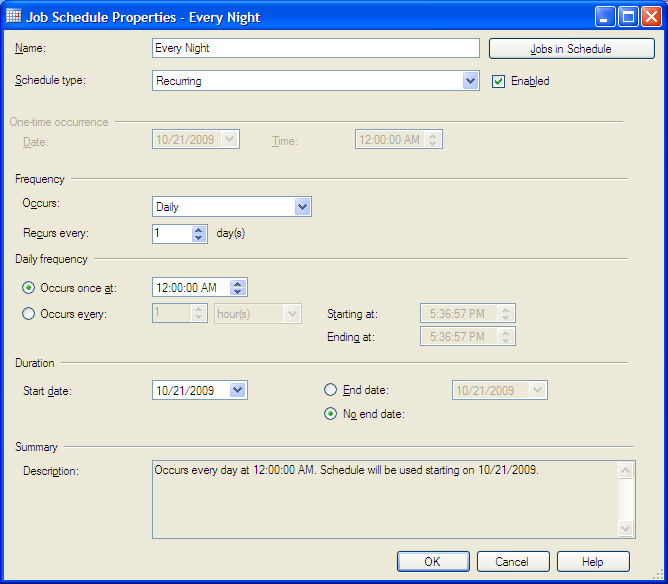
4. Select the Schedules tab and click Edit.
5. Set up the schedule to execute the job every night.
Maintenance tasks
The SQL Server databases need to be maintained, in order to keep the best possible performances. Tasks such as “update of the statistics”, “reorganize or rebuild of the indexes”, “shrink of the databases”, as well as backups, need to be run regularly.
We recommend set up the standard maintenance plans of SQL Server to manage those tasks. The backups can be excluded, if they are done through another chanel.
Also, we can imagine to put the execution of the HOPEX cleanup procedures (see previous chapter) as the preliminary step to the SQL Server job that will run the maintenance tasks.
You can find below some screenshots of a default maintenance plan (with backups), with SQL Server 2012. It can be adapted to your version, and your rules :
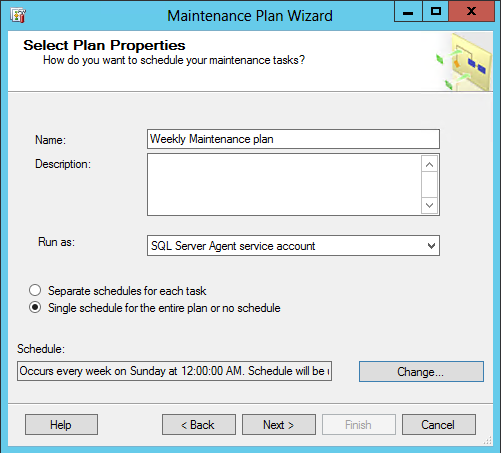
1. Create a maintenance plan using the SQL Server wizard (in SQL Server Management Studio).
2. Give it a name and a schedule (click Change).
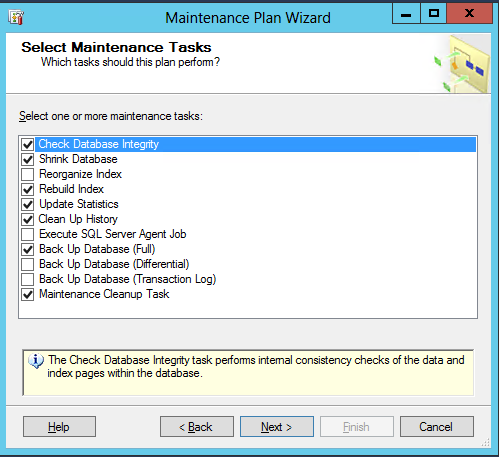
3. Select the following maintenance tasks:
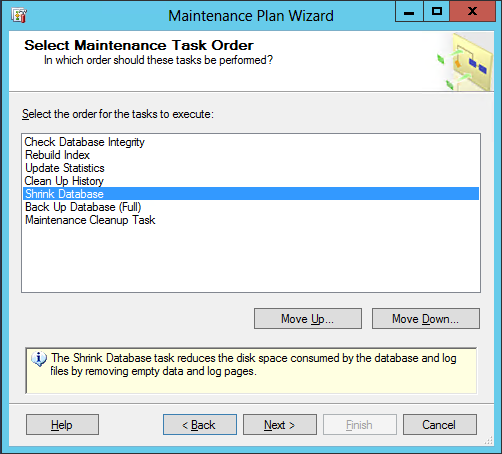
4. Order the maintenance tasks as follows:
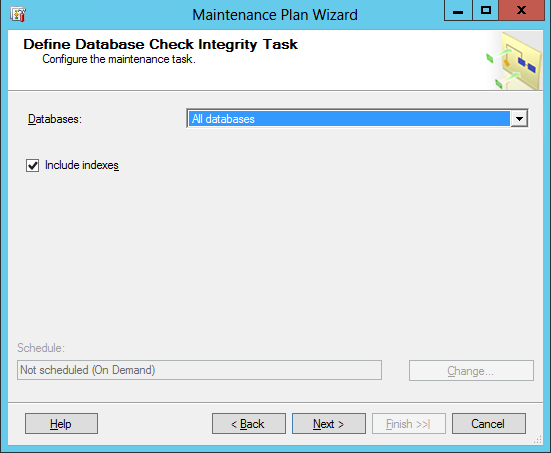
5. Check all databases (including the system databases):
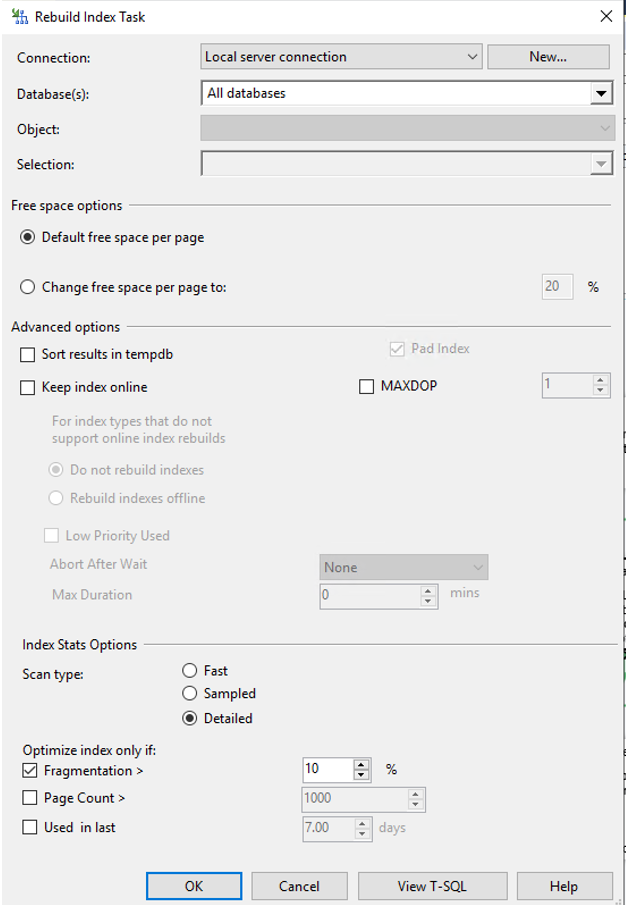
6. Rebuild indexes for the user databases:
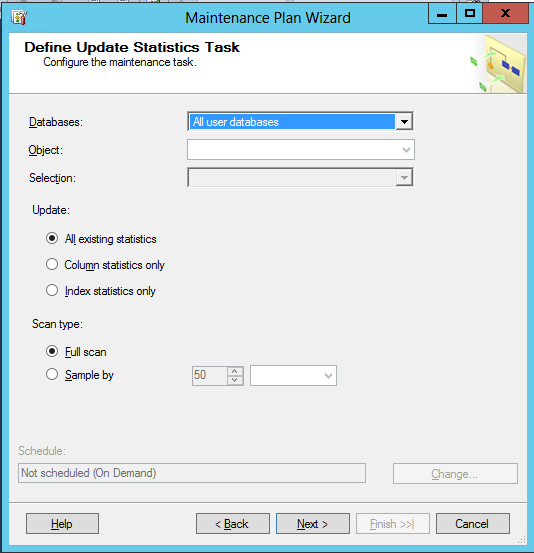
7. Same thing for the update of the statistics:
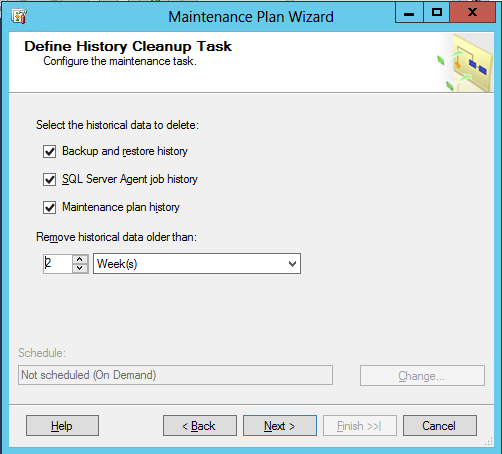
8. Define how long the log files will be kept:
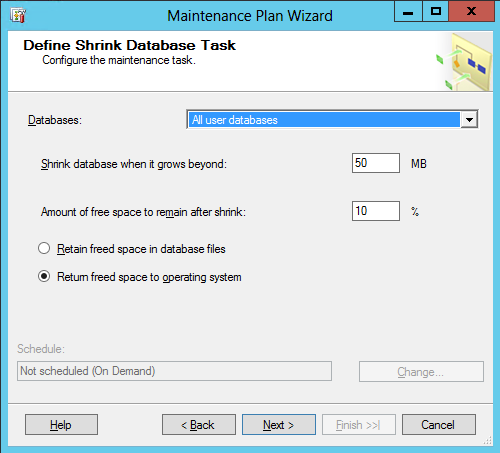
9. Shrink all user databases, or at least the HOPEX databases:
10. Backup all databases, choose the destination folder, and if you want to have subfolders for each database:
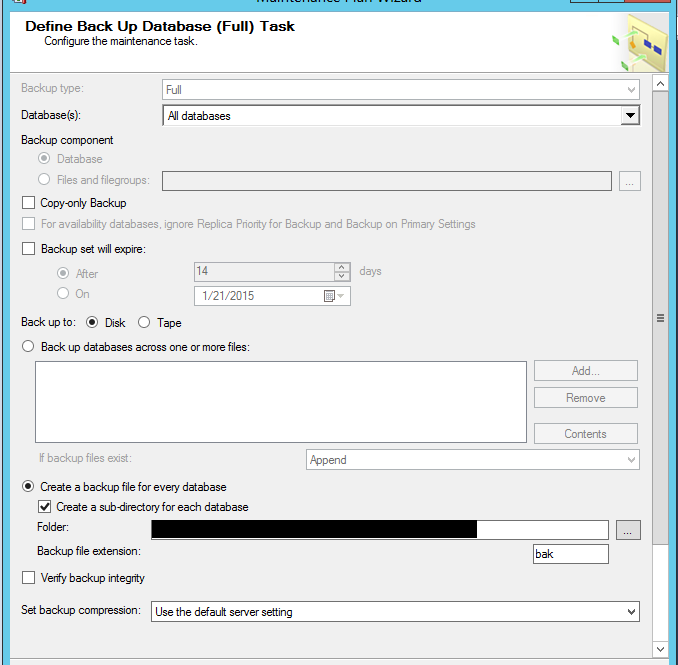
11. Provide the folder where the backups are being stored, the extension, and if you want to include subfolders, as well as how long you want to keep the files before deleting them:

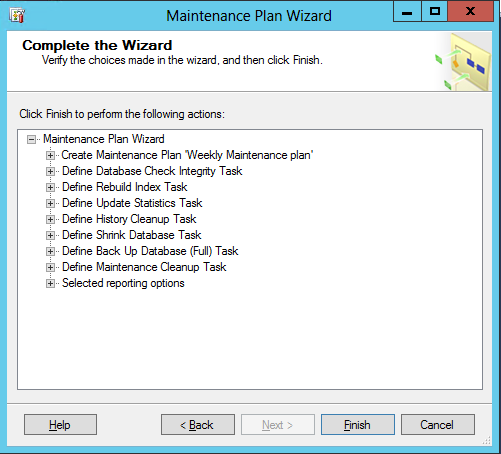
12. Keep the default :
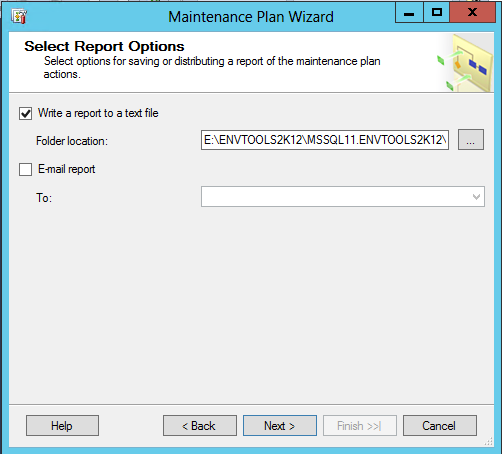
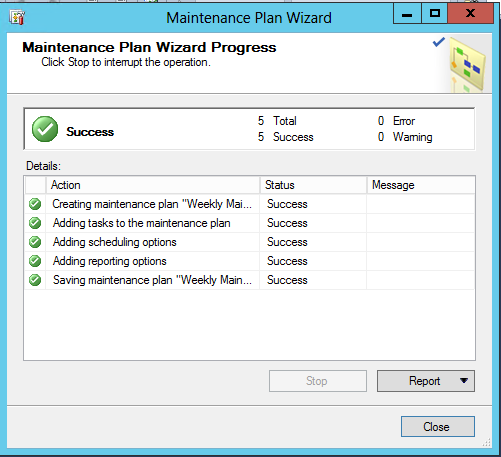
13. Click Finish to create the maintenance plan, and the SQL Server job: