8. Installation in multi-tenant scenarios
HOPEX supports multi-tenant at infrastructure level. A same server can be used to host several customers.
Multi-tenant capability is not supported at the following levels:
• database
Each database is independent and do no share tables/columns/data.
This ensures highest security for our customers' data.
• application
Each deployment is autonomous and do not share exe or dll.
This enables to have customers in different versions and updates.
Multi-tenant capabilities are available to manage:
• multiple environments or instance.
• multiple versions on the same server.
8.1. Multi-environments – Multi-instances
HOPEX V5 supports multiple installations on the same server. This type of deployment is useful when you:
• want to put the PRED-PROD and PROD on the same server.
• have several HOPEX Environments (SystemDb) for historical reason.
For new customer, this scenario is not recommended.
When doing so you need to adjust IIS configuration to run properly this type of deployment.
Moreover, make sure you size the server accordingly. Each additional instance on a server requires a minimum of 8Gb of RAM.
The architecture pattern of such installation is the following:
• each Instance as a dedicated DNS
• each instance as a dedicated port allocated
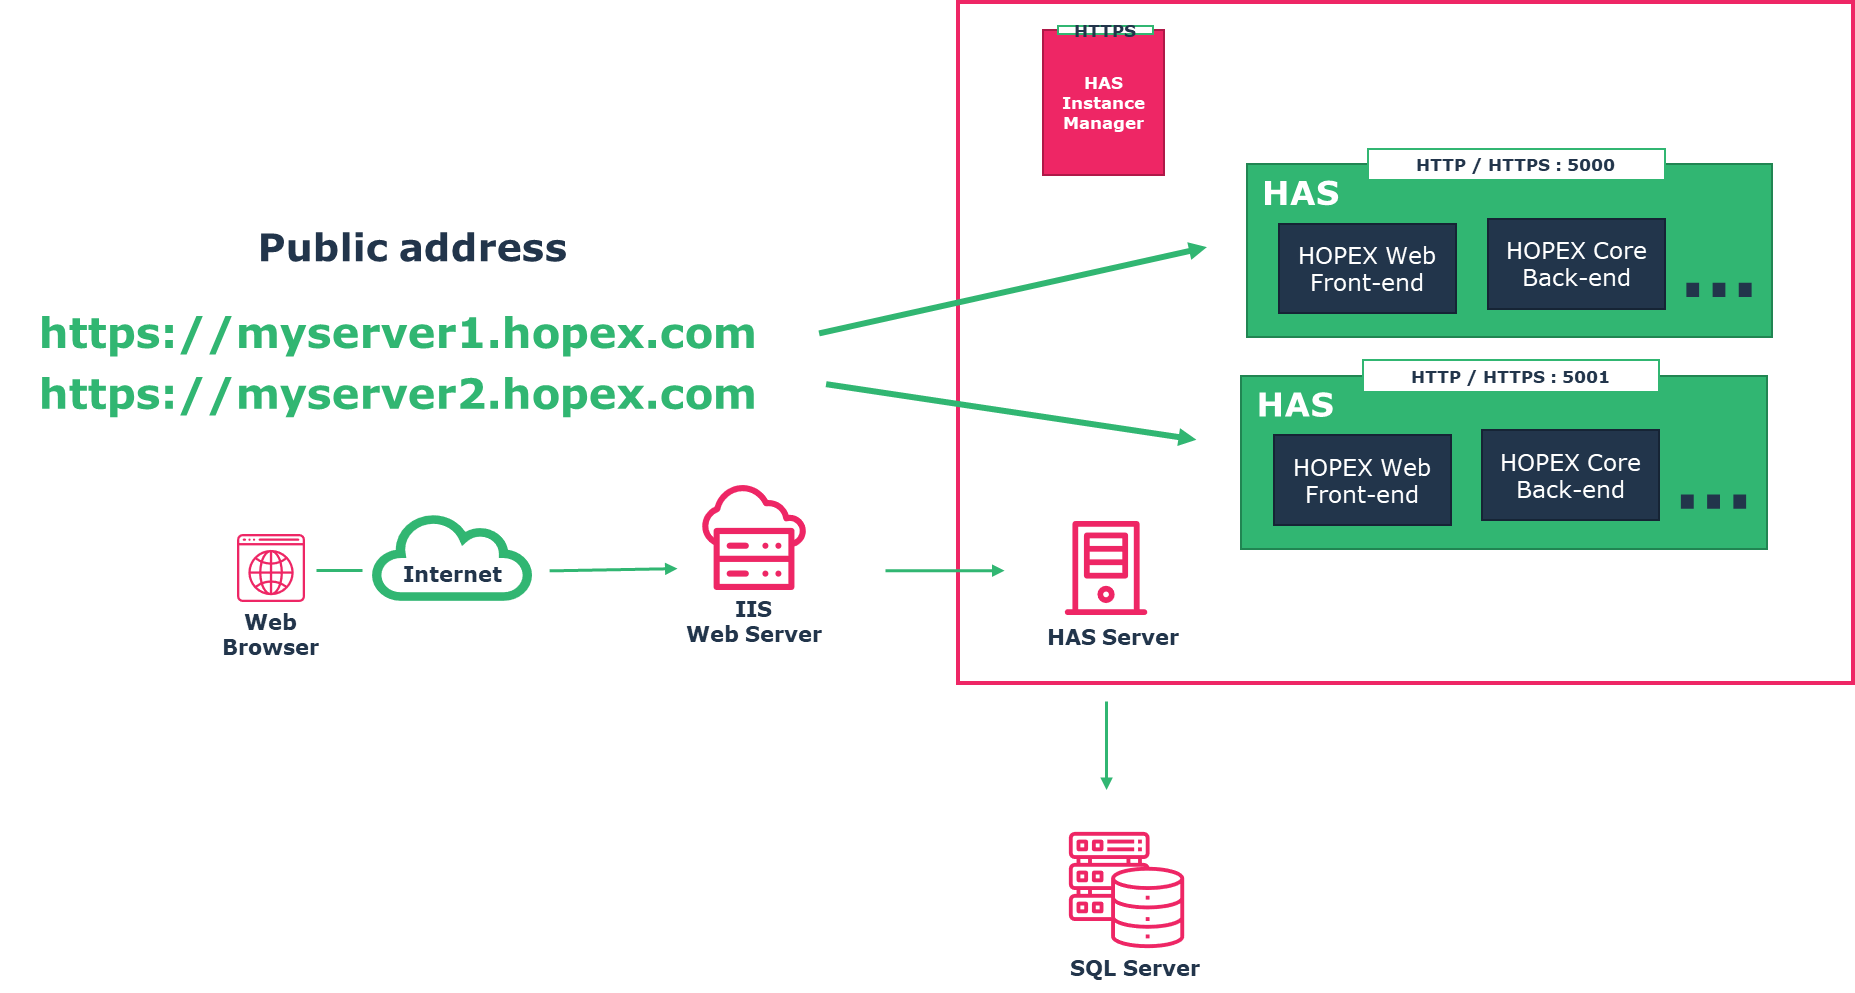
The installation of HAS Server:
• is the same process as described in previous chapters.
• You may need to adjust the IIS configuration described from previous chapter as described below.
8.1.1. Configure IIS
8.1.1.1. Public DNS and SSL for each instance
For each instance you must have a DNS.
For example:
Moreover, your SSL Certificate must be valid for both DNS, so either you have:
• a wild card SSL certificate. Example: *.hopex.com
• all the alternative DNS name defined in your certificate prod.hopex.com, preprod.hopex.com…
|
Example of alternative DNS certificate
|
Example of Wild card certificate
|
 |
 |
If you do not have a wildcard certificate you need to add extra binding in your IIS website. In that case:
1. Go on your Default Web site.
2. Right-click and Edit Binding.
3. Add a binding for each URL.
4. Enter a Hostname for each URL that matches the SSL Certificate.
Example:

8.1.1.2. Create a server Farm for each instance
For each Instance you must create a server farm as described section “2.6 Configuring Server Farm - ARR”
Make sure you enter the right port number. In doubt check the IIS config file as described section “2.8.3 Checking configuration (optional)”
8.1.1.3. Create a rewrite rule for each instance
For each Instance, you have an URL Rewrite rule that you need to ensure has the proper condition.
Example with 3 instances. You can see 3 farms, 3 URL Rewrite rule that each have a condition.

8.1.2. Domain users
The domain user used is the same for all the instances. So, this domain user must have access to:
• all HOPEX Environment shared folders and Must license
• the database in case of Trusted Connection.
8.2. Multi-version scenario
This scenario concerns the following situation:
• If you are migrating or want to preview some features without changing you existing version.
• If you are a partner or a developer, you may need to work alternatively with different version of HOPEX. In that context you may want to have several versions installed: V5 CP2, V5 CP3, V5 CP4…
This installation of this scenario is the same as the multi-environment / multi-instance.
Just ensure the HAS Instance manager is its latest version and that you have all the prerequisites that correspond to each version you want to use.

Recommendations:
• Give explicit name to the cluster
• Give port number to ease understanding which version you are looking at.
For example, set port 5100 for V5 CP1, 5200 for V5 CP2, 5210 for V5 CP1 HF1… Caution some port may be already in use by other applications.