Inventorying Technologies with ITMC Discovery
Eracent's ITMC Discovery™ tool provides automated discovery of an organization's on-premises technologies and applications.
The data collected is stored in a local Eracent database. You can import this data into your HOPEX repository through a Java job.
Once the technologies are created in HOPEX, you can import their life cycle from IT-Pedia. This is the normalization phase.
Installing the Module
Before you can use the Eracent Discovery tool, you must complete the following steps:
1. Install JAVA Standard Edition 8 or higher.
2. In case HOPEX is hosted on a server with a self-signed or internally signed SSL certificate, you need to add this certificat manually to your JAVA trust store:
• First you must obtain the public certificate from the server where HOPEX is installed. You can request it from the server administrator or view it in any browser by visiting the HOPEX security information Web page and saving a copy of the certificate.
• Once you have the certificate saved in file (.cer), you need to add it to the trust store of your JVM.
• To import the new certification, run the keytool as a user with permission to write to the cacerts file:
keytool -import -file <the cert file> -alias <any name> -keystore <path to cacerts file>
• You may be asked for a password. The default password provided with Java is "changeit".
3. In case Eracent is hosted on a server with a self-signed or internally signed SSL certificate, you must add this certificate manually to your JAVA trust store:
• You need to obtain the public certificate from the server where Eracent is installed. You can request it from the server administrator or get it from any browser by displaying an Eracent security information web page, and saving a copy of the certificate.
• Once you have saved the certificate to a file (.cer), you need to add it to the trust list of your JVM.
• To import the new certification, run keytool as a user with write permission to the "cacerts" file:
keytool -import -file <the cert file> -alias <any name> -keystore <path to cacerts file>
• You may be asked for a password. The default password, as provided with Java, is "changeit".
4. Go to the HOPEX HAS console and generate an API Key used to authenticate to HOPEX: go to Modules -> Authentication - > Api Keys -> Create. In the form, choose an "Open Session" and fill out the other input fields with your user HOPEX parameters.
5. Go to the module installation folder in CONF/mega.properties and copy/paste the generated key in the api_key property.
6. Launch the batch file \EXE\EracentToHopex_Sequence\EracentToHopex_Sequence_run.bat to run the discovery tool:
Structure of the module
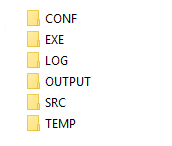
CONF
This folder contains:
• The context file (variables to be filled by the user to run the process on his machine)
• The file Types.csv, which contains the technology types from Eracent to load into HOPEX
• The file Functions.csv, which contains the functions from Eracent to load into HOPEX.
Set the configuration before running the .bat file. In the Types.csv and Functions.csv files, in the "Import" column, enter 1 to load the type or function into HOPEX, 0 otherwise.
See Configuration.
EXE
This folder contains the zip file that contains the .bat files you must run to get data from Eracent and load them into Hopex. See Retrieving Data Collected by ITMC Discovery.
LOG
This folder contains the logs files which are created every time you launch the .bat.
List of log files you can find in this folder:
• log_dateOfTheDay.csv: the files with steps of the execution, errors included
• Hopex_requests.csv: all the requests sent to HOPEX
• errors_WS_Hopex.csv: all the errors from HOPEX POST requests
• errors_response_Hopex.csv: the responses from HOPEX with code 200 which contains errors.
OUTPUT
This folder contains the files used as history of each object already loaded into HOPEX (Publisher_history.csv, Product_history.csv, Version_history.csv).
When an object (Technology, Vendor, etc.) has been loaded into HOPEX, it appears with its idabs in the corresponding file. This history ensures that objects already transferred to HOPEX are not altered (renamed, deleted).
If you try to re-import a scanned object after deleting it from HOPEX, it will not be imported as long as it is present in the history file. The object must therefore be manually removed from the history file before it can be re-imported into HOPEX.
SRC
This folder contains the .zip file which is the Talend project that can be imported into Talend to be modified.
TEMP
This folder contains all the temporary files used during the execution.
Configuration
The folder CONF contains three files with a set of properties to configure the discovery tool:
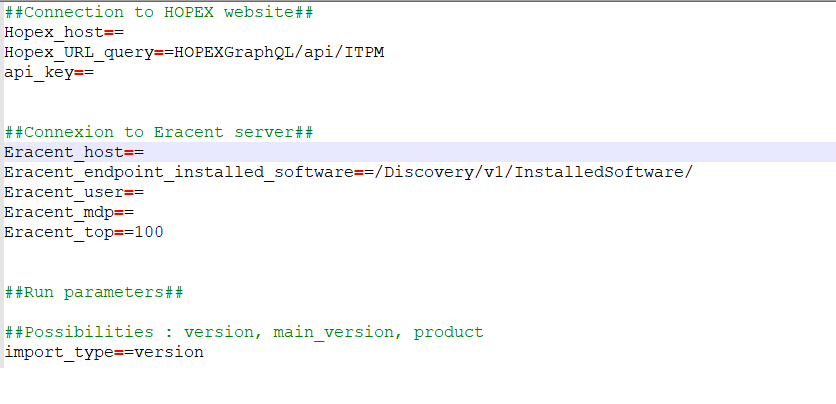
• Technical Configuration (mega.properties): a text file that contains a set of connection properties to be defined to launch the tool.
##Connection to HOPEX website##
Hopex_host=={paste here the URL where Hopex is hosted }
Hopex_URL_query==HOPEXGraphQL/api/ITPM
api_key=={paste here the api key generated in the section I.2}
##Connexion to Eracent server##
Eracent_host=={paste here the URL where Eracent server is hosted }
Eracent_endpoint_installed_software==/Discovery/v1/InstalledSoftware/
Eracent_user=={paste here the username of the user who has access to the Eracent server }
Eracent_mdp=={paste here the password of the user who has access to the Eracent server }
Eracent_top=={Eracent network response package size (in number of technologies) - default value = 100 - does not affect the number of item retrieved, only the size of the network query response packages}
##Run parameters##
##Possibilities : version, main_version, product
import_type=={Select one of the possibilities above to choose the type of technology you want to import }
• Type file (Types.csv): a table of all technology types that can be imported from Eracent to the HOPEX repository.
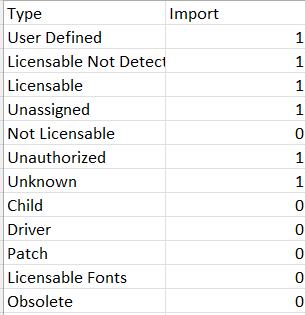
For each type, enter 1 to load all technology of this type into Hopex, and 0 if you want to ignore the technologies of this type.
• Function file (Function.csv): in this file you can filter technologies so that they are not imported into HOPEX, based on their source Function, and you can define an HOPEX Technological Functionality for the imported technologies.
The column "Function" lists the technical functionalities that exist in Eracent.
The column "Technical_Functionality" indicates the corresponding technical functionalities in HOPEX.
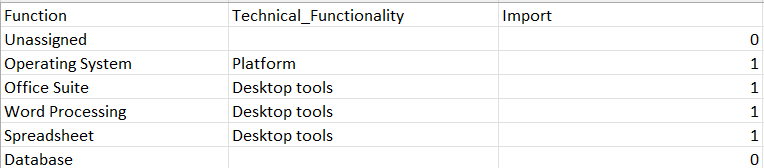
You can filter the technologies you want to import from Eracent into HOPEX based on these Functions: enter "1" in the "Import" cell to import the Eracent technologies with the given Function, "0" otherwise.
Upon import, the HOPEX Technical Functionality input in the "Technical_Functionality" column will be linked to all imported technologies with the matching Eracent Function specified in the Function Column. If no Technical Functionality is specified, no Technical Functionality will be linked to the imported technology.
Retrieving Data Collected by ITMC Discovery
In the EXE folder of the module installation are the .bat files to be executed to get the data from Eracent and load them into HOPEX:
• GetDataFromEracent_run.bat: to retrieve the data stored in the Eracent database.
• GetDataFromHopex_run.bat: to import the data into HOPEX.