Managing Data Writing Access
Full management of data writing access and opening of corresponding diagram is only available with HOPEX Administration (Windows Front-End).
The Web Administration desktop enables to:
• display writing access areas (as a list or a hierarchical tree)
• create writing access areas:
• define their upper levels (“Administrator” by default)
• define their lower levels
• define their members
• compile the writing access diagram
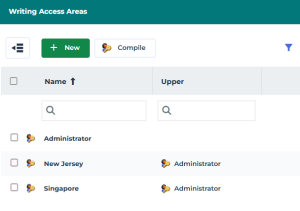
Accessing Writing Access Areas (list)
To access the list of writing access areas (in Web):
1. Connect to the HOPEX Administration desktop.
2. Click the Data Access > Writing Access areas navigation menu.
The list of writing access areas displays with, for each area, its corresponding Upper area.
 .
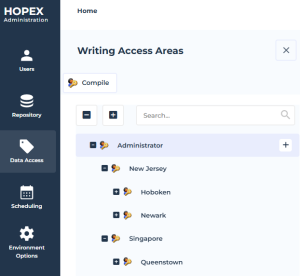
.Accessing Writing Access Areas (tree)
To access the hierarchical tree of writing access areas (in Web):
1. Connect to the HOPEX Administration desktop.
2. Click the Data Access navigation menu.
3. Click Writing Access areas  .
.
.The hierarchical tree of writing access areas displays.
Creating a Writing Access Area
To create a writing access area:
• you must define its name
• you can define its upper area (“Administrator” by default)
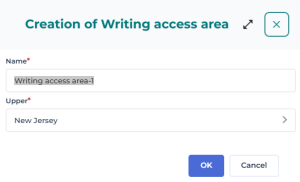
To create a writing access area:
1. Access the list of writing access areas.
2. In the list menu bar, click New  .
.
.3. Enter the writing access area name.
E.g.: Hoboken
4. By default its upper area is “Administrator”, to modify it:
• Click the Upper field arrow and select Connect Writing Access Area.
• Select the area.
E.g.: New Jersey
• Click Connect.
5. Click OK.
 .
.Creating a Writing Access Area with its Upper Area
To facilitate the hierarchical creation, you can create a writing access area directly under its upper access area.
To create a writing access area with its upper area predefined:
1. Access the tree of writing access areas.
2. Hover the cursor over the name of the upper writing access area, then click  New > Writing access area.
New > Writing access area.The upper writing access area is predefined.
E.g.: New Jersey.
3. Enter the Name of the writing access area.
E.g.: Newark.
4. Click OK.
Defining Writing Access Area Members
A writing access area member can be a person or a person group.
To define the writing access area members:
1. Access the list of writing access areas.
2. Access the writing access area properties.
3. In the Characteristics page, expand the Access area members section.
4. Click Connect  .
.
.5. (If needed) To narrow down the target, click the Access Area Member drop-down menu and select Person or Person Group.
6. (Optional, to refine your search) In the second field, enter the character string you want to search for.
7. Click Find  .
.
.8. In the result list, select the required members of the area and click Connect.
The selected person and/or person groups are connected to the writing access area.
 . Confirm Remove.
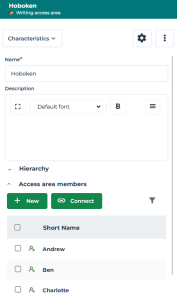
Defining a Lower Writing Access Area
A writing access area may have several lower writing access areas.
To define a lower writing access area:
1. Access the list of writing access areas.
2. Access the writing access area properties.
3. In the Characteristics page, expand the Hierarchy section.
4. In the Lower list, click Connect .
. and enter its Name and select its Upper area.5. In the Possible Lower Writing Access Areas, select the area and click Connect.
Defining an Upper Writing Access Area
A writing access area may have several upper writing access areas.
To define an upper writing access area:
1. Access the list of writing access areas.
2. Access the writing access area properties.
3. In the Characteristics page, expand the Hierarchy section.
4. In the Upper list, click Connect .
.5. To create an area: click New , then enter its Name, and select its Upper area.
, then enter its Name, and select its Upper area.6. In the Possible Upper Writing Access Areas, select the area and click Connect.
Deleting a Writing Access Area
You can delete a writing access area.
• The writing access areas dependent on the deleted writing access area are, after updating, no longer connected to the writing access area tree. It is therefore preferable to first change their link with the obsolete writing access area for a retained writing access area.
• A person must belong to a writing access area ("Administrator" by default).
If you delete a writing access area that includes members, you must connect these persons to another writing access area.
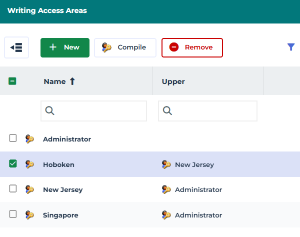
To delete a writing access area:
1. Access the list of writing access areas.
2. Select the writing access area.
3. In the list menu bar, click Remove .
.If the removal has an impact, a warning is indicated in the Status column with its Motive.
4. Click Delete to confirm.
To connect multiple persons to the same writing access area, select the persons then click in a writing access area cell of the list to use the drop-down menu to select the area.
Compiling the Writing Access Diagram (Web)
Running writing access diagram compilation ensures consistency of HOPEX behavior with declarations of the diagram.
To compile the writing access diagram (Web):
1. Access the list of writing access areas.
2. In the list menu bar, click Compile  .
.
.When compilation is complete, a message indicates that the operation was successful, or, if applicable, that the diagram contains errors.