NSV-8 Systems Configuration Management
NSV-8 captures evolution plans that describe how the system, or the architecture in which the system is embedded, will evolve over a lengthy period of time.
To successfully understand the time evolutions, timeline milestones are very important. In Information system planning, master plans are used to define long term evolutions of system that will best respond to business function demands.
The HOPEX NAF allows the user to create master plans that describe system evolution. A master plan is composed of milestones where life periods of architecture items are constrained. The master plans are used to describe system evolution scenarios and depending on the analysis of these scenarios, the scenarios can either be elected, rejected or postponed.
An architecture contains one or more master plans. Each of them describes the evolution of different parts of the system. A specific master plan is used to describe the overall evolution of the system. The creation of this master plan is transparent to the user. It enables the creation of top level scenarios.
For further information on Master Plan modeling, see the HOPEX Planning documentation.
Creating a Solution Master Plan
Solution Master Plans are created in the navigation tree. The details of these Master Plans are then displayed as a graphical representation in a Gantt Chart.
To create a Solution Master Plan in the NAF navigation tree:
1. In the NAF navigation bar select System Views > NSV-8 > All Solution Master Plans.
2. Click New.
3. Enter the name of your Master Plan.
4. Select the planning mode of your Master Plan. By default the Master plan is date-oriented.
5. Click OK.
Displaying the Gantt Chart
The Gantt chart is automatically created with the master plan.
To view the Gantt chart of a master plan:
The Master Plan is initialized with the milestones that were created. Milestone arrangement is from left to right.
You can create and modify elements directly in the Gantt Chart.
To complete the Master plan, you can:
• Create milestones
• Create planned configuration capabilities
• Add the time periods of objects to be planned.
• Indicate the life-cycle status of the planned objects.
Creating milestones in a Gantt Chart
A milestone marks the date on which the results of a task are expected. Each milestone therefore corresponds to the beginning or end of availability of a resource architecture/system. Milestone arrangement is from left to right.
To create a milestone and add it to a Master plan from the Gantt Chart:
1. Click the Milestone button at the top of the Gantt Chart.

2. In the dialog box that appears, enter the name of the milestone.
3. Indicate the type of milestone to be created. In the case of a standard milestone, select the preceding milestone.
4. Click OK.
The Milestone is created and appears in the Master Plan. This Milestone is also displayed in the Properties dialog box of the Master Plan, in the Characteristics tab.
If you made an error and wish to delete the milestone, click the cross on the milestone.
Adding time periods to a master plan and planning object life
The Gantt chart of a master plan relates to certain object types.
Adding an object to a master plan means integrating planning of the different object life cycle steps in the Gantt chart of the master plan. You can therefore plan all the steps in the life of the object.
To add time periods:
1. Above the master plan table, click the Add Time Period button.
2. In the Query dialog box that appears, use the Find button to find the required object, in this case a resource architecture.
3. In the list proposed, select your object and click OK.
The dialog box for adding planned objects opens with the chosen object.
4. Click Next to continue.
You are then required to select the life cycle of the object.
5. In the Life Cycle to Follow, select a life cycle, for example "Application development life cycle".
6. Specify the Begin Date and the End Date.
7. Click OK.
Application life planning appears in the master plan.
You can define absolute start and/or end dates on the time period.
When completed, the Gantt Chart displays the milestones and planned objects.
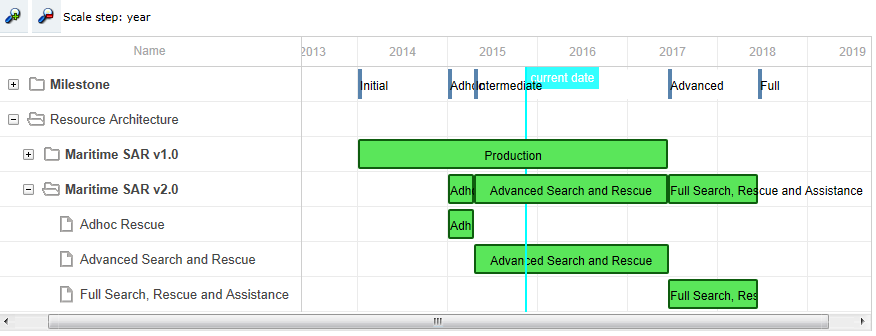
Example of an NSV-8 Gantt Chart