Specifying a worksheet with the template builder
When using the template editor, you can perform various operations :
• add sheets, delete or modify existing ones
• parameterizing the new worksheets population or modifying the existing ones
• modify model, worksheet and column parameters to access specific facilities
Excel Template Builder interface
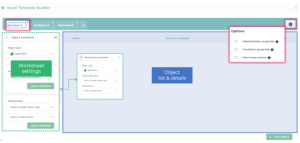
The Template Builder interface provides:
• atop, tabs for each of the worksheets composing the Excel workbook
• on the left, the worksheet setting window This worksheet can be a relationship or an object worksheet.
 to switch worksheet type.
• in the center, the list of characteristics correspoinding to the columns of the worksheet and their details.
• on the top-right, template settings
Managing the Excel Template Worksheets
Worksheets contained in the workbook are represented by tabs at the top of the Builder interface.

You can:
• click New worksheet  to add a worksheet to the workbook
to add a worksheet to the workbook• double-click the name of the worksheet to rename it
• click Delete  (at the top-right of each tab) to delete a worksheet
(at the top-right of each tab) to delete a worksheetWhen you start from an existing template, the name of some worksheets may bear an underscore as prefix. This indicates that the worksheet in question is only editable through Excel. Some of these worksheets may also contain information and recommendations regarding the use of your Excel workbook.
E.g.: the _README worksheet
Configuring an Excel Template Worksheets
An Excel import or export worksheet contains, by nature, a list of instances in rows, along with their attributes in columns.
Instances can be objects or relationships.
An Excel template can feature two types of worksheet:
• object worksheets which group together the characteristics of a list of objects of the same type,
• relationship worksheets, which group together the characteristics of a list of links of the same type.
You are able to include relationships in an object worksheet settings. Relationship worksheets are only useful if you need relationship attributes after parameterizing an object worksheet.
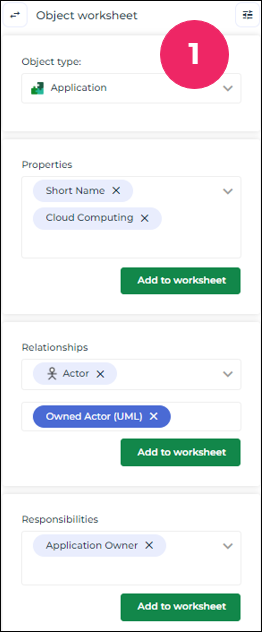
Setting up an object worksheet
To set up an object worksheet:
1. On the top-left, define Object worksheet as worksheet type (default value).
to switch worksheet type.2. In the Object type field, select the object you want to describe in the worksheet.
The following fields display progressively.
3. [Optional] Define the worksheet advanced settings.
4. Create the columns of your target file.
5. [Optional] Modify the Name in the worksheet to customize the naming of the columns.
6. [Optional] Define the columns advanced settings.
E.g.: setting up an Applications object type worksheet.
Setting up a relationship worksheet
A relationship worksheet is meant to complement the information contained in an object worksheet: it defines attributes attached to the relationships mentioned in the object worksheet previously set up.
A relationship is defined between an object considered as a "source" and an object considered as a “target”. The “source” object "source" is the relationship owner; if it is deleted, the relationship is also deleted.
The type of a relation ship is defined by the type of the “source” object and the type of the “target” object.
To set up a relationship worksheet:
1. Define Relationship worksheet as worksheet type.
to switch worksheet type.2. In the Object type field, select the source object type.
3. In the Target object type field, select the target object type.
4. In the Relationship field, select the type of the relationship that interests you between the source and the target objects.
5. [Optional] Define the worksheet advanced settings.
6. In the Properties field, in the drop down list, select the values that you want to see in the worksheet (these values correspond to columns in the target file).
7. Click Add to worksheet to list the property values in the central area of the Builder.
8. [Optional] Edit the Name in worksheet column values to customize the column names.
9. [Optional] Define the columns advanced settings.
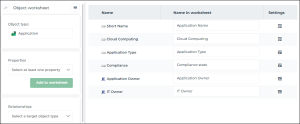
Creating columns
The Excel target file columns feature as rows at the center of the Builder interface.
A column can be associated with different characteristics:
• an object attribute, defined in the Properties field,
• a link between the described object and a target object, defined in the Relationships field,
• a role or a profile associates to the described object, defined in the Responsibilities field.
To add columns to a worksheet:
1. Open the worksheet that interests you.
The following fields display depending on the pre-selected object type, as well as the other fields progressively filled in.
E.g.: creating columns for an Applications object type worksheet.
2. In the Properties field, in the dropdown list, select the values that you want to see in the worksheet (these values correspond to columns in the target file).
3. Click Add to worksheet to list the property values in the central area of the Builder.
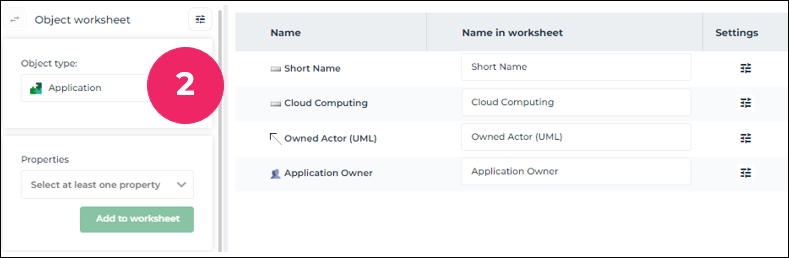
4. [Optional] Edit the Name in worksheet column values to customize the column names.
5. [Optional] Define the columns advanced settings.
Once the columns are created and the template is saved, the specified columns appear in the associated Excel worksheet.

Modifying the column order
To edit the column ordering in the target document:
1. Hover the cursor over the row of your choice.
2. On the far left of the row, click Drag and drop to order column  .
.
.Hold down you click.
3. Drag and drop the row to the place you want to move it.