2. IIS Web Server
The following installation instructions are to be applied on each server that will behave as an “IIS Web Server”. The following instructions apply to Windows Server 2019. For other Windows versions adjust accordingly.
Should you have several IIS, you need to add a load balancer (no sticky session) in front.
For information:
• one IIS Web server is suitable for most deployments.
• IIS is not required for single laptop deployment (consultant, developer, partners), in that case skip this chapter.
2.1. Adding SSL Certificate
To ensure data protection, it is highly recommended to use SSL/TLS. If you want to activate this feature, it is then mandatory, as a prerequisite, to configure your IIS platform to activate the SSL/TLS.
You will need to have a signed certificate. You can bind the HTTPS protocol to any wanted port, in the installation process you will choose the port.
For official Microsoft documentation on IIS, see https://docs.microsoft.com/en-us/iis/manage/configuring-security/configuring-ssl-in-iis-manager.
2.1.1. Adding certificate on IIS Web Server
Make sure the SSL certificate has been properly imported in windows certificate store, see the instructions section 4.3 Adding certificate on the server.
In that example the public url of the installation is https://vp-iis1-v5.fr.mega.com Adjust naming based on your own policy and naming convention. Ensure this is a signed certificated.
2.1.2. Adding certificate on IIS
The certificate will be automatically visible when you edit the binding of your website. If it does not appear it means the certificate is not valid or you missed a step in previous section.
The instructions are explained in the following steps.
2.2. Installing IIS
If IIS is already installed, please check that all required features are enabled
To install IIS:
1. In Windows Operating System turn on IIS and its features:
From Control Panel: “Turn Windows features on or off”
Or
From Server Manager: Add Roles and features (https://docs.microsoft.com/en-us/windows-server/administration/server-manager/server-manager#start-server-manager)
2. Click Manage > Add Roles and features.

3. In the pop-up Wizard, click Next.
The Server Roles page is displayed.
The Server Roles page is displayed.
4. Select: Web Server (IIS).
5. If prompted click Add Features.
6. Ensure the following options are selected:
Web Server:
o Common HTTP Features
Default Document
Directory Browsing
HTTP Errors
Static Content
o Health and Diagnostics
HTTP Logging
Tracing
o Performance
Static Content Compression
Management Tools:
o IIS Management Console

7. Click Next to Install IIS and its related features.
2.3. Installing URL Rewrite
URL Rewrite is tightly integrated with IIS Manager and is a prerequisite for ARR to work as expected.
To install URL Rewrite:
1. Download “rewrite_amd64_en-US.msi” URL Rewrite from official IIS website: https://www.iis.net/downloads/microsoft/url-rewrite.
2. Click Install this extension to get the Web installer.

3. Scroll down to Download URL Rewrite Module section to select an offline installer.

4. Choose:
- Web Platform Installer if the server has internet access connection.
- x64 installer if the server does not have internet access.
- Web Platform Installer if the server has internet access connection.
- x64 installer if the server does not have internet access.
5. Launch the installer:
a) Select Accept the terms in the License Agreement, then click Install.

b) Click Next if needed.

c) Click Finish.

2.3.1. Security: removing X-Powered-By header
To remove x-powered-by header:
1. Access URL Rewrite.

2. Create a variable:
a) in Actions > Manage Server Variables, click View Server variables.
b) Add the RESPONDE_X-POWERED-BY variable.

3. At rule level, Add an Outbound Rule.
For more details see https://techcommunity.microsoft.com/t5/iis-support-blog/remove-unwanted-http-response-headers/ba-p/369710

2.4. Installing ARR
IIS Application Request Routing (ARR) is required to map the official “URL DNS” to the HAS server farm that will handle the web request.
To install IIS ARR:
1. Download IIS Application Request Routing (ARR) 3.0 “requestRouter_amd64.msi” from the official website: https://www.iis.net/downloads/microsoft/application-request-routing
ARR depends on URL Rewrite. Make sure URL Rewrite is installed prior to installing ARR. Alternatively, use the Microsoft Web Platform Installer link instead, which installs the ARR and its dependency in the right order.

2. For online server: click Install this extension to get the Web installer.
Or for offline server: scroll down to Download URL Rewrite Module section to select an offline installer.

3. Choose:
- Web Platform Installer if the server has internet access connection
- x64 installer if the server does not have internet access
- Web Platform Installer if the server has internet access connection
- x64 installer if the server does not have internet access
4. Launch the installer:
a) Select Accept the terms in the License Agreement, then click Install.

b) Click Next if needed.

c) Click Finish.

2.5. Configuring Sites
Caution: this configuration may change if you leverage an existing IIS Server
In that configuration the IIS server is dedicated to HOPEX Application Server Deployment.
There is no other Website expose by this IIS Server. Should there be other website you will need to adjust URL rewrite rules.
The following steps detail how to configure the IIS Server on HTTP (80) or HTTPS (443).
You must choose one or the other. A mix of HTTPS and HTTP is not allowed.
To configure Sites:
1. Right-click Default Web Site and select Edit Binding.

2. For:
an HTTP configuration, see section 2.5.1 Configuring HTTP port 80.
an HTTPS configuration, see section 2.5.2 Configuring HTTPS port 443.
2.5.1. Configuring HTTP port 80
To perform an HTTP configuration (if not already configured):
1. Click Add (or click Edit on existing 80).
o In the Type field, select “http”.
o In the IP address field, select “All unassigned”.
o In the Port field, enter: “80”.

2. Click OK.
3. Click Close.
In that context, remove existing HTTPS.
2.5.2. Configuring HTTPS port 443
To perform an HTTPS configuration (if not already configured):
1. Click Add (or click Edit on existing 443).

2. In:
• the Type field, select “https”.
• the IP address field, select “All unassigned”.
• the Port field, enter: 443.
3. Click OK.
4. Select appropriate SSL Certificate (the one imported from above step 2.1 Adding SSL Certificate).
5. Click Close.

6. In that context, remove existing HTTP.
2.6. Configuring Server Farm - ARR
ARR will allow to redirect the request send to the “IIS Server” to the “HAS Server”.
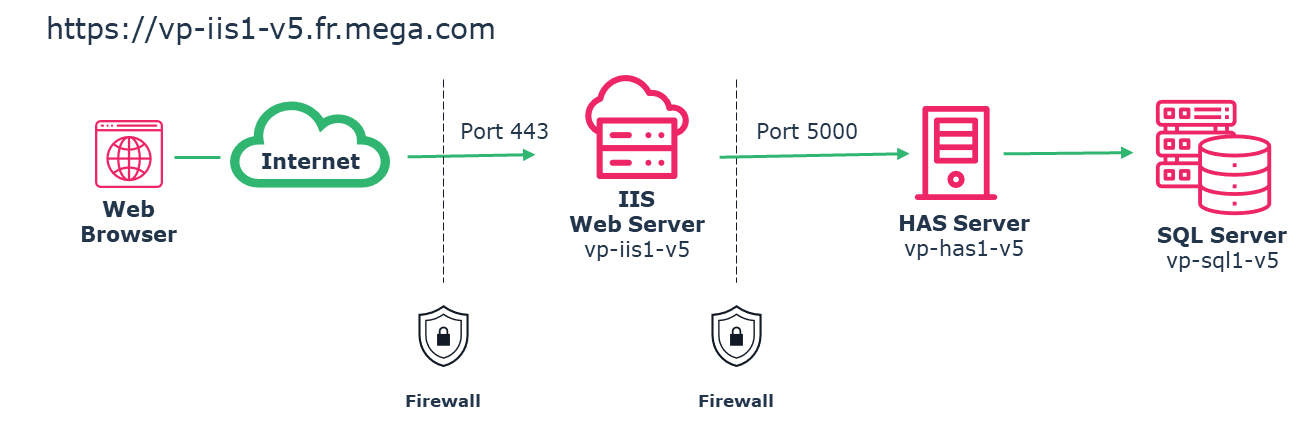
In that configuration there is:
One public URL DNS that will be https://vp-iis1-v5.fr.mega.com
One HAS Server named “vp-has1-V5” installed on port 5000.
You need to adjust the following instruction to your own URL and server name.
2.6.1. Creating a Server farms
Even if you have a single server, perform the following:
1. Right-click the Server Farm root level and select Create Server Farm.

2. Enter a name to the server farm: for instance, “HAS Server Farm PROD”.

If you have several instances, give an explicit name to the farm
HAS Instance 1 – PROD - 5000
HAS Instance 2 – PRE-PROD 5001
HAS Instance 1 – PROD - 5000
HAS Instance 2 – PRE-PROD 5001
3. Click Next.
4. In the server address enter the name of the server (entering an IP address is not supported). In that example: vp-has1-v5
5. Click Advanced settings.

6. . Scroll to always put both port (HTTP/HTTPS)
o HTTP port, enter 5000
o HTTPs port, enter 5000
7. Click Add.

8. Repeat this operation for each HAS Server of the cluster.
You now need to add each server of the cluster. If you have a single server for HAS then you need to put this server.
Example: with two HAS server names “vp-has1-v5” and “vp-has2-v5”.


7. Click Finish.

8. When prompted click Yes to create the URL Rewrite rule.

If you do not get prompted to create the URL Rewrite rule it means URL rewrite might not be installed. You must install it and then create the rule manually.
2.6.2. Configuring the Health Test
To configure the Health Test:
1. Select the Server Farms you have just created.
2. Double-click Health Test.

3. In the input URL add the server URL:
Always write “localhost” regardless of your public URL/DNS.
Choose HTTP or HTTPS depending on how the instance node has been configured. See corresponding chapter for more details “4 SSL Certificates configuration”
2.6.3. Configuring the proxy timeout
To configure the timeout:
1. Select the Server Farms you have just created.
2. Double-click Proxy.

3. In the Time-out field, enter 120, then Apply. 120s is the max do not put above.

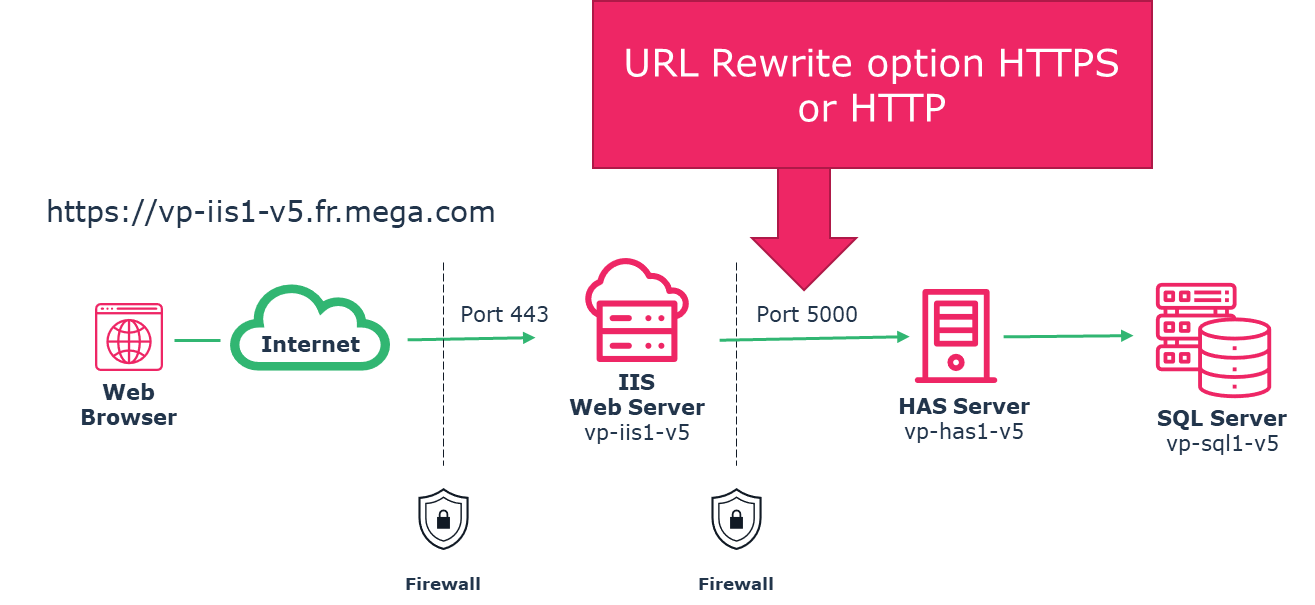
2.6.4. Configuring the URL Rewrite rule
You need to adjust the URL Rewrite rule that was created:
1. Click the IIS root level.

2. Double-click URL Rewrite.
The rewrite rule created is named “ARR_ server farm name”.

3. Select the rule and double-click it (or click Edit).
4. Expand Conditions section to add one:
o Click Add.
o In the Condition input field, enter {HTTP_HOST}
o Select “Matches the Pattern”
o In the Pattern field, enter the DNS of your URL. Example « vp-iis1-V5.fr.mega.com »

5. Scroll down to the Scheme drop-down menu:
You will be able to decide this on the Instance Manager in the following chapter. If you have selected “Enable https” between cluster then select HTTPS else select HTTP.

o Select HTTPS (443) if you are securing the URL
o Select HTTP (80) if you are not securing the URL
|
HTTPS (preferred choice)
|
 |
|
HTTP
|
 |
6. Click Apply.
CAUTION: There are 2 areas where you defined HTTP and HTTPS. This option is the communication between IIS and HAS
2.7. Request Filtering
You need to adjust the Request filtering rules in IIS. Make sure that:
• there is no URL request filtering.
• there is no HTTP Verbs request filtering.
• there is no header request filtering.
• there is no query string request filtering.
Having value in any of this tab of IIS may interfere with HOPEX and prevent it from working properly. All security aspect of this request filtering are already managed by HAS.
You must Edit feature settings:
1. On root level select Request Filtering.

2. In the Actions pane, click Edit Feature Settings.

3. Increase default value 2048.
o Maximum query string (Bytes): 9012

2.8. Configuring Logs files details and location
The following steps are “optional”. They are here to ease:
• diagnosis with complementary logs
• move location of all IIS logs
Launch the IIS Management Console

2.8.1. Locating IIS Logs
To locate IIS logs:
1. Select the Root level of the IIS Server.

2. Double-click Logging.

3. In the Logging pane, adjust Directory location of logs.
2.8.2. Enabling detailed logs for HTTP status code 502
To enable detailed logs for HTTP status code 502:
1. Go to Root level.

2. Double-click Failed Request Tracing Rules.

3. Right-click the list and select Add.

4. In the Add Failed Request Tracing Rule, select All Content and click Next.

5. Select Status Code and in the field enter “502” then click Next.

6. Click Finish.

The rule for tracing HTTP 502 errors is now added. You must now enable the Tracing logs.
To enable the Tracing logs:
1. Go to Default Web Site.

2. In the Actions pane, Manage Website > Configure section, click Failed Request Tracing.
3. In the Edit Website Failed Request Tracing Settings window, select Enabled.
4. (If needed) In the Directory field, modify folder location. Default: %SystemDrive%\inetpub\logs\FailedReqLogFiles.
5. Adjust Maximum number of trace files. Default 50.
6. Click OK.

2.8.3. Checking configuration (optional)
The server farm and healthcheck configuration you did are stored by IIS in an XML file in Microsoft. This file is called applicationHost.config.
You can find this file here: %windir%\system32\inetsrv\config
1. Access the applicationHost.config file.

2. Go at the end of the file or search for your server name and port.
3. You can check here the port you have selected and healthcheck url.

For more details read the Microsoft official documentation: