Displaying IT-Pedia Properties in HOPEX
Prerequisite
To view the IT-Pedia property page for a technology, you need to activate the corresponding option:
1. Open the Administration desktop.
2. In the edit area, click Environment Options.
The environment options window opens.
3. In the navigation tree, click Tools > Data Exchange> Import > IT-Pedia.
4. In the right pane of the options window, check the Activate IT-Pedia option.
The IT-Pedia properties imported into HOPEX appear under the IT-Pedia properties page of the relevant technology.
The page displays the history of changes made to data during a synchronization or update action.
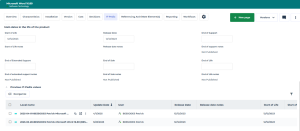
Technology properties related to the official technology life cycle are automatically defined in the Characteristics page of the technology properties, under the Official Lifecycle section.
• Release date
• End of Support
• End of Extended Support
A Support Alert report uses this data to track technology obsolescence. For example, the solution automatically detects current and future conflicts when an underlying technology component becomes obsolete while the business application is still in production.
See Support Alert report.
See also: Technology Automatic Updating and Alerts.
Tracking properties updated by IT-Pedia
Each IT-Pedia property update (via data import or update command) creates a record containing the values processed by IT-Pedia and associated with the HOPEX software technology concerned.
The record displays the software technology identifier and the date of modification.
IT-Pedia updates report
You can view IT-Pedia updates in the IT-Pedia Updates report.
To generate this report:
1. In the navigation bar, click Reports.
2. In the edit area, click Create report.
3. In the filters, enter the report name.
The report appears in the editing area.
4. Move the mouse over the report and click Create report.
5. In the wizard, select the date from which you wish to see updates.
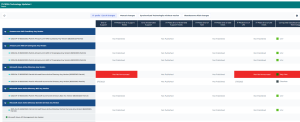
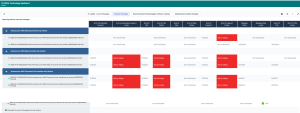
The report includes :
• A list of changes made since the selected date.
• A list of manual changes to support dates: these are software technologies on which a “Set by Mega” date note exists.
• The list of synchronized software technologies with no defined version (“Any Version”).
• The list of synchronized technologies whose obsolescence risk has been modified.
Example
Modifying dates from IT-Pedia
The technology lifecycle dates from the IT-Pedia import may be in read-only mode. Through an Excel file you can modify or complete the technology dates and update them in your repository.
You can use the file in two ways:
• Download it and manually define the technologies and attributes to be modified.
• Select the technologies and their attributes in HOPEX and export them to the file via the Excel export tool.
Once the file is completed, you can import it into HOPEX to update the technologies in your repository
To import the model:
1. Click the Main Menu then Import > Excel Template Download.
2. Select "Technology Lifecycle Date Import Template".
To export directly from HOPEX the technologies and their attributes in the Excel file:
1. Click the Main Menu then Export > Excel (*.xls; *.xlsx).
2. Select the Using a HOPEX Template.
3. Select "Technology Life Cycle Dates Import Template" and check Load Mega objects.
4. Click Next.
5. Under Excel Worksheets, select "Software Technology".
6. Under Columns, select the attributes you want to set on the technology.
7. Click Next.
8. Select the Excel sheet and under Objects to be exported, add the desired technologies.
9. Click Next.
10. Open the file that contains the technologies to be modified or completed.
11. For each technology, enter the desired dates in the corresponding columns, for example "Start of Life".
Once the file is completed, you can import it into HOPEX.
The modified attributes appear in the IT-Pedia properties of the concerned technologies, with the note "Set by Mega".

See also: Defining Technology Life.