Viewing Objects Before Export
Viewing models with a perimeter allows preview of the operation result before its execution, and modification of the operation if required. You can therefore:
In the case of object export, other objects (connected to the root object) are also exported - they are determined by behavior of the "Standard for export" perimeter related to links existing around the root object.
Enabling the view option
To view objects that will be exported, you must enable the View objects before export option:
1. From your HOPEX workspace, select Tools > Options.
2. In the HOPEX Data Exchange > Export > Files option group: Generic options select View objects before export option.
Viewing objects
To view objects that will be exported:
1. Select menu Tools > Options.
2. In the HOPEX Data Exchange > Export > Files option group: select the View objects before export option.
The View button  appears in the Objects frame.
appears in the Objects frame.3. In the Export HOPEX Objects dialog box, select an object in the list and click View .
.The object detailed view window appears.
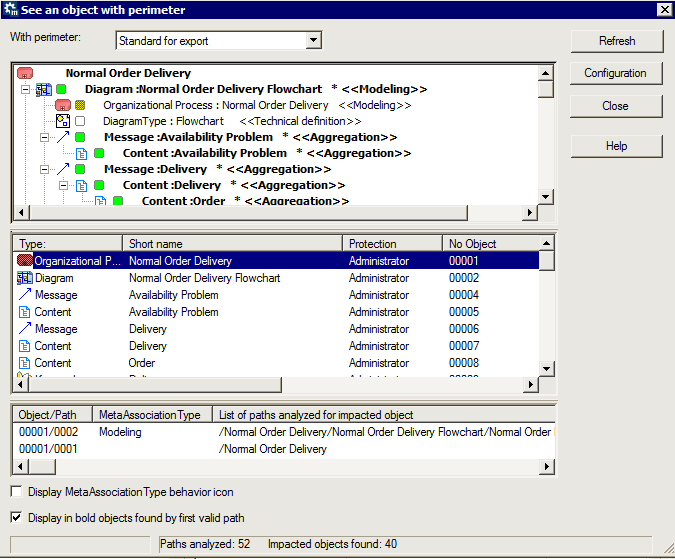
The See an object with perimeter window presents all exported objects in two ways (result of propagation applied to the root object):
• The top frame presents, in tree form, the objects that will be exported with the root object. For each object it details:
• the propagation behavior defined by the "Standard for export" perimeter for the link browsed.
The behavior of this operator depends on the various link types and will determine the objects that will also be exported.
The behavior of this operator depends on the various link types and will determine the objects that will also be exported.
• the corresponding link type (for example Modeling).
• the propagation type (identified by an icon) that will be executed on the object.
Table: Description of propagation behaviors
Icon | Value | Propagation description |
|---|---|---|
 | Deep | Recursive complete propagation: Takes into account this link and the opposite object only. Propagation continues. |
 | Standard | Simple propagation: Takes into account this link and the opposite object only. Propagation stops. |
 | Link | Limited propagation: Takes into account this link but not the opposite object. Propagation stops. |
 | Abort | No propagation: Does not take into into account this link or the opposite object. No propagation: |
You can customize display of these results by selecting:
• Display MetaAssociationType behavior icon, which presents propagation behavior defined for the MetaAssociationType.
• Display in bold objects found by first valid path.
• the middle table lists objects that will be exported with the root object. For each object it details:
• the number of paths linked to the object.
• the comment associated with the object.
• the bottom table details all paths by which the object selected in the middle table has been found, together with the corresponding link type (MetaAssociationType).
To locate an object/path in the tree:
The Configuration button accesses the perimeter configuration tool.