Running Visio Import
To import a Visio diagram, follow this procedure:
1. Select the Visio file and the configuration file
2. View and select the pages to be imported
3. For each page, define the mapping between Visio and HOPEX objects.
Step 1: Select a Visio file and a configuration file
To import a diagram created in Visio into HOPEX:
1. From the Tools menu bar, select Import > Visio (*.vsd).
The file import wizard window opens.
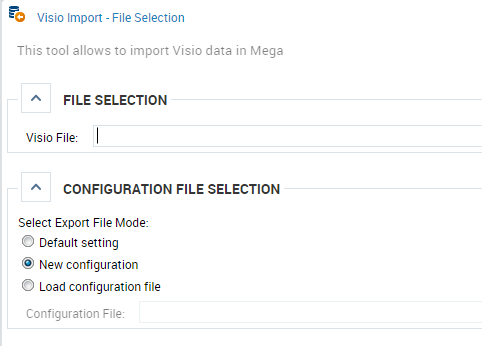
2. In the File Selection frame, select the Visio file to be converted.
3. In the Configuration File Selection frame, select the export file mode:
• Default settings: this option applies the mapping file that has been defined in the environment options. See Defining a Default Configuration File.
• New configuration: does not load a predefined map file.
• Load configuration: this option is used to select a mapping file on a computer or network.
4. Click Next.
Step 2: View and select pages to be imported
This step displays the contents of the Visio pages so you can select the pages to be imported.
For each page to import you must define:
• the MetaClass to which the diagram created in HOPEX will be attached
• the Described Element (instance of the MetaClass)
• the Diagram Type to create
When selecting a page, press See Diagram to view the corresponding drawing.

To define the object and diagram to create from a Visio page:
1. Under Visio Pages, select the relevant page.
2. Click in the MetaClass column and click List MetaClasses.
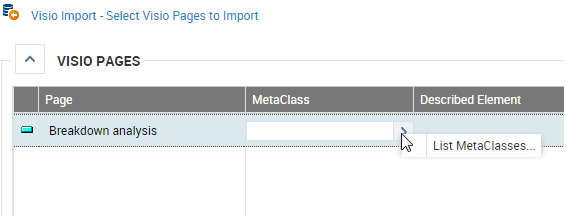
3. Search and select the HOPEX MetaClass.
For example Organizational Process.
4. Indicate the Described Element.
For example the "Breakdown analysis" Organizational Process.
5. You can select an existing object in HOPEX or enter the name of the object to create.
6. Select the Diagram Type to create.
For example BPMN Organizational Process.
7. In the Import column, select the box to import the page.
8. Do the same with the other pages.
9. Click Next.
Step 3: Define the mapping of objects of each Visio page
In this step you specify the mapping to be done for each item of the Visio pages selected in the previous step. See also "Mapping Visio and HOPEX concepts", page 3.
To create mappings between Visio et HOPEX concepts:
1. Under Visio Pages, select the appropriate page.
The list of Masters and Shapes for the page appears.
You can view objects of this list in the diagram by checking the Locate box associated with the objects in question. Selected objects are highlighted in red in the diagram.
2. For each Visio master, indicate the corresponding HOPEX MetaClass.
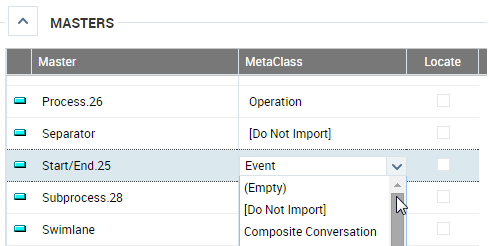
When selecting a master, the list of associated shapes appear.
In the Attribute/Link column of each shape, you can specify the shape properties. See also Visio Import Example.
3. When mappings are defined, click Next.
The report of created objects appears. You can save the report in one of the available formats.
4. Click OK to validate and finish the import.
At the end of the import, the configuration file of the mappings you created is downloaded automatically (.xml file). You can back up this configuration file in order to retrieve mappings for subsequent imports.
