Mapping Fields
Mapping process
To map fields:
1. From the Mapping menu, open the relevant table mapping.
2. Click Add new mapped item.
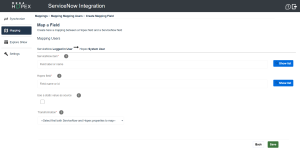
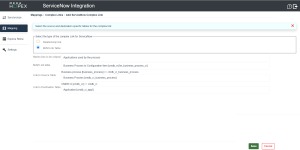
The Map a Field creation page appears.
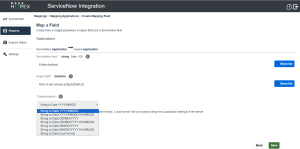
3. Enter the ServiceNow field and the HOPEX field of your choice.
 .
.4. (Optional) Click Use a static value as source to configure a specific value into the target system.
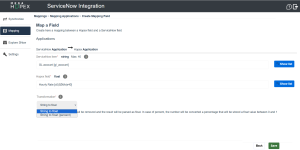
5. According to the fields you selected, Transformation (data conversion) is either automatic or requires further settings.
Supported Field Types
Field type | Description |
|---|---|
GUID | Used for absolute identifiers |
String | Used for single line and multiple line text. Formatting is not supported. Strings can be limited in size |
Integer | Used for numbers without the comma |
Float | Used with decimal numbers and percentages |
Boolean | Used with decimal numbers and percentages |
Date | Used to identify date and time |
Enum | Used when a field can hold a predefined list of values. Note that enums in ServiceNow have the "Choice" type. |
Link | Used when the field is a reference to another object. Note that links in ServiceNow have the "Reference" type. |
Mapping the Name
To map the name:
1. In the ServiceNow item field, enter "Name" and select the adequate value.
2. In the Hopex field, enter "**NAME**".
3. Click Save.
Mapping the Description
To map the description:
1. In the ServiceNow item field, enter "Description".
2. In the Hopex field, enter "Comment".
3. Click Save.
Mapping a String to a Date
To map a String type field to a Date type field:
Mapping a String to a Float
To map a String type field to a Float type field:
Mapping a String to a Link
To map a String type field to a Link type field:
Mapping Enumerations
To map fields containing multiple values, you must specify further the correspondence of the values between HOPEX and ServiceNow.
To map enumerations:
1. Enter the relevant ServiceNow and HOPEX fields.
2. Click Save.
3. Click Define mappings for enums.

Multiple values of both ServiceNow and HOPEX fields are displayed into separate tables.
4. Select a value in the table on the right first.
5. Select the matching value in the table on the left.
The correspondence of these values is displayed in a matrix (at the bottom part of the sceen).
6. Click Back and Save.

Mapping Links
You can map links between ServiceNow and HOPEX.
There are two types of links.
• Simple links (i.e. direct link between two objects) are easy to map in the Map a Field creation page.
• Complex links (i.e. links using intermediate objects) require further configuration as presented below.
Mapping complex links
By default, complex links are not available in the list of fields to map.
Therefore, you need to define a complex link in order to be able to map it.
Defining a complex link in HOPEX
To define a complex link in HOPEX:
1. From the Mapping menu, select Define complex links.
2. Click the Add new HX button.
3. Select a Source MetaClass and a Destination MetaClass.
4. Click Search Links.
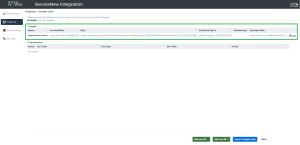
Complex links between the two MetaClasses appear in a table.
 .
.5. Click  to select the complex link of your choice.
to select the complex link of your choice.6. Enter a name for this complex link.
7. (Optional) Enter the standard links to hide.
8. Click Save.

Defining a complex link in ServiceNow
To define a complex link in ServiceNow:
1. From the Mapping menu, select Define complex links.
2. Click the Add new SN button.
3. Select the type of complex link between:
• Relationship link
• Many-to-many link
4. Enter the relevant fields and click Save.
Example of a complex link
Here is an example of a complex link configuration in order to map the Users in ServiceNow with the Application Owners in HOPEX.
Please note the following first:
• In HOPEX, there is an intermediary object between the MetaClasses "Application" and "Person (System)". Hence, you need to define this complex link.
• In ServiceNow, there is no intermediary object between the tables "Application" and "System User". Hence, no further configuration is needed.
• Once the complex link is created, you eventually need to map HOPEX's complex link with ServiceNow's simple link.
Defining the complex link in HOPEX
To define this complex link in HOPEX:
1. From the Mapping menu, select Define complex links.
2. Click the Add new HX button.
3. Select "Application" in the Source MetaClass and "Person (System)" in the Destination MetaClass.
4. Click Search Links.
A list of links appears.
5. Use the filters to display "Person Assignment" in the "Link1" column.
6. Use the filters to display "Assigned Person" in the "Link2" column.
7. Click  to select the complex link.
to select the complex link.8. Enter a name for this complex link.
9. Select "Application Owner" in the Business Role.
10. Click Save.
The complex link has been successfully created. It appears in the list of complex links.
Mapping HOPEX's complex link with ServiceNow's simple link
To map these links:
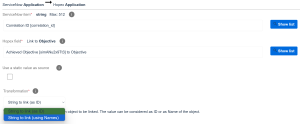
1. From the Mapping menu, select the mapping you created for Applications.
2. Click Add mapping items.
The Map a Field page appears.
3. Select "Assigned to" in the ServiceNow item.
4. Select the newly created complex link in the Hopex field.
5. Click Save.
