Modifying a Work Package Scheduling Diagram
You can modify the content of a work package created with the ADM method without there being any impact on the method itself.
Creating a work package in a diagram
To create a work package in a diagram:
1. In the objects tool bar, click the Work Package button 
2. Then click in the diagram workarea.
The Add Work Package dialog box appears.
3. Enter the name of the work package and click the Create button.
The Creation of Work Package dialog box appears.
4. Click Finish, if you do not want to base your work package on a project type or a method.
To create a new work package diagram:
1. Right-click a work package and select New > Diagram.
2. In the wizard that opens, select Scheduling Diagram and click the Create button.
An empty diagram appears.
Interconnecting Work Packages
In a scheduling diagram, you can easily interconnect different work packages.
To connect work packages (or projects):
1. In the objects toolbar, click 
2. Click on the first project and, keeping the mouse button pressed down, draw a line to the second.

The direction of the link is important. In the case above, the link indicates that "Project 1" precedes "Project 2".
If you drew the arrow in the wrong direction, you must delete the link and redraw it in the correct direction.
To delete the link:
1. Right-click on the link.
2. In the pop-up menu that appears, select Delete.
Creating a work package by linking it with other work packages
To create a work package while linking it with two other work packages:
1. In the objects toolbar, click the Work Package button
2. Click on the first work package and, keeping the mouse button pressed down, draw a line to the second.

The Add Work Package dialog box appears.
3. Add the name of the new work package and click Create.
4. In the work package creation dialog box that appears verify the name of the project and click Finish if you do not wish to specify the project type.
The new work package is created and connected to the two others.
Specifying work package composition
To specify work package comosition:
1. Select View > Views and Details.
2. In the dialog box that opens, select the Composition check box, then click OK.
3. Draw a link between two sub-projects.
The Create link dialog box appears.
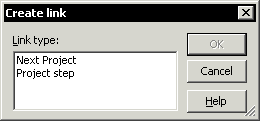
It offers a choice between a "Next Project" link which indicates a sequence between two projects, and a "Project Step" link which indicates that one project is a step to be carried out in another.
4. Select the "Project Step" link. A dotted arrow line is displayed between the two projects.
