Web Service Factory (WSF) Template
Installing the HOPEX WSF template
To install the HOPEX WSF template:
Use the VSIX file provided: Mega.WSF.Template.Installer.vsix.
This Visual Studio extension adds a new C# template in Hopex sub-section.
Creating an HOPEX Web Service
To create a Web service:
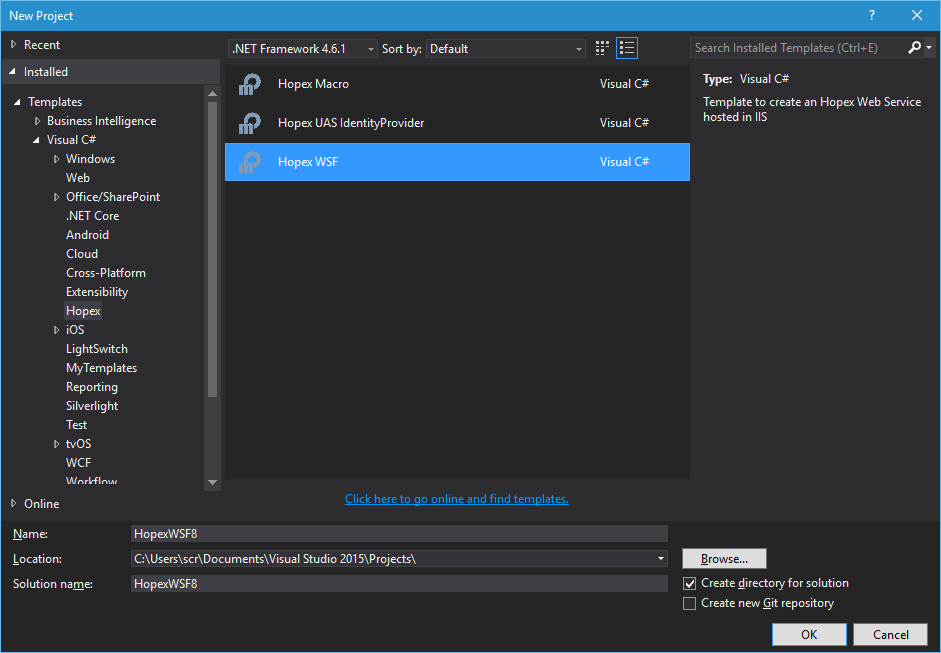
1) Create a new project in Visual Studio.
2) Expand Templates/Visual C#.
3) Select Hopex folder.
4) Select Hopex WSF type project.
5) Select .NET Framework 4.6.2.
6) Change the project's default name.
7) Click OK.
A pop-up window asks you information to help you creating projects
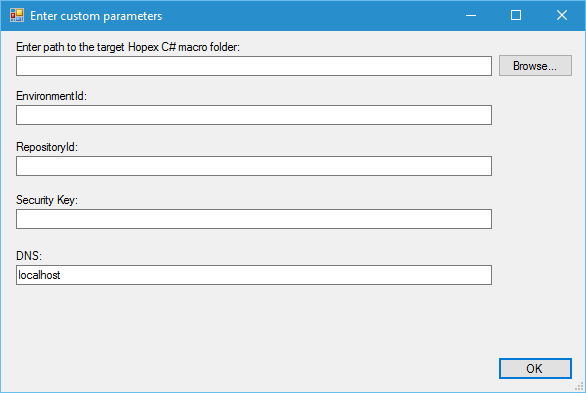
8) Enter all the fields: Path to the macro folder (under Hopex/System folder), EnvironmentId and RepositoryId that you want to target, Security Key given during your installation, and machine name (DNS).
• To get the environment id, you can use HOPEXAPI: http://DNSNAME/HOPEXAPI/restapi/v1/environments/ to get a list of environments.
• To get the repository id, you can use HOPEXAPI: http://DNSNAME/HOPEXAPI/restapi/v1/environments/ENVIDABS/repositories/ to get a list of repositories
• More info about HOPEXAPI at: Hopex Web Service API
9) Click OK.
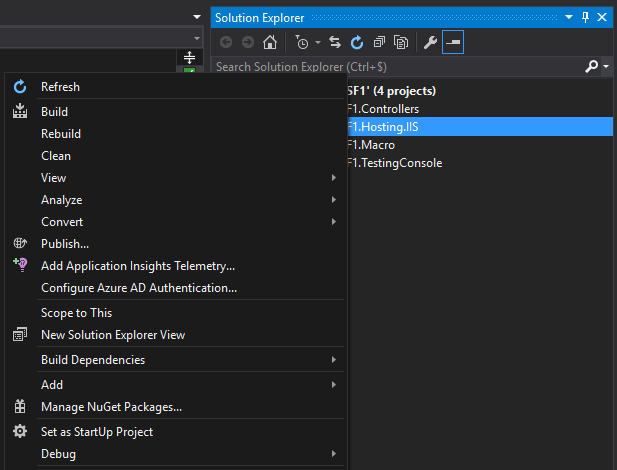
The following projects are created:
See
See Controllers project.Controllers project.
See Macro project.
See WARNING: If your web services are synchronous, your macro must return its result within 90 seconds. If your treatment is longer than that you will experiment a timeout. To avoid this timeout, we strongly recommend implementing asynchronous web services and asynchronous macro if your macro exceed 20 seconds execution time.
To run your web service:
1) Set Hosting.IIS and TestingConsole as starting projects.
2) Build the solution.
3) Run projects.
4) The macro is executed and returns “Hello World!”.
Controllers project
Implementing a controller
To implement a controller:
1) Inherit from ApiController.
2) Follow the SimpleCallController implementations provided in the template.

hopexResult variable contains the result returned by the macro.
NB: To call a macro registered in Hopex, you can set “UseGenericMacro” Boolean to false and call directly the macro by its Id. In this case, Macrometadata is as follow:

Security
You can define the accessibility level (e.g.: “read”, “write”) of each method.
To define a method accessibility level:
1) In your Web service class, add the “HasScope” attribute to the method.
Example: [HasScope("read")]
Creating and using an EventSource
The EventSource class enables to create events for event tracing for Windows (ETW).
To use telemetry:
1) Create a class inheriting from EventSource.
Add the EventSource attribute to your class.
For each message that you want to send to the telemetry, create a new method and call the WriteEvent method inside it.
Warning: Each method must have a distinct EventId.
Once your EventSource is created, you can start using it in your Web service.
To do so:
1) Use a private static readonly variable to load IServiceProvider interface and another one for your telemetry.
Example:
protected static readonly IServiceProvider Svc = PluginContainer.GetService<IServiceProvider>();
private static readonly ExampleEventSource Telemetry = ExampleEventSource.Log.Value;
2) Enable it in your controller.
Example:
Svc.Telemetry.InstanceListener.EnableEvents(Telemetry, EventLevel.LogAlways);
3) Use it in your methods implementations.
Example:
Telemetry.GetJobResultMessage(nameof(ExampleController), Thread.CurrentThread.ManagedThreadId.ToString(), id);
Log events
To log information or errors:
1) In the ILogger interface, several methods are available.
Example:
Svc.Logger.Info(MyClassType, "This is an info message.");
Svc.Logger.Error(MyClassType, "This is an error message.");
Using CacheComponent
To use cache component:
1) Save any object serialized in a string in cache:
CacheComponent.InsertOrUpdate("{Id}", JsonConvert.SerializeObject(myObject));
2) Retrieve the object:
var myObject = JsonConvert.DeserializeObject<MyClass>(CacheComponent.Get("{Id}"));
Hosting.IIS project
The Hosting.IIS project hosts your controllers and uses the MegaWebServiceFactory to define how the service is hosted.
In the Hosting.IIS web.config file:
Example:

Macro project
This is where you implement your business logic. You can use all of the HOPËX APIs to retrieve, create, or modify objects in HOPEX. The ExecuteMacro method will be given a string parameter and the MegaRoot Object and will return the desired result in a string.
Example: 
 WARNING: If your web services are synchronous, your macro must return its result within 90 seconds. If your treatment is longer than that you will experiment a timeout. To avoid this timeout, we strongly recommend implementing asynchronous web services and asynchronous macro if your macro exceed 20 seconds execution time.
TestingConsole project
App.config
The app.config file contains the necessary keys to get your HOPEX context:

- JobUrl is the url of your web service (ie. the Hosting.IIS project).
- UasUrl is the url of your UAS installation.
- ClientId is the application's client ID (how the API identifies the application).
- ClientSecret is the corresponding client secret.
- UserName is the HOPEX login that executes the macro.
- UserPassword is the corresponding password.
- Scopes specifies the level of access that the application is requesting.
- HopexEnvironmentId is your HOPEX environment id, you can get it using HOPEX web API.
- HopexRepositoryId is the id of your HOPEX repository, you can get it using HOPEX web API.
- HopexProfileId is the id of the profile that runs the macro.
Program.cs
This class contains the main method and is used to call UAS and your web service for testing purposes.
Deploying the HOPEX WSF Service
To create the deployment package:
1) In Visual Studio, right-click your IIS project.
2) Click Publish.
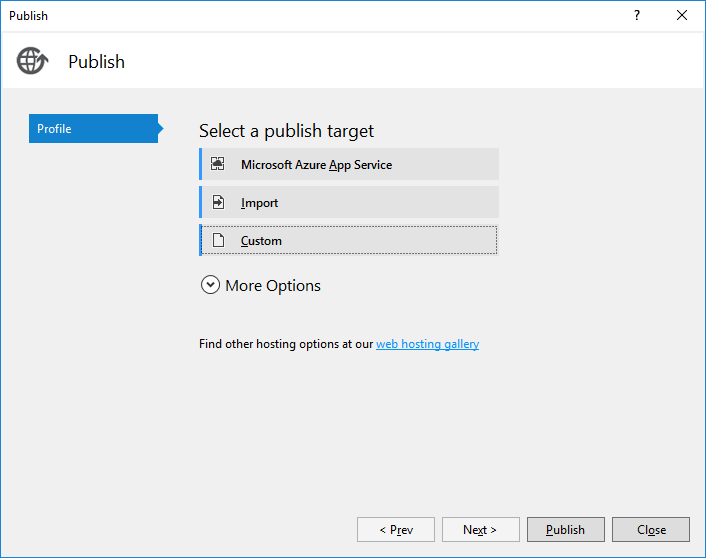
3) In Select a publish target, select Custom.
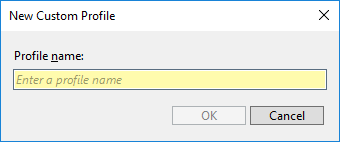
4) Enter a Profile name.
5) Click OK.
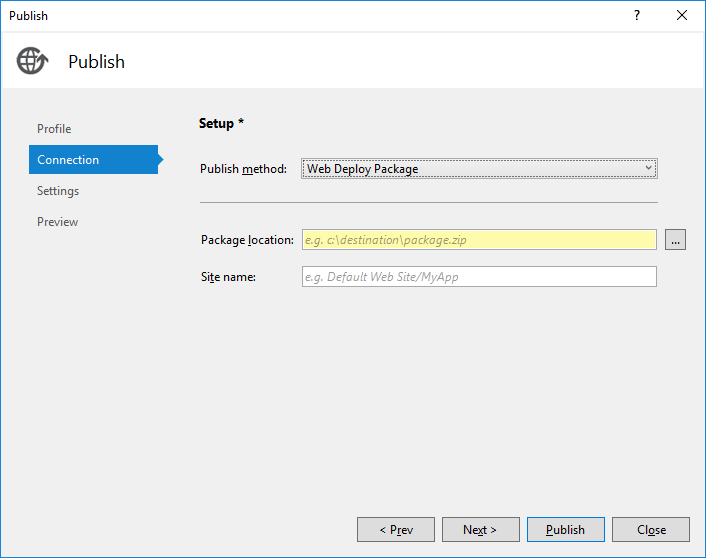
6) In the Publish method field, select Web Deploy Package.
7) Enter a Package location and a Site name.
8) Click Publish.
To deploy your package:
1) Open a command prompt.
2) Go to your package location.
3) Execute the following command:
{PackageName}.cmd /Y
4) Check that your package is well deployed in IIS.
Solve possible Cross Origin Resource Sharing (CORS) issue
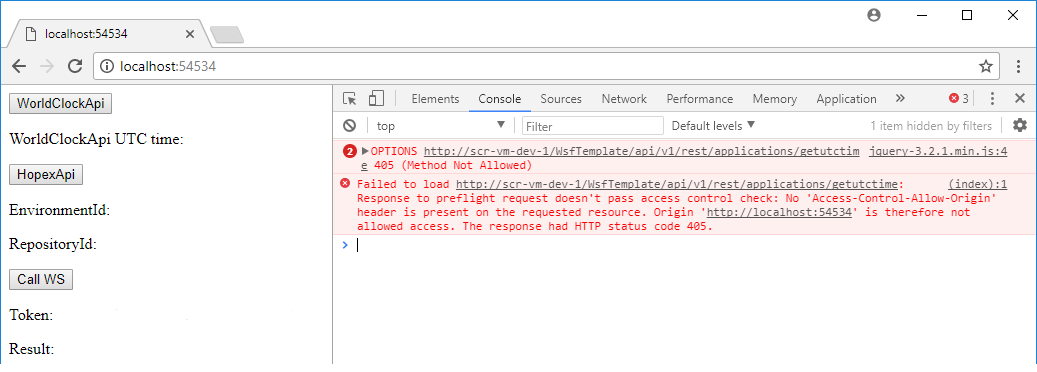 If you call your web service from another server within an HTML page, using jQuery for instance, you will run into the following issue:
 To allow CORS, you must check that the lines in yellow are present in your web.config file.
In “Access-Control-Allow-Origin”, enter the url of the web site that hosts your HTML page.
In this example: “http://localhost:54534”.
Now your service is accessible from this url but not from others.