Creating and Generating a Web Site
Every HOPEX product enables generation of a Web site from objects in the repository. This allows simple distribution of the content of the HOPEX repository via an Intranet. Users can consult the objects of a project (e.g.: processes) in the form of HTML pages.
As standard, you can create and generate a Web site from a Web site template that serves as a model. The pages are generated independently of each other, and the links between the repository objects automatically define the hypertext links (you need only click one of these links to pass from one page to another and navigate within the Web site).
Creating a Web site from a Web site template
It is possible to create and generate a Web site without the HOPEX Power Studio technical module. To do this you must base it on a Web site template that you have created specifically.
To create a Web site from a Web site template:
1. Connect to HOPEX (Windows Front-End).
2. Access the Documentation window:
3. In the tree, right-click the Web Sites folder and select New > Web Site.
The Create Web Site page appears.
4. Enter the Name of the Web site.
Example: "Site 1".
5. (Optional) To modify the default generation folder (<environment path>\Intranet) of the Web site click  .
.
. It is recommended that you create a sub-folder for each Web site generated
Example: under the "Intranet" folder, create folders with the same name as your Web site.
6. In the From Site Web Template field, use the drop-down menu to select a Web site template.
7. Click Finish.
The new Web site is listed in the Web Sites folder.
8. Right-click the new Web site and select Properties.
9. In the Web site properties window, select the Objects tab.
10. To restrict the range of objects to be generated, click the object type and then click Delete.
11. To add an object to the range of objects to be generated, click Add and select An object.
12. In the Add an Object window, select the object Type.
Example: “Project”.
13. In the Name field, select the object.
Example: “Customer Loyalty Program”.
The object appears in the list.
14. Click OK.
Generating a Web Site (Web Front-End)
Web Site Generation Prerequisites
To be able to generate a Web site with HOPEX Web Front-End, you must first:
• Configure email sending at the installation level
• Identify a HOPEX addressee and specify an email
• make sure that there is an existing and ready-to-be generated web site in HOPEX Windows Front-End.
Managing and scheduling web site generation
To generate a Web site with HOPEX Web Front-End, you must define its generation date and time.
To generate a Web site:
1. Connect to HOPEX (with the “Enterprise Architect” profile for example).
2. Access the Web site you want to generate:
• (Web Front-End) via the search by object type "Web Site ".
• (Windows Front-End) from the Documentation window. Unfold the “Web sites” folder.
3. Right-click the Web site and select Generate in background.
Dialog boxes appear, indicating the progress of site generation.
When the Web site has been generated, a dialog box proposes opening the site.
4. (If needed) In the generation scheduling window, click Connect  to add recipients to the email reception regarding the Web site generation information.
to add recipients to the email reception regarding the Web site generation information.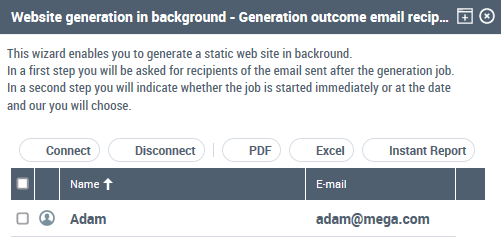
5. Click Next.
The Scheduling windows opens.
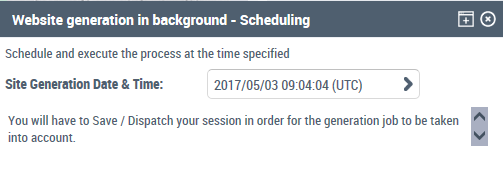
6. In the Site generation Date Time, click the arrow to define the Web site generation date and time.
7. Click Finish.
At the Web site generation, the recipients specified step 4 receive an email including a link to download the Web site.
Accessing the generated web site
(Web Front-End) To access the generated web site from the informative email received:
1. Click the link and connect to HOPEX Web Front-End.
2. Right-click the business document which is displayed and click Open.
A zip file is downloaded. It contains the generated pages of the static web site.