Starting a Workflow
Starting a workflow (Web Front-End)
You may start a workflow from a list of objects, for example a list of applications.
To start a workflow:
1. From your HOPEX desktop, access a list of objects that contains the object concerned.
2. Roll the mouse over the Local name column of the object, click More  and select Workflows.
and select Workflows.A panel is displayed on the right.
3. From the drop-down list, select the workflow you wish to use.
4. Click Start Workflow.
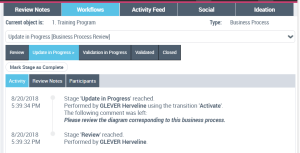
After triggering the first workflow transition, you may view the activity of the on-going workflow:
Starting a workflow (Windows Front-End)
To access workflows, see Consulting Workflows (Windows Front-End).
To start a new workflow:
1. At the top of the Collaboration navigation window, via  , click Start Workflow.
, click Start Workflow.2. Click the workflow that interests you then OK.
3. In the first dialog box of the wizard that appears, enter the workflow name.
4. In the Workflow Subject field, click Create then select an object to connect.
5. Click OK.
6. Enter a comment for the workflow if required and click Next.
7. Select the Users assigned to the next workflow status then click Finish.