Configuration
The Configuration tab of UAS Tools displays a wizard that allows you to configure UAS options. It aims at showing and asking you the least information possible, as several options can be inferred from others.
You will input information in the home page (the configuration page) and if everything is valid, you will then be presented with the result page that will give you information on how to include the generated configuration files in UAS.
Configuration page
The configuration tab is split in three categories presented as a wizard:
• Getting Started
• Identity Provider
• CORS (Cross-Origin Resource Sharing)
You can go from step to step as you wish if there are no client-side validation errors.
If there are any errors at this point, they appear either below the corresponding field, or at the top of the related section.
The CORS section includes a publish button (“Generate configuration”), which submits all the form data to the server where they will be subject to more advanced validation. As with the client-side errors, server-side errors will be shown at their correct location, and the wizard will switch back to the first section.
Getting Started
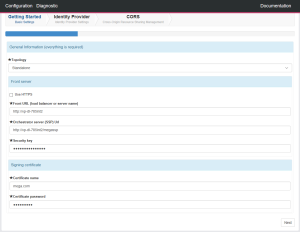
In the General Information section, you can select the topology of the server, which defaults to Standalone. In case of Cluster mode, some additional options pertaining to cache management are displayed.
The Front server section lets you input Hopex and SSP URLs, as well as the related Security Key.
• Front Server URL should indicate only the root address, i.e., do not add /hopex or /uas
• SSP URL is usually the same address as above, appended with /megassp
• The Security Key is found in clear text during HOPEX install time, or encrypted in the UAS web.config file
The certificate section lets you input information concerning the certificate. It must be installed on each server UAS is installed on. This is especially important in Cluster mode.
Identity Providers
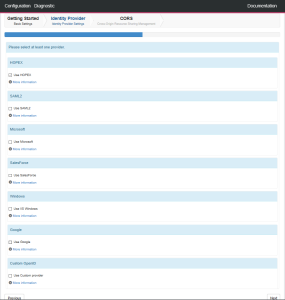
In the providers sections, you can add the authentication providers UAS will use. You need to select at least one authentication provider. Unlike almost all other sections in UAS Configuration tool, the following providers information cannot be validated on the server-side, so make sure they are correct:
• Microsoft
• Google
• SalesForce
Note: for now, the client secret for these providers will be written in plain text in megasite.ini for Hopex V2R1.
If you need help for a provider, click the “More information” link at the bottom of every section, which will open the UAS documentation directly on the correct section.
CORS
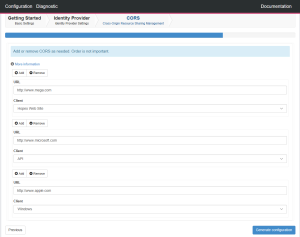
In the CORS section, you can add or remove CORS as needed, up to a maximum of 5, by using the Add and Remove buttons.
The order in which you add them is not important.
The order in which you add them is not important.
If you need help concerning CORS, click the More information link pointing to UAS documentation that will give you more details.
When you are done with everything, click Generate configuration to validate your changes and create a configuration file that will be used to configure UAS.
Result page
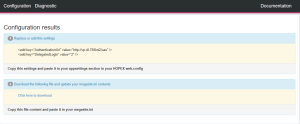
After successful validation of the configuration, the Result page is displayed.
Depending on the Topology, you have specific actions to perform. You have to:
• Edit the HOPEX web.config and perform the changes displayed in the first section of this page (Replace or add these settings)
• For HOPEX V2R1
o Download the megasite.ini file, populated with entries concerning UAS, that need to be injected in HOPEX megasite.ini
• For HOPEX V2
o Download and overwrite UAS config.json file
• In cluster mode, install the same signing certificate on each node.