Configuration and monitoring procedures
The following procedures apply to all front-ends.
Configuring the command line (/RO /RW code)
Each product is associated to a product code.
Ex: HOPEX Business Process Analysis code 'HBPA'
A property 'Command line' can be configured at several levels:
|
Level
|
Comment
|
|
Profile level
|
Configuration at this level is recommended. As there are less profiles than users, configuration is easier to maintain.
|
|
User level (Login)
|
Configuration at this level is NOT recommended. It is mainly available for compatibility with previous versions.
|
At each level, it is possible to specify a command line with the following syntax:
/RW'<list of product codes>' /RO'< list of product codes>'
Example:
/RW'DMO;HBPA' /RO'DBB'
Where:
• /RW: defines a list of product code accessed in read/write mode.
Note that /K (previous specification) is equivalent to '/RW'
Note that /K (previous specification) is equivalent to '/RW'
• /RO: defines a list of product code accessed in read/only mode.
Prerequisites:
• Identify the HOPEX environment containing the users to be configured.
• Get the table of product codes that you have bought.
• Get a company specification of user/profile x product assignment. The level of configuration (user level or profile level) must be specified for each user for the company.
Example of procedure to set /RW /RO for a profile:
• Run the Administration Console.
• Open the environment.
• Select the folder 'User Accounts > Profiles and Permissions'.
• Right-click > Manage.
• In the tab 'Profile', select the expected profile.
• Right-click > Properties.
• In the tab 'Characteristics', set the property 'Command line'.
Example of procedure to set /RW /RO for a user:
1. Run the Windows Administration Console.
2. Open the environment.
3. Select the folder 'User Accounts > Users.
4. Right-click > Manage.
5. In the tab 'Logins', select the login of the user requested.
Ex: select the login 'Mega' for the login holder 'Mega'
6. Right-click > Properties.
7. In the tab 'Characteristics', set the property 'Command line'.
If a value is set at both level, the intersection will be considered for /RW.
If a value is set at both level, the concatenation will be considered for /RO.
Example:
|
Command line value set for the user (Login Level)
|
Command line value set for profile
|
Command line value considered
|
|
|
/RW'HBPA'
|
/RW'HBPA'
|
|
/RW'DMO;HBPA'
|
/RW'HBPA'
|
/RW'HBPA'
|
|
/RW'DMO'
|
/RW'HBPA'
|
-
|
|
/RW'DMO;HBPA' /RO'DBB'
|
/RW'HBPA' /RO'MTS2'
|
/RW'HBPA' /RO'DBB;MTS2'
|
Results:
• The profile is configured to run certain products.
• The user is configured to run certain products.
Specifying a default licence
If several licences exist in the licence folder, users must be configured explicitly. Otherwise, they cannot login. It is however possible to specify a default licence.
Procedure:
In the file in router.ini, manually add a section [Config] such as:
[Config]
DefaultLicence=<licence name>
Where 'licence name' is the name of the licence file without the .must extention.
Ex: if the file is 'Licence-T0002.must', the licence name is 'Licence-T0002'.
Declaring users
This is important in several situations:
• Several Must licences exist: users should be allocated in the different licences unless a default licence is specified.
• Shared licence: possible users should be specified beforehand.
• Dedicated licence: named users should be specified beforehand.
Adding a user to a licence
Prerequisites:
• A Must licence is installed.
• A HOPEX installation is available and configured for Must licences.
• Get user x licence mapping specification. Each user must be declared with its HOPEX login. The users must be able to know the login of each user. Ex: the HOPEX login of John Smith is 'U0001'.
Procedure:
1. Run the Must licence utility.
2. Select the licence folder.
3. Select the licence to be configured. Ex: Licence-T0001.
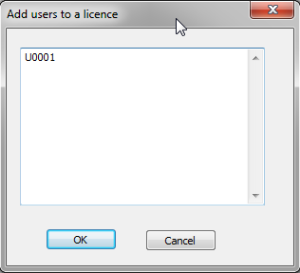
4. Click the 'Add user' button: enter the login name (Ex: enter 'U0001' for the user 'John Smith is 'U0001') and click 'OK'.
Results:
• The user is displayed in the left pane below the licence (<user login>). Ex: U0001
• The 'Router.ini' configuration file is created in the licence folder for saving this specification. A section [User/Licence] is created or updated.
Example:
[User/Licence]
U0001=Licence-T0001
Note that you can also enter several login names separated with semicolon or line break (example: U0001;U0002)
Removing a user from a licence
Prerequisites:
• A Must licence is installed.
• A HOPEX installation is available and configured for Must licences.
Procedure:
1. Run the Must licence utility.
2. Select the licence folder.
3. Select the licence to be configured. Example: Licence-T0001.
4. Select the login of the user to be removed.
5. Click the 'Remove user' button.
Results:
• The user is no longer displayed in the left pane below the licence.
Configuring possible users of products
Setting a user as a possible user of a product
Prerequisites:
• A Must licence is installed in the licence folder.
• A HOPEX installation is available and configured for Must licences.
• Users are declared.
• Get user x product mapping specification.
Procedure:
1. Run the Must licence utility.
2. Select the licence folder.
3. Select the licence to be configured.
4. Select the product to be configured.
5. Select the user to be set as a possible user of the product.
6. Click the 'Possible user or not' button.
Results:
• When both user and product are selected, a checkbox is displayed in the 'Poss. User' column of the top right pane. It shows that the current user is a possible user for the product.
• Files are created in the licence folder for saving this specification. A subfolder 'USERS' exists with the licence name. It contains a user file. Ex: U0001.usr-ARC-MEGA.

Removing a user as a possible user of a product
Prerequisites:
• A Must licence is installed in the licence folder.
• A HOPEX installation is available and configured for Must licences.
• Users are mapped to licences.
Procedure:
1. Run the Must licence utility.
2. Select the licence folder.
3. Select the licence to be configured.
4. Select the product to be configured.
5. Select the user to be removed as a possible user of the product.
6. Click the 'Possible user or not' Button.
Results:
• When both user and product are selected, no checkbox is displayed in the 'Poss. User' column of the top right pane.
• Files are updated in the licence folder for saving this specification.
Cleaning up licence tokens
Prerequisites:
• A Must licence is installed in the licence folder.
• A HOPEX installation is available and configured for Must licences.
• Verify with the Must licence utility that no user is currently logged on to the licence to be cleaned.
Procedure:
1. Run the Must licence utility as Administrator.
2. Select the licence folder.
3. Select the licence to be configured.
4. Click the 'Clean up' Button.
Results:
• Unexpected token files are purged.
Note that, if a lot of token files exist when the button 'Clean up' is first clicked, the processing can take several minutes according to the number of token files, the number of licences and the file access performances. The token files are purged for each licence displayed in the left pane. The processing will run faster the next times button 'Clean up' is clicked (as most token files will have been purged).
Instant monitoring of licence connections
The Must licence utility can be used to monitor connections even though it was not designed for this purpose. Display may be slow.
Prerequisites:
• A Must licence is installed in the licence folder.
• A HOPEX installation is available and configured for Must licences.
Procedure:
1. Run the Must licence utility.
2. Select the licence folder.
3. Select the licence to be monitored.
4. Select the user or the product to be monitored.
5. Read the top right pane, column 'Connected'.