Launching the Excel Export Wizard
You can run the Export Wizard from:
• your HOPEX workspace (Windows Front-End or Web Front-End)
• the Administration desktop (Web Front-End)
Accessing the export wizard
To run the wizard for export of data to an Excel file:
1. In:
• HOPEX (Windows Front-End) : click File > Export > Excel (*.xls ; *xlsx).
• HOPEX (Web Front-End) : click Main Menu > Export > Excel.
• the Administration desktop (Web Front-End): in the Tools pane, select the Excel > Export sub-folder.
The export wizard appears.
2. Select the export mode for the file:
• New Export File: no file is selected as template, you must define file parameters (which constitute the structure) as well as objects to be exported.
• From Template: you can use an existing Excel file as a template, or a template supplied as standard with HOPEX. The wizard automatically displays the structure of the file used as a model. You can modify this structure so that the generated file will differ from the template file. You can also reuse objects of the existing file.
New export file
To export data in a new file:
1. In the export wizard, select New Export File, then click Next.
2. Enter the name of the file to be created.
3. (Windows Front-End) If necessary, define another backup location.
4. If necessary, change the format type to .xls (by default .xlsx).
5. Click Next.
6. Define file configuration. See Defining Excel File Parameters.
7. Click Next.
8. Select objects to be exported. See Selecting Objects to Export in Excel Format.
9. Click Finish to start export.
Existing export file
To initialize the export file from an existing file:
1. In the export wizard, select From Template mode, then click Next.
2. Select the file to be used as template:
• Either by scrolling the list of files in the Predefined Template File.
• Or by indicating the name and location of a User Template File.
3. (Windows Front-End) If necessary, define another location for the Excel Export File.
4. If necessary, change the format type to .xls (by default .xlsx).
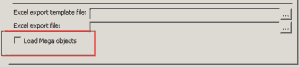
5. To reuse objects of the existing file, select the Load HOPEX Objects check box.
6. Click Next.
7. Define file configuration. See Defining Excel File Parameters.
8. Click Next.
9. Select objects to be exported. See Selecting Objects to Export in Excel Format.
10. Click Finish to start export.
Export steps
Whatever the selected mode, file export is in three steps:
At each of these steps, it is possible to pass to the next step or return to the previous step.