HOPEX Archimate Functional Administration
The Archimate Enterprise Architect is responsible for the following tasks:
Using Libraries
In the context of the HOPEX Archimate solution, a library can contain an architecture or represent an external environment with respect to the architecture under study.
Accessing the list of libraries
To access the list of libraries from the Environment navigation pane:
 Click Libraries
 in the navigation menu.
The Architectures tree for the repository is displayed. The library tree appears underneath.
Creating a library
To access the list of libraries from the Environment navigation pane:
1. Click Libraries in the navigation menu.
The library tree is displayed over the architecture tree.
2. Select New > Library.
A Libraries creation dialog box opens.
3. Specify the the name of the library.
4. If appropriate, enter the name of the Owner.
5. Click OK.
The library appears in the tree.
Defining a Default Library
When you begin working in a repository, you should define a default library.
To define a default library:
1. Select the library in which your are going to be working.
2. Right-click the library and select Set as default.
This library appears in the Default Library folder.
Creating an Architecture
Creating an architecture
To access the desktop and create architecture elements, a new architecture based on the ArchiMate framework is required.
To create an architecture:
1. In the navigation area of the HOPEX Desktop, select the Environment navigation pane.
The list of architectures appears in the edit area.
2. Select New > Architecture.
The new architecture is created in the architectures tree.
3. Open the properties window and select Characteristics tab.
4. Modify the Name of your architecture.
5. Click OK.
Connect the architecture to a library
To connect the architecture to a library:
1. Open the architecture properties window that interests you.
2. From the Owner field, select the library to which you want to connect the architecture.
3. In the Environment navigation pane, select Libraries.
The Architecture tree appears with the new architecture.
Link a User to an Architecture
Managing an architecture with the HOPEX Archimate solution includes different steps. In the solution interface, each step is associated with a navigation pane.
With HOPEX Archimate, the phases of an enterprise plan are described in a work environment.
To define the work phases of an enterprise plan to which a user has access, you must:
• specify the work environment of an architecture
• allocate the user to the steps of an architecture
Thus, when connected to HOPEX Archimate, the user will only see the selected work environment steps.
Specifying the work environment of an architecture
A user is allocated to an architecture through a work environment.
To link a new work environment to an architecture:
1. From the Environment navigation pane, select Libraries menu.and expand the Architectures tree.
2. Open the Architecture properties window that interests you.
3. Select the Assignment tab.
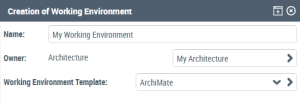
4. Click on the arrow to the left of the Working environment field and select New.
A Work environment creation window opens.
5. Specify the name of the environment that you want to create, specify its Archimate type and click OK.
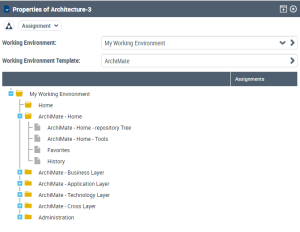
The tree with the steps of a Archimate type work environment appears on the bottom of the page.
Allocating the user to the steps of an architecture
With the HOPEX Archimate solution, a user of the solution is a person (system).
To assign a user to all the steps of an architecture:
1. Open the Architecture properties window that interests you and select the Assignments tab.
2. At the tree root of the steps of the work environment, click the check box located under the Assignments column.
An assignment window opens.
3. Click Connect.
A dialog box for connecting persons (system) connection.
4. Find and select the persons (system) associated with the users that interest you.
5. Click Add.
6. In the assignment window, select the persons that you wish to connect to the enterprise plan and click OK.
 In the same way, you can link a user to the steps of the work environment.
7. Dispatch your private workspace so that the Architecture appears in the Architecture selection drop down list.