Managing action plans
Creating Action Plans
To create an action plan:
1. Click the main navigation menu, then Inventory.
2. Select Reports > Remediation > Action Plans.
3. Click New.
The action plan is created.
Characterizing Action Plans
To specify action plan properties:
1. Click the main navigation menu, then Inventory.
2. Select Remediation > All Action Plans.
3. Open the properties of the action plan.
General characteristics
You can specify the following information:
• Name: action plan name.
• Owner: this field is specified by default by the user who created the action plan.
• Owner Entity: entity responsible for action plan implementation.
• Approver: user responsible for validation of the action plan when all actions are completed.
• Means: text description of means required/desired for action plan execution.
• Priority: enables indication of a level. Priority can be:
• "Low"
• "Medium"
• "High"
• "Critical"
• Origin: enables definition of the context of carrying out the action plan:
• "Audit"
• "Compliance"
• "Event"
• "Risk"
• "RFC"
• "Other".
• Category: the action plan can for example be connected to:
• risk impact reduction
• project management
• process improvement
• control performance improvement
• etc.

Other values are available.
• Nature: enables definition of whether the action plan is:
• Corrective
• Preventive
• Comment: supplements information on the action plan and its characteristics.
• Steering Calendar: used for sending reminders to the person responsible for an action plan so that they can indicate action plan progress.
A steering calendar for monthly reminder of progress is supplied by default.
Financial assertion
• Forecast Cost: action plan cost estimate.
• Forecast Cost (Man-Days): estimate in man-days of action plan implementation workload.
RACI
The action plan Owner responsible for definition of actions to be carried out and their execution.
This field is specified with the name of the action plan creator or with the name of the action plan approver.
Success factors
In the Success Factors section, you can specify in text the success indicators enabling assessment of success of the action plan.
Scope
To position an action plan in its environment, you can associate objects with the action plan in the Scope section.
You can connect objects of the following types:
• Controls
• applications
• risks
• entities
• process
• incidents
Milestones
Milestones are key dates of the action plan.
The planned end date is mandatory.
Attachments
You can attach business documents to an action plan:
For more details on the use of business documents, see the
HOPEX Common Features guide.
Managing Actions
The owner of the action plan must define actions enabling execution of the action plan. The owner can create actions and assign these.
To create an action from an action plan:
1. In the main navigation menu, click To-Do List then My Responsibilities > My Action Plans.
Depending on your profile, you can also access action plans via the menu
Remediation > Action Plans.
2. Select the action plan in question and click Properties.
3. In the Actions section, click New.
4. In the action properties, complete fields:
• Priority: enables indication of a level. Priority can be: "Low", "Medium", "High" or "Critical".
• Owner: responsible for the action as specified by the action plan creator.
• Owner Entity: entity responsible for action plan implementation.
5. You can specify milestones, which are important dates of the action.
• Planned Begin Date
• Planned End Date
6. Click OK.
The action is created.
Action Plan Workflows
Depending on the profile role of the person that created the action plan, two workflows are available:
• a "top-down" approach
• a "bottom-up" approach
Commands enabling passage from one workflow status to another are available:
• in the pop-up menu of the action plan from an action plans list
• in the properties dialog box of an action plan, by clicking the action plan icon at top left
"Bottom-up" approach
In a "bottom-up" approach, the action plan can be created by any user (for example, the Application owner or the IT RM Manager. An approver must validate the action plan so that it can be implemented. This is the case when assessment questionnaire respondents propose an action plan: they must first submit it via the workflow.
"Top-down" approach
In the framework of a "top-down" approach, the action plan is created by a responsible. The action plan does not need to be validated in this case.
Action workflow
When action plan actions have been defined, starting an action plan starts the linked actions.
When the action responsible has completed his/her actions, these can be closed. Closing the action plan automatically closes the linked actions.
Action Plan Follow-Up
Indicating action plan progress
You can create progress states to indicate its progress.
To specify action plan progress:
1. From the navigation menu, select Remediation > Action Plans.
2. Select an action plan and open its properties.
3. Expand section Action Plan Progress, and in the Progress Update frame, click New.
4. Specify a Progress Update Percentage.
5. If required, specify the Progress Assessment.
You can specify if the action plan is:
• On Time
• Delayed
6. Click OK.
The progress state is created. You can create these at regular intervals.
Action plan follow-up reports
You can follow up on action plans with reports.
To access the Reports tab:
1. From the navigation menu, select Remediation > Action Plans > Follow-up Report.
2. Click New.
You can, if necessary, specify parameters in the corresponding tab.
3. Click the Reports tab to display the results.
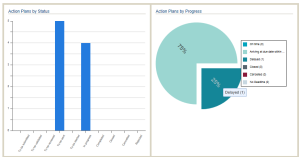
This report contains a number of bar and pie charts represent the distribution of action plans
• by status
• by progress
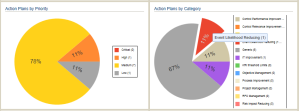
• by priority
• by category
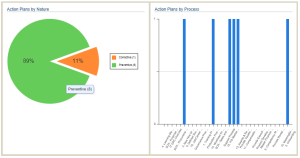
• by nature
• by process
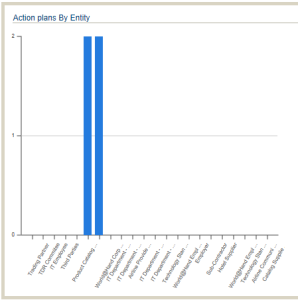
• by entity
To access the action plans concerned:
1. Click in the bar or the pie chart sector in question.
2. The corresponding actions plans appear in a list on the bottom of the page.