Modifying Web Site/Web Site Template
General Characteristics
General Characteristics
In the Web site properties, Characteristics tab, you can enter or modify the default values for:
• The Web site Folder (temporary folder used for generation only).
• Names of Home Page and Site Map.
 You can modify the default names of the Home Page and Site Map. You can also leave a box empty. In this case, the corresponding page will not be generated in the generation folder.
 • The Parent URL, if the site is generated for insertion into an Intranet. By default, the parent URL (which corresponds to the Enterprise Site link in the Web site Home Page) is “www.mega.com”.
• The Style Sheet used ("NewLook.css" by default).
 A style sheet groups the rules of presentation that can be applied to elements in a Web page. These rules are expressed in Cascading Style Sheet (CSS) language. For further information, consult the W3C (World Wide Web Consortium) recommendations (http://www.w3.org).
You can choose a style sheet different from that proposed by default if you do not find this suitable.
You can customize the style sheets supplied in the "Mega_Std" folder. To do this, you must copy them into the “Mega_Std” folder of the custom module tree-structure, where you can modify and rename them. You can also create new style sheets and save them in this same folder.
• Home Page and Site Map templates.
The home page and site map can be generated:
• From files with extension .MTH, located in the "MEGA_Std" folder in which Hopex was installed: "HomeLeft.mth" for the Home Page, "SiteMap.mth" for the Site Map with navigator at the left.
If you want to customize these files, copy them into the “Mega_Std” folder of the custom module tree-structure and refer to Modifying Home Page and Site Map Files.• From formatters of Descriptor or Script type.
The Options button is active only with the Hopex Power Studio technical module.In a Web site template properties, Folder and Parent URL fields are not available. The other fields are available if the Web site template is not write-protected.Configuring Page Setup
To enter the general options of Web site generation:
1. In the Web site properties, Characteristics tab, click Options.
The Options button is active only with the Hopex Power Studio technical module.The Options window opens.
2. In the Options window you can enter the characteristics of objects that you want to appear, and configure certain page setup options.
Characteristics
Section titles
Menu presentation
Web site hosting
Modifying Logos, Bullets and Fonts
To modify the logo and bullets of your Web site pages:
1. In the Web site properties, Characteristics tab, click Options.
2. In the Options window, click Extended options.
3. In the Extended options window:
• The Menu Frame tab allows you to customize the appearance of the navigation menu located at the left of the navigation window: logo, bullets of titles and sub-titles.
• The Contents Frame tab allows you to customize the appearance of the elements that appear in the main part of the page: logo, bullets of titles and sub-titles.
You can also specify if you wish to zoom in your diagram drawings (Zoom Image (Internet Explorer)). In choosing this function, you can select a scale in % in a menu located at the bottom of Web site diagrams or in the diagram pop-up menu (for SVG format). This functionality is only available if the diagram is in a frame isolated from the diagram description.
Images of logo and bullets are located in the "Mega_Std" folder of the installation site. You can modify and copy them into the “Mega_Std” folder of the custom module tree-structure.
If you do not want your logo to appear in generated pages, select the "Neutral.gif" file in the Logo text box.
Details concerning background images, colors, fonts and links
• Background images, color of links and the font should be configured in a style sheet. For more details, see Modifying Style Sheet .css.
• If you want to retain fonts used in the RTF comments of objects, you should select the RTF font enabled check box in the Generation tab of the Web site properties.
Modifying Image Format
You can generate Web site diagram images in the following formats:
• PNG
• Bitmap
• SVG
• JPEG
To modify the default format of generated images:
1. In the workspace, select Tools > Options.
2. Expand the Documentation folder and select Web Sites.
3. In the right pane, in Generated images format field, select the required format.
4. Click OK.
SVG format
Images generated in SVG (Scalable Vector Graphics) format are of higher quality than those generated in other formats, particularly when using zoom (distortion).
To view images generated in this format, you must install a specific viewer. The SVG Editor field indicates the SVG viewer URL address. It will be automatically downloaded when viewing the image. If you prefer to use another viewer, change the URL address.
Using SVG format in generated pages
You can zoom in a diagram by activating one of the commands in the pop-up menu.
To zoom in:
 Click Zoom in.
To zoom out:
Click Zoom out.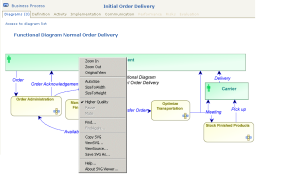
The zoom is carried out from the drawing center point.
To zoom on part of a drawing:
1. Position the cursor on the part of the drawing concerned and press the <Ctrl> key.
The pointer changes shape: 
2. Right-click the mouse button and select the zoom type.