Defining Web Site Composition
Before generating a Web site, you need to define its composition and page setup by entering its properties.
To define the Web site composition:
1. In Hopex Windows Front-End, right-click the Web site and select Properties).
2. Indicate the properties and format of your Web site, see:
Defining Objects
You must indicate which main object or main object list you want to display in your Web site. You can add projects, processes, etc. that group basic objects.
Example: You can build your site from a project. All the component objects of the project will appear in the Web site when you create the corresponding pages.
To define objects you want to display in your Web site:
1. From the Web site Properties, select the Object tab.
2. To add:
• objects, see Adding an object
• object lists, see Adding an object list
3. If you do not want the objects that depend on the main object to appear in the Web site, you need to deactivate the extraction process: clear Propagation.
 Extraction carried out starting from a project includes the diagrams of this project, with for each diagram the objects represented such as org-units, messages. For detailed information, see the Hopex Power Supervisor guide.
 4. Click OK.
Adding an object
Adding an object list
Adding Pages
A page is a hypertext document that is part of a Web site. You need to add pages for each object to be covered in a page.
To add pages to your Web site:
1. From the Web site Properties, select the Pages tab.
2. In your Web site tree, right-click the Pages folder and select Add.
The Add Page dialog box opens.
3. In the Object field select the type of object described
4. (optional) If necessary, you can select a Query (filter) to restrict the list of objects to be included in a page.
Example: Quality Assurance organizational processes
You cannot use queries that contain variables. For this reason they are not proposed in the list. If no query appears, click  .
. 5. In the Format pane, define the HTML page Format:
• Header
• Body
See Text formatting.6. Click OK.
Text formatting
Modifying pages
Adding Index Pages
Index pages facilitate access to your Web site pages.
Indexes list the objects that appear in the Web site.
You can create index pages from objects already the subject of a page.
If the index is not created from an object page, you can customize it using an HTML descriptor or VB Script. The descriptor should be of category "HTML Specific Body"
This descriptor should be created from the "HTML Specific Body" sub-folder of the "HTML Web Site Specific Page" folder in the Utilities navigation window).To create an index page from an object:
1. From the Web site Properties, select the Pages tab.
2. In your Web site tree, right-click the Indexes folder and select Add.
The Add Index Page dialog box opens.
3. From the Contents pane, select the page.
4. From the Index type pane, select the type of object that will form the contents of the index.
The index type allows you to determine the format of your index.
When you are defining Web site pages, do not specify two different formats for the same object type: when the page is generated, only the latest format will be taken into account.5. Click OK.
The properties of your Web site have been specified.
Contents of a Generated Web Site
A generated Web site contains several types of page:
• Site Map
• Index pages
• Pages specific to each object in the repository Hypertext links in these pages provide access to related pages. The pages are divided into several parts or frames.
Presentation of pages can be customized. For more details, see Configuring Web Sites.
Home page


Site map
Index pages
Pages specific to each object
Web Site Folders and Files
Files supplied as standard and those resulting from generation are located in the the following folder: <environment path>\Intranet
A sub-folder for each Web site is automatically created (if it has not been specified at the time of creation of the Web site). In the "Intranet" folder of the environment or in the sub-folder corresponding to the Web site you will find:
• The "Standard" folder that contains the standard images provided for use when generating the Web site.
• The "Pages" folder that contains the generated files (“.htm” extension).
• The "Images" folder that contains the generated diagrams.
The name of the default folders can me modified. See Modifying the name of Web site folders.• Files corresponding to the Home Page and Site Map.
Viewing or modifying the location of web site files
To view or modify the location of web site files:
 Open the properties of the web site in Hopex Windows Front-End.
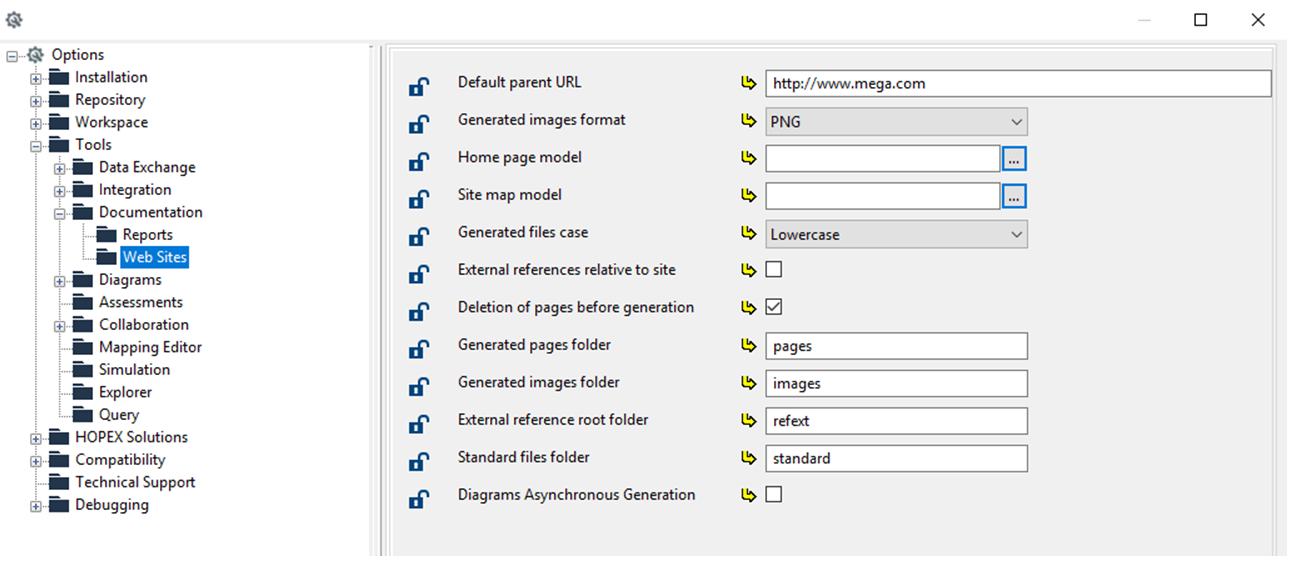
Modifying the name of Web site folders
To modify the name of web site folders:
1. Launch "Administration.exe" and open the site options.
2. Expand the Tools > Documentation > Web sites folder.
3. Modify the name of the "Generated pages", "Generated Images" or "Standard files" folders.
Home page and site map
File names for the Home Page and Site Map can vary depending on your specifications. If a name does not appear in the Characteristics tab of the site properties dialog box, this means that the corresponding page has not been generated.
By default, the Home Page and the Site Map have the navigation menu on the left. If you want to position this at the top, you must change the Home Page and Site Map page templates. They can also be customized by copying templates in the Mega_Std folder of the has.custom module. For more detailed information, see Modifying Home Page and Site Map Files.