On-Premise Specific Features
Creating a User Account as an Administrator
As an Administrator you can create a user account:
• Define its role :
• Administrator: gives full administrative access.
• Custom: you can define authorizations regarding HAS console and/or Hopex Supervisor
• Delegated Administrator: gives minimal access, typically used in SaaS contexts.
• (if needed) Grant access to Hopex repositories
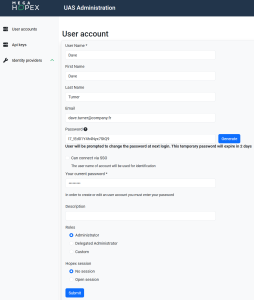
To create a user account as an Administrator:
1. Access the HAS console as an Administrator:
2. In the navigation menus, select Modules > Authentication > User accounts.
3. Click Create.
4. Enter the user's details:
• Login (mandatory): enter the login of the user
 The Login cannot be modified after creation.
• First Name, Last Name, and Email of the user are optional
• Password: enter a temporary password or click Generate.
The password expires in two days and must be shared with the user for first-time login. • Your current password: enter your own password.
• (Optional) Add a Description.
5. In Roles, select the role based on required access level:
• "Administrator"
• "Custom" and select the required authorizations
• "Delegated Administrator"
6. In Hopex session for API, keep No session
7. Click Submit.
Configuring Authentication as an Administrator
As an Administrator, you can configure the following:
• Hopex Native Authentication
• Windows Authentication
• SAML2 Provider
• OpenID Connect Provider
For step-by-step guidance, refer to the HOPEX Unified Authentication Service.Importing a Module (On-Premise)
Certain Hopex Solutions require additional modules to be imported before use.
To import a module:

Creating an API Key
API keys not associated with a Hopex session must be created directly in the HAS Console.
API keys associated with a Hopex session must be created via HOPEX Administration, see Managing API Keys.To create an API key in the HAS console:
1. Access the HAS console:
2. In the navigation menus, select Modules > Authentication > Api keys.
3. Click Create.
4. Enter a key Name.
5. Configure the Roles:
• Administrator: Grants full access to perform all operations in the HAS Console with administrative rights.
• Custom: Grants limited permissions for certain operations in the HAS Console and/or Hopex Supervisor.
6. Click Submit.
7. Copy and save the key immediately.
The key will not be retrievable later.