Setting Up the Hopex-ServiceNow Connection
To set up the connection between Hopex and ServiceNow:
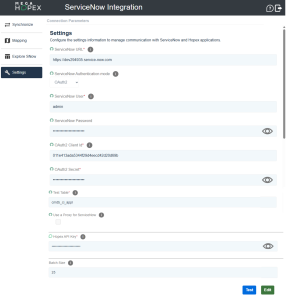
1. In the menu, select Settings.
2. Click Edit.
3. Enter the ServiceNow URL: The URL of your ServiceNow instance.
4. Select the ServiceNow Authentication mode:
• Basic: Can be used for quick set up in non-production environments.
• OAuth2: Recommended for production environments due to its enhanced security and token-based access.
5. Enter the ServiceNow User and the ServiceNow Password.

The user must have access to REST APIs and the objects to synchronize.
6. (Optional) Modify the default Test Table.
This table is used to test the connection and the rights of the user.
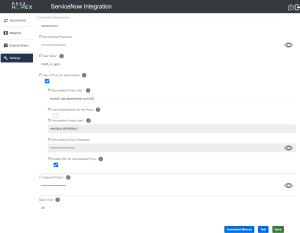
7. (Optional) Tick the box to set up a Proxy for ServiceNow.
8. Enter an API key.

The Hopex login used to create the API key must be different than the Hopex login used to access ServiceNow Integration.
9. (Optional) Modify the default Batch Size.
This represents the quantity of objects synchronized in each call to the web service.
The higher the value, the higher the performance. Bear in mind that this may generate errors if the value is higher than the number of objects in each call.
10. Click Test to check whether the connection between ServiceNow and Hopex is successful.
11. Click Save.
Setting Up OAuth2.0 in ServiceNow
To set up the OAuth2 authentication mode, follow these steps in your ServiceNow instance:
• Ensure the OAuth Plugin is activated
• Set up an OAuth Application
Ensure the OAuth Plugin is activated
To ensure the OAuth Plugin is activated:
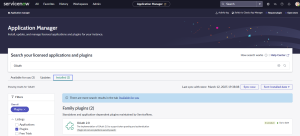
1. Navigate to All > System Definition > Plugins.
2. Find the "OAuth 2.0" plugin using the filter criteria and search bar.
3. Check that it appears in the Installed tab.
Set up an OAuth Application
To set up an OAuth Application:
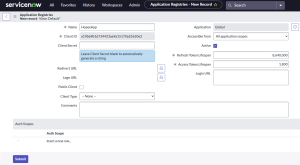
1. Navigate to All > System OAuth > Application Registry.
2. Click New.
3. Select Create an OAuth API endpoint for external clients.
4. Fill in the required fields:
• Name: e.g., Hopex App
• Client ID: Automatically generated by ServiceNow
• Client Secret: Use the one generated or use a custom one
5. Copy the Client ID and the Client Secret.
Setting Up a Proxy
According to your company security standards, it may be necessary to set up a Proxy.
The Proxy will only affect the communications to ServiceNow.
To set up a Proxy:
2. Enter a ServiceNow Proxy URL.
• The URL format must be as follows: protocol://url:port where protocol can be: HTTP, SOCKS4, SOCKS4a and SOCKS5.
3. (Optional) Tick the box Use authentication for the Proxy and enter the following information:
• ServiceNow Proxy User
• ServiceNow Proxy Password
According to your specific situation, authentication data for the Proxy can be:
• explicit by filling in the above fields, or
• implicit in the Proxy URL, or
• not required.
4. (Optional) Tick the box Enable SSL for ServiceNow Proxy.